
Overall Overview
The VeridiumInstaller is an automated installation utility designed to simplify the deployment of the VeridiumID platform on Red Hat Enterprise Linux 9 environments.
It orchestrates the setup of all required Veridium components—such as web applications, databases, and coordination services—across multiple servers or clusters, following best practices for enterprise-grade authentication systems.
The installer supports both single-tier (unified) and multi-tier (layered) architectures and provides flexibility in addressing models, allowing deployments based on distinct ports or fully qualified domain names (FQDN/SNI).
This guide explains:
-
The system and network prerequisites required before installation.
-
The step-by-step process to execute the VeridiumInstaller.
-
The post-installation tasks needed for validation, security, and maintenance.
General assuptions:
-
The installer is using ssh keys to connect to all nodes. These keys are needed just for the installation period and can be removed after the installation completion.
-
During installation it is needed a privilaged account (root or other user). After the installation, the priviledges can be revoked.
-
During the installation all the necessary users will be created.
-
It is highly recommended to have a different mounted disk for /vid-app, before starting the installation.
By following this guide, administrators can perform a repeatable, standardized, and secure on-premise deployment of VeridiumID.
1. Pre-Requirements
Before you begin the installation, ensure that all operating system and environment prerequisites are met on every node in the cluster.
1.1 Operating System Preparation
-
Disable Firewall Temporarily
sudo systemctl stop firewalld
sudo systemctl disable firewalld
You can re-enable
firewalldafter installation with the correct service rules applied. The rules are detailed at the end of this document.
-
Create a Common SSH key Across Nodes
Ensure the same Linux user exists on all nodes with SSH key-based passwordless access. Add the public key from the deployemnt node and set it to all nodes for the user that is doing the installation.ssh-keygen ##take this key from the installer node ~/.ssh/id_rsa.pub and set it on all machines by adding in ~/.ssh/authorized_keys cat ~/.ssh/id_rsa.pub vi ~/.ssh/authorized_keysThis user must have
sudoprivileges during installation (or install asroot).
-
Dedicated Application Disk
A separate mounted volume for/vid-appis highly recommended. This directory stores logs, packages, backups, and runtime files.
1.2 Package and Dependency Installation
Install required Linux dependencies on all nodes before running the installer:
## RHEL8
sudo yum -y install vim apr-devel openssl-devel libstdc++-devel curl unzip wget zlib zlib-devel nc openssh-clients perl rsync chrony python39 python39-pip net-tools dialog jq rng-tools tmux tcpdump java-17-openjdk libatomic sqlite
## RHEL9
sudo yum -y install vim apr-devel openssl-devel libstdc++-devel curl unzip wget zlib zlib-devel nc openssh-clients perl rsync chrony python3 python3-pip net-tools dialog jq rng-tools tmux tcpdump java-17-openjdk tar libatomic sqlite
2. Deployment Steps
2.1 Obtain and Unpack the Installer
-
Copy arhive to the node from where the installation will take place and the ssh key was generated (e.g.,
/vid-app/installer).-
For RHEL8
veridium-installer-rhel8-12.4.72.tar.gz -
For RHEL9
veridium-installer-rhel9-12.4.72.tar.gz
-
-
Extract the archive:
##RHEL8
tar xvf veridium-installer-rhel8-12.4.72.tar.gz
##RHEL9
tar xvf veridium-installer-rhel9-12.4.72.tar.gz
2.2 Configure Time Synchronization (Recommended)
To prevent token, log, or certificate issues, ensure all nodes share the same time source.
Confirm synchronized time using:
chronyc tracking
timedatectl
usefull commands :
sudo vi /etc/chrony.conf ## to add NTP servers
sudo systemctl enable chronyd ## enable service
sudo systemctl start chronyd ## start service
##sudo timedatectl list-timezones | grep Bucharest
##sudo timedatectl set-timezone Europe/Bucharest
2.3 Run the Veridium Installer
2.3.1 Launch the Installation Script
Run the installer with parameters identifying Web and Persistence nodes:
./veridium-installer.sh -w <web_nodes_IPs> -p <persistence_nodes_IPs>
Example:
./veridium-installer.sh -w 10.10.10.11,10.10.10.12 -p 10.10.10.21,10.10.10.22,10.10.10.23
This launches the interactive configuration wizard.
2.3.2 Installation Wizard Steps
-
Set Internal and External FQDNs
-
Internal domain for LOCAL communication.
-
External domain for public access.
-
In some environments internal and external FQDNs may be the same.
-
Choose between ports or FQDN/SNI addressing models.
-
-
HAProxy Configuration
-
SNI-based: each component exposed via individual FQDN (recommended).
-
e.g.,
admin-intFQDN,ssp-intFQDN,shib-intFQDN
-
-
Port-based: one FQDN with distinct ports.
-
e.g.,
intFQDN:9444(Admin),intFQDN:9987(SSP)
-
-
-
Define Node Roles
-
These values are already prepopulated from installer script.
-
Assign IPs for WebApplication and Persistence layers.
-
The installer validates connectivity before deployment.
-
-
Allocate RAM Resources
Most common is to leave values by default - Specify memory allocation (e.g.,8g,16g) for major components. -
Set CA Variables
Define values specific for your company - used for internal TLS certificate generation (organization, OU, etc.). -
Database Configuration
-
Defaults to Cassandra - nothing to configure
-
Optional: configure Oracle connection parameters if using external DB.
-
-
Review Configuration Summary
The installer displays a full overview of your configuration before starting. Confirm before proceeding. -
Deployment Execution
-
Establishes SSH connectivity to all nodes.
-
Installs web, persistence, and supporting services based on roles.
-
-
After deployment, the configured values can be found in host_list.txt file.
In case of installation failure, please contact support with received error.
3. Post-Installation Configuration
3.1 Sudo Permissions for veridiumid User
Ensure the veridiumid account has these sudo privileges to manage services and scripts:
veridiumid ALL=(root) NOPASSWD: /bin/systemctl stop ver*
veridiumid ALL=(root) NOPASSWD: /bin/systemctl start ver*
veridiumid ALL=(root) NOPASSWD: /bin/systemctl enable ver*
veridiumid ALL=(root) NOPASSWD: /bin/systemctl status ver*
veridiumid ALL=(root) NOPASSWD: /usr/bin/crontab -l
veridiumid ALL=(root) NOPASSWD: /usr/bin/crontab -e
veridiumid ALL=(root) NOPASSWD: /sbin/tcpdump
veridiumid ALL=(root) NOPASSWD: /bin/bash /etc/veridiumid/scripts/*
veridiumid ALL=(root) NOPASSWD: /bin/python3 /etc/veridiumid/scripts/*
Once installation is complete and validated, these privileges can be tightened or restricted according to enterprise security policies.
3.2 Validation and Testing
After installation:
-
Verify all services are running:
/etc/veridiumid/scripts/check_services -
Test web interfaces (admin, SSP, authentication) via browser.
4. Post-Deployment Hardening and Observations
After confirming a successful setup the following can be done:
-
Re-enable
firewalldor equivalent and open only required ports. -
Restrict SSH access to Veridium nodes.
-
Configure log rotation and monitoring.
-
Apply OS security patches regularly.
4.1 Enable log rotate to run each day
## apply this fix, because some files might be duplicated
if [ -e "/etc/logrotate.d/rsyslog" ] && [ -e "/etc/logrotate.d/syslog" ]; then
    rm -f /etc/logrotate.d/syslog
    systemctl restart logrotate
fi
## enable the logrotate timer to be executed periodically
systemctl enable logrotate.timer
systemctl start logrotate.timer
4.2 Firewall rules to be added if firewall should be enabled - this is a guideline and should be done in agreement with the client firewall policy.
On persistence nodes
# Enable and start firewalld
systemctl enable firewalld
systemctl start firewalld
# Check available zones -> default zone is 'public'
firewall-cmd --get-active-zones
# Add rules for persistence ports
firewall-cmd --zone=public --add-port=22/tcp --permanent
firewall-cmd --zone=public --add-port=2181/tcp --permanent
firewall-cmd --zone=public --add-port=2888/tcp --permanent
firewall-cmd --zone=public --add-port=3888/tcp --permanent
firewall-cmd --zone=public --add-port=7000/tcp --permanent
firewall-cmd --zone=public --add-port=7001/tcp --permanent
firewall-cmd --zone=public --add-port=7199/tcp --permanent
firewall-cmd --zone=public --add-port=9092/tcp --permanent
firewall-cmd --zone=public --add-port=9095/tcp --permanent
firewall-cmd --zone=public --add-port=9042/tcp --permanent
# Add rules for ILP kafka
firewall-cmd --zone=public --add-port=9192/tcp --permanent
firewall-cmd --zone=public --add-port=9193/tcp --permanent
firewall-cmd --zone=public --add-port=9195/tcp --permanent
# Restart firewalld
systemctl restart firewalld
# Validate ports are present in the firewalld config
firewall-cmd --zone=public --list-all
# Example output
public (active)
  target: default
  icmp-block-inversion: no
  interfaces: eth0
  sources:
  services: cockpit dhcpv6-client ssh
  ports: 22/tcp 2181/tcp 2888/tcp 3888/tcp 7000/tcp 7001/tcp 7199/tcp 9092/tcp 9095/tcp 9042/tcp 9192/tcp 9193/tcp 9195/tcp
  protocols:
  forward: yes
  masquerade: no
  forward-ports:
  source-ports:
  icmp-blocks:
  rich rules:
On webapp nodes
# Enable and start firewalld
systemctl enable firewalld
systemctl start firewalld
# Check available zones -> default zone is 'public'
firewall-cmd --get-active-zones
# Add rules for webapp ports
# In case of SNI configuration
firewall-cmd --zone=public --add-port=22/tcp --permanent
firewall-cmd --zone=public --add-port=443/tcp --permanent
firewall-cmd --zone=public --add-port=2083/tcp --permanent
# In case of ports configuration
firewall-cmd --zone=public --add-port=22/tcp --permanent
firewall-cmd --zone=public --add-port=443/tcp --permanent
firewall-cmd --zone=public --add-port=9444/tcp --permanent
firewall-cmd --zone=public --add-port=9987/tcp --permanent
firewall-cmd --zone=public --add-port=8544/tcp --permanent
firewall-cmd --zone=public --add-port=8944/tcp --permanent
firewall-cmd --zone=public --add-port=8945/tcp --permanent
firewall-cmd --zone=public --add-port=8946/tcp --permanent
firewall-cmd --zone=public --add-port=8947/tcp --permanent
firewall-cmd --zone=public --add-port=2083/tcp --permanent
# Restart firewalld
systemctl restart firewalld
# Validate ports are present in the firewalld config
firewall-cmd --zone=public --list-all
# Example output
public (active)
  target: default
  icmp-block-inversion: no
  interfaces: eth0
  sources:
  services: cockpit dhcpv6-client ssh
  ports: 22/tcp 443/tcp 9444/tcp 9987/tcp 8544/tcp 8944/tcp 8945/tcp 8946/tcp 8947/tcp 2083/tcp
  protocols:
  forward: yes
  masquerade: no
  forward-ports:
  source-ports:
  icmp-blocks:
  rich rules:
To remove port from active configuration
# Remove port
firewall-cmd --zone=public --remove-port=PORT_NUMBER/tcp
# Add config to permanent configuration
firewall-cmd --runtime-to-permanent
# Reload firewalld rules
firewall-cmd --reload
5. Installation Error handling
5.1 Installation fails
In case that installation fails, contact veridium support deparment for remediation. After the issue is fixed the installation can be resumed by running installation script once again.
The installation script will automaticallly resume.
Action needed on fresh install - translations
On a fresh install environment with version 3.8.4, some text is missing during the enrollment process — instead of readable labels, raw translation keys are displayed.
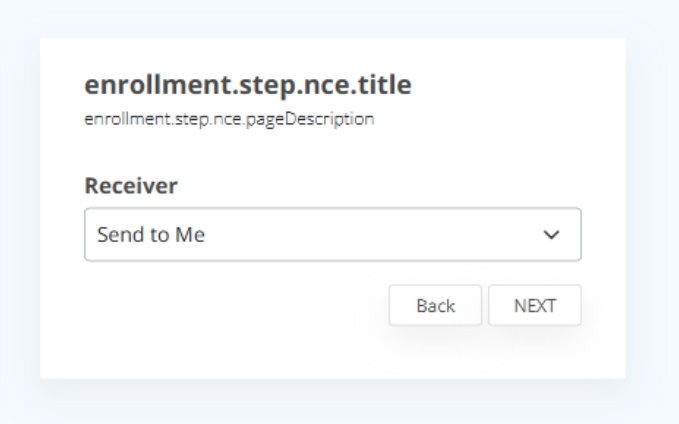
To fix this, the following translations go to Websecadmin → Advanced → i18n.json and add below keys:
{
  "key": "enrollment.step.ad.title",
  "translations": { "en": "Form registration" },
  "regex": ".*\\.title$"
},
{
  "key": "enrollment.step.codeValidation.title",
  "translations": { "en": "Code validation" },
  "regex": ".*\\.title$"
},
{
  "key": "enrollment.step.nce.title",
  "translations": { "en": "Select code validation receiver" },
  "regex": ".*\\.title$"
},
{
  "key": "enrollment.step.adminValidation.title",
  "translations": { "en": "Please contact admin to validate your identity" },
  "regex": ".*\\.title$"
},
{
  "key": "enrollment.step.jwt.title",
  "translations": { "en": "Form base registration" },
  "regex": ".*\\.title$"
},
{
  "key": "enrollment.step.proxy.title",
  "translations": { "en": "Proxy server registration" },
  "regex": ".*\\.title$"
},
{
  "key": "enrollment.step.email.title",
  "translations": { "en": "Form based registration" },
  "regex": ".*\\.title$"
},
{
  "key": "enrollment.step.ad.pageDescription",
  "translations": { "en": "Please enter your directory service credentials." },
  "regex": ".*\\.pageDescription$"
},
{
  "key": "enrollment.step.codeValidation.pageDescription",
  "translations": { "en": "In order to activate this profile, please enter the confirmation code received via SMS or email" },
  "regex": ".*\\.pageDescription$"
},
{
  "key": "enrollment.step.nce.pageDescription",
  "translations": { "en": "Select how you want to receive the code" },
  "regex": ".*\\.pageDescription$"
},
{
  "key": "enrollment.step.adminValidation.pageDescription",
  "translations": { "en": "Please contact admin to validate your identity" },
  "regex": ".*\\.pageDescription$"
},
{
  "key": "enrollment.step.jwt.pageDescription",
  "translations": { "en": "Enter JWT" },
  "regex": ".*\\.pageDescription$"
},
{
  "key": "enrollment.step.proxy.pageDescription",
  "translations": { "en": "Proxy server registration" },
  "regex": ".*\\.pageDescription$"
},
{
  "key": "enrollment.step.email.pageDescription",
  "translations": { "en": "Enter your username address" },
  "regex": ".*\\.pageDescription$"
}