

Applicable Versions: VeridiumID 3.8.4+
Overview
This document describes how to:
-
Add a new datacenter to an existing VeridiumID deployment.
-
Replicate configuration and data between datacenters.
-
Validate the new datacenter.
-
Remove a datacenter from an existing CDCR deployment.
-
Recover from common deployment failures.
The procedures and examples in this document assume the following example deployment topology.
Primary Datacenter:
FQDN: mydomain1.veridium.local
|
Hostname |
Role |
IP |
Datacenter Name |
|---|---|---|---|
|
dev63-webapp-cdcr1-node-1 |
VeridiumID WebApp |
10.204.63.1 |
data1 |
|
dev63-webapp-cdcr1-node-2 |
VeridiumID WebApp |
10.204.63.2 |
data1 |
|
dev63-persistence-cdcr1-node-1 |
VeridiumID Persistence |
10.204.63.7 |
data1 |
|
dev63-persistence-cdcr1-node-2 |
VeridiumID Persistence |
10.204.63.8 |
data1 |
|
dev63-persistence-cdcr1-node-3 |
VeridiumID Persistence |
10.204.63.9 |
data1 |
Secondary Datacenter
FQDN: mydomain2.veridium.local
|
Hostname |
Role |
IP |
Datacenter Name |
|---|---|---|---|
|
dev63-webapp-cdcr2-node-1 |
VeridiumID WebApp |
10.204.63.3 |
data2 |
|
dev63-webapp-cdcr2-node-2 |
VeridiumID WebApp |
10.204.63.4 |
data2 |
|
dev63-persistence-cdcr2-node-1 |
VeridiumID Persistence |
10.204.63.10 |
data2 |
|
dev63-persistence-cdcr2-node-2 |
VeridiumID Persistence |
10.204.63.11 |
data2 |
|
dev63-persistence-cdcr2-node-3 |
VeridiumID Persistence |
10.204.63.12 |
data2 |
Terminology
The following terms are used consistently throughout this document:
|
Term |
Description |
|---|---|
|
DATACENTER_TO_BE_ADDED |
The name of the datacenter being added to the existing VeridiumID deployment. In the examples throughout this document, this refers to the Secondary Datacenter, in our case “data2”. |
|
new datacenter |
Secondary Datacenter |
|
ZOO_BKP |
The full path to the directory where the ZooKeeper backup data will be stored. For example: |
|
ZOOKEEPER_PROPERTIES_BASE64 |
The Base64-encoded output of |
|
onboarding command |
The command generated during Step 2.3 – Initialize CDCR under Generated Onboarding Command. This command is used to configure the Datacenter to Be Added and includes the datacenter name and the Base64-encoded ZooKeeper configuration. |
|
DATACENTER_TO_BE_REMOVED |
The datacenter that will be removed from the CDCR cluster. In this procedure, this refers to the Secondary Datacenter, named |
Expected Duration
|
Operation |
Estimated Duration |
|---|---|
|
Add Datacenter |
2–3 hours |
|
Remove Datacenter |
~1 hour |
|
Cassandra Replication |
Depends on database size and network bandwidth |
Impact
-
No planned downtime.
-
Minor service interruptions may occur during configuration updates.
-
Recommended during off-peak business hours.
Architecture Assumptions
-
Primary datacenter is fully operational.
-
Secondary datacenter is already deployed.
-
Both datacenters run the same VeridiumID version. Also Elasticsearch, zookeeper and cassandra should have the same version.
-
The same CA infrastructure will be used across both datacenters.
-
The secondary datacenter contains no production data prior to onboarding.
Validation Criteria
CDCR configuration is considered successful when:
-
Cassandra nodes from both datacenters are visible and healthy.
-
ZooKeeper ensemble is healthy.
-
Elasticsearch cluster is green.
-
Web applications start successfully in both datacenters.
-
Traffic can be routed through the load balancer to the new datacenter.
-
Authentication and enrollment flows operate correctly in each datacenter.
1. Prerequisites
1.1 User Requirements
The procedure must be executed as root or with sudo command:
1.2 Backup ZooKeeper Configuration
Before making any changes, create a backup of the ZooKeeper configuration in both datacenters.
Run the following commandS once on any node in each datacenter:
ZOO_BKP=/opt/veridiumid/backup/zookeeper/beforeCDCRCreation
sudo bash /opt/veridiumid/migration/bin/migration.sh -d $ZOO_BKP
1.3 Network Connectivity Requirements
Ensure that the following ports are open between the persistence nodes in the Primary Datacenter and the Secondary Datacenter.
ZooKeeper
|
Port |
Protocol |
Purpose |
|---|---|---|
|
2181 |
TCP |
Client Connections |
|
2888 |
TCP |
Leader/Follower Communication |
|
3888 |
TCP |
Leader Election |
Cassandra
|
Port |
Protocol |
Purpose |
|---|---|---|
|
9042 |
TCP |
CQL |
|
7000 |
TCP |
Storage Communication |
|
7001 |
TCP |
Storage Communication |
Elasticsearch
|
Port |
Protocol |
Purpose |
|---|---|---|
|
9092 |
TCP |
Cluster Communication |
|
9095 |
TCP |
Replication |
Connectivity Validation
Verify that each required service is listening on the expected TCP ports.
ss -tulpn | grep 2888
Verify remote connectivity from a node in the opposite datacenter:
nc -zv IP_ADDRESS 2888
Repeat the connectivity test for all required ports listed in the Network Connectivity Requirements section.
Notes
-
These ports must be reachable in both directions between the persistence nodes in the Primary Datacenter and the Secondary Datacenter.
-
Any firewalls, security groups, or network ACLs must allow the required traffic before starting the deployment.
1.4 VeridiumID CDCR Prerequisite
For VeridiumID 3.9.0 this step is not required, as is automatically delivered in the release. Please skip the step.
For VeridiumID 3.8.4 deployments only:
Perform these steps on every node in both the Primary Datacenter and the Secondary Datacenter before continuing with the deployment.
Download Updated Scripts
https://veridium-repo.veridium-dev.com/repository/VeridiumUtils/Veridium_3.8.4/VeridiumInstaller/cdcr_scripts.tar.gz
Extract
tar xvf cdcr_scripts.tar.gz
Install
sudo bash update_scripts.sh
2. Initialize CDCR Configuration
2.1 Update ZooKeeper Templates
Update the ZooKeeper infrastructure templates before adding the Secondary Datacenter (new datacenter).
Run the following command on:
-
One WebApp node in the Primary Datacenter (for example,
dev63-webapp-cdcr1-node-1–10.204.63.1) -
One Persistence node in the Primary Datacenter (for example,
dev63-persistence-cdcr1-node-1–10.204.63.7)
sudo bash /opt/veridiumid/setupagent/scripts/update_tenant_infra.sh
Purpose
This command updates the ZooKeeper infrastructure templates using the current cluster configuration.
The updated templates are stored in ZooKeeper and will be used to configure the Secondary Datacenter during the deployment process.
2.2 Stop Services in Secondary Datacenter
Run the following command on ALL nodes in the Secondary Datacenter (new datacenter):
sudo bash /etc/veridiumid/scripts/veridium_services.sh stop
2.3 Initialize CDCR
Determine the Secondary Datacenter Name
If you are unsure of the secondary datacenter name, run the following command on any node in the Secondary Datacenter:
sudo grep DATACENTER_TAG /etc/default/veridiumid/ver_migration | awk -F'=' '{print $2}'
Example:

our Datacenter name from Secondary Datacenter is “data2”.
Initialize the CDCR configuration for the Secondary Datacenter.
Run the following command one time only on any node in the Primary Datacenter:
sudo bash /etc/veridiumid/scripts/veridiumid_cdcr.sh -i -w 10.204.63.3,10.204.63.4 -s 10.204.63.10,10.204.63.11,10.204.63.12 -n DATACENTER_TO_BE_ADDED
Ensure that all IP addresses and the datacenter name are correct before executing the command, as they will be embedded into the generated configuration and onboarding commands.
Parameters
|
Parameter |
Description |
|---|---|
|
|
Comma-separated list of WebApp node IP addresses in the Secondary Datacenter. |
|
|
Comma-separated list of Persistence node IP addresses in the Secondary Datacenter. |
|
|
Name of the datacenter to be added. In our case “data2” |
Important: If any validation fails, do not continue with the deployment. Follow the instructions in the Step 5.1 – Rollback (If the Initialize CDCR step fails).
What This Step Does
Updates the ZooKeeper infrastructure templates, including:
-
tentant-infra.yaml
-
zoo.cfg
-
cassandra.yaml
-
elasticsearch.yml
Also updates the following configuration files:
-
config.json
-
elasticsearch.json
Generated Onboarding Command
The veridiumid_cdcr.sh command generates an onboarding command that is required to configure the Secondary Datacenter (New Datacenter).
The generated command will be similar to the following:
bash /etc/veridiumid/scripts/veridiumid_cdcr.sh -a -n DATACENTER_TO_BE_ADDED -z "ZOOKEEPER_PROPERTIES_BASE64"
Example:
bash /etc/veridiumid/scripts/veridiumid_cdcr.sh -a -n data2 -z "Y29....MDA="
Important: Save the generated command to a notepad. It will be required later during the onboarding of the Secondary Datacenter.
3. Configure Secondary Datacenter (new datacenter)
The veridiumid_cdcr.sh script supports optional parameters that allow you to skip the configuration of Cassandra or Elasticsearch when they are not managed by VeridiumID.
This is useful in environments that use:
-
Oracle Database instead of Cassandra.
-
An externally managed Elasticsearch cluster.
Optional Parameters
|
Parameter |
Description |
|---|---|
|
|
Skip Cassandra configuration. |
|
|
Skip Elasticsearch configuration. |
Note: When required, include these parameters together with the commands in this section.
Example: To skip the Cassandra configuration, run:
bash /etc/veridiumid/scripts/veridiumid_cdcr.sh -a -n DATACENTER_TO_BE_ADDED -z "ZOOKEEPER_PROPERTIES_BASE64" -c
Note: The -c parameter has been added to the end of the command to skip the Cassandra configuration.
Example: To skip the Elasticsearch configuration, run:
bash /etc/veridiumid/scripts/veridiumid_cdcr.sh -a -n DATACENTER_TO_BE_ADDED -z "ZOOKEEPER_PROPERTIES_BASE64" -e
Note: The -c parameter has been added to the end of the command to skip the Elasticsearch configuration.
Important: Replace DATACENTER_TO_BE_ADDED and ZOOKEEPER_PROPERTIES_BASE64 with the actual values generated for your environment during Step 2.3 – Initialize CDCR. These values are unique for each deployment and will differ from the placeholders shown in this example.
3.1 Configure Persistence Nodes
Configure the persistence nodes by running the onboarding command on every persistence node.
Execution Order
Important: Run the command on one node at a time. Wait for the command to complete successfully before proceeding to the next node.
Run the command in the following order:
-
All persistence nodes in the Secondary Datacenter (New Datacenter).
-
All persistence nodes in the Primary Datacenter.
sudo bash /etc/veridiumid/scripts/veridiumid_cdcr.sh -a -n DATACENTER_TO_BE_ADDED -z "ZOOKEEPER_PROPERTIES_BASE64"
Note: Use the onboarding command generated in Step 2.3 – Initialize CDCR. If required, append the optional parameters described earlier (such as -c to skip Cassandra or -e to skip Elasticsearch) before executing the command.
See below “Example that everything looks good” output for each command.
Actions Performed
Configures:
-
Cassandra
-
ZooKeeper
-
Elasticsearch
-
Filebeat
-
SetupAgent
Updates:
-
Truststores for services
-
zookeeper.properties
Restarts persistence services.
Important: If any validation fails, do not continue with the deployment. Follow the instructions in the step 5.2. if the Configure Persistence Nodes step fails.
Validation
Verify that all configured services are running and report a GREEN status.
Command:
bash /etc/veridiumid/scripts/check_services.sh
Expected result:
-
All configured services report a GREEN status.
-
No failed or stopped services are reported.
Example that everything looks good:
Add the Secondary Datacenter persistence node (dev63-persistence-cdcr2-node-1, 10.204.63.10) to the CDCR cluster using the onboarding command:
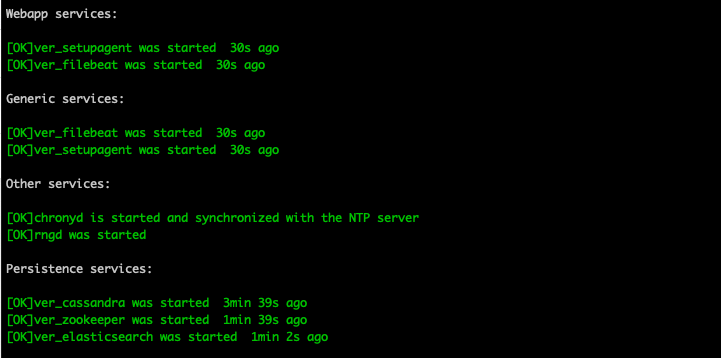
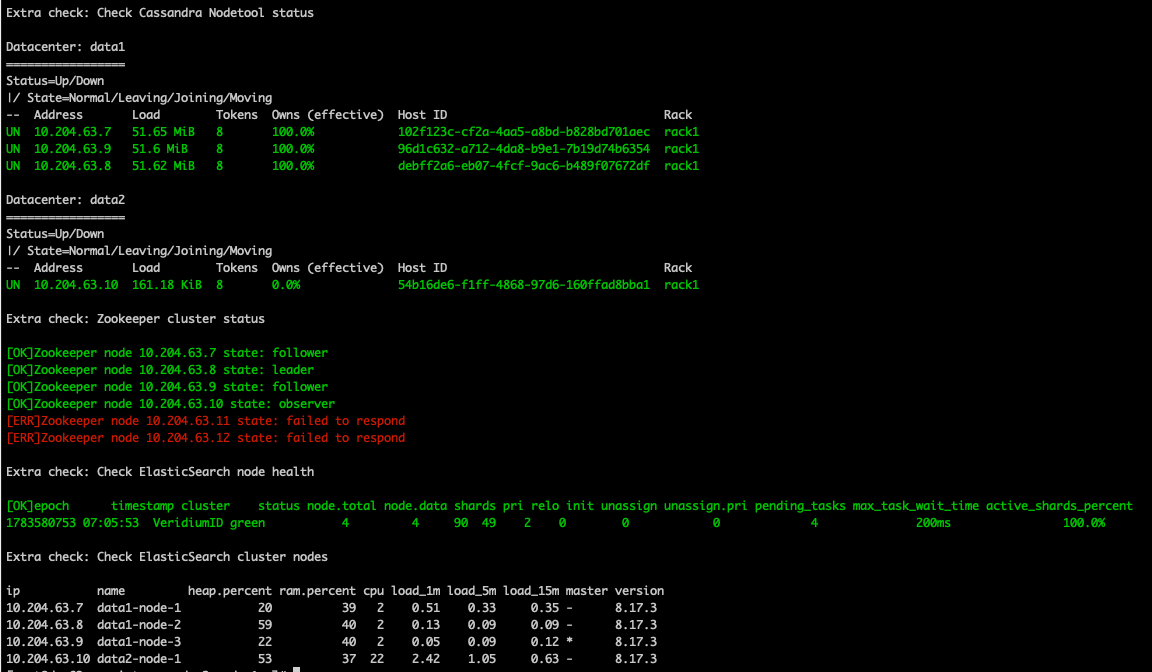
Add the Secondary Datacenter persistence node (dev63-persistence-cdcr2-node-2, 10.204.63.11) to the CDCR cluster using the onboarding command:
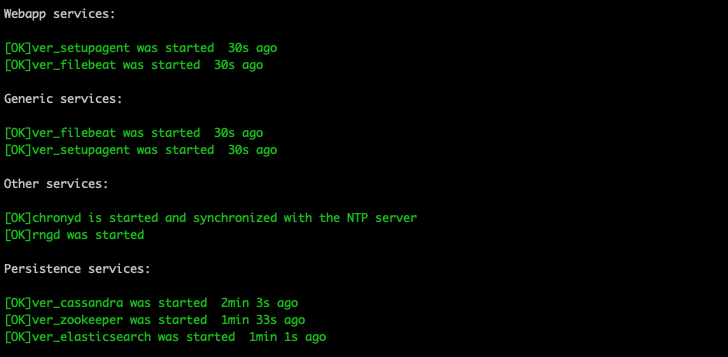
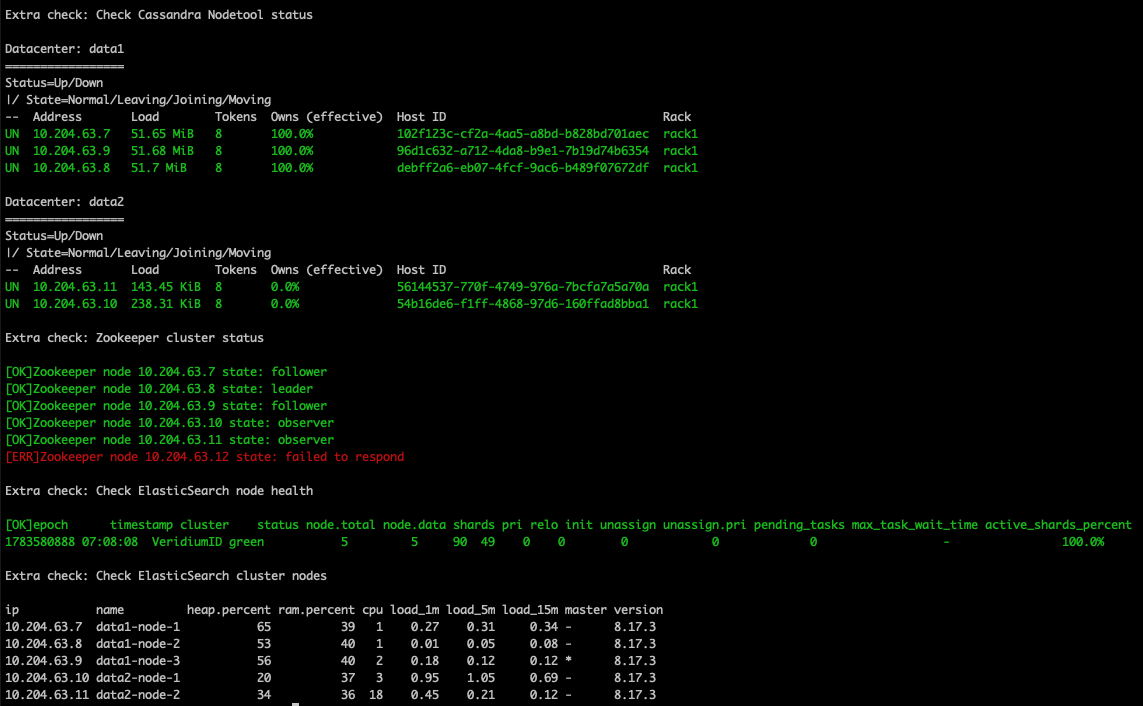
Add the Secondary Datacenter persistence node (dev63-persistence-cdcr2-node-3, 10.204.63.12) to the CDCR cluster using the onboarding command:
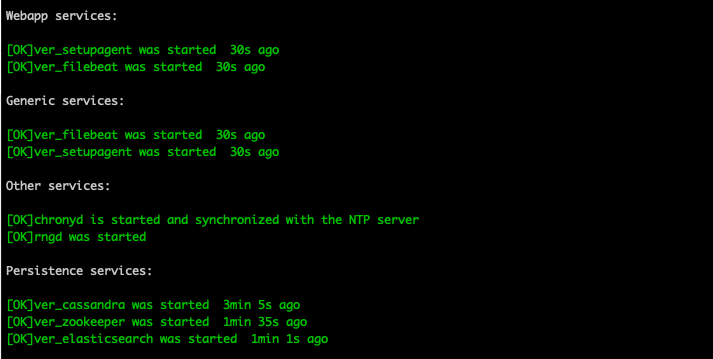
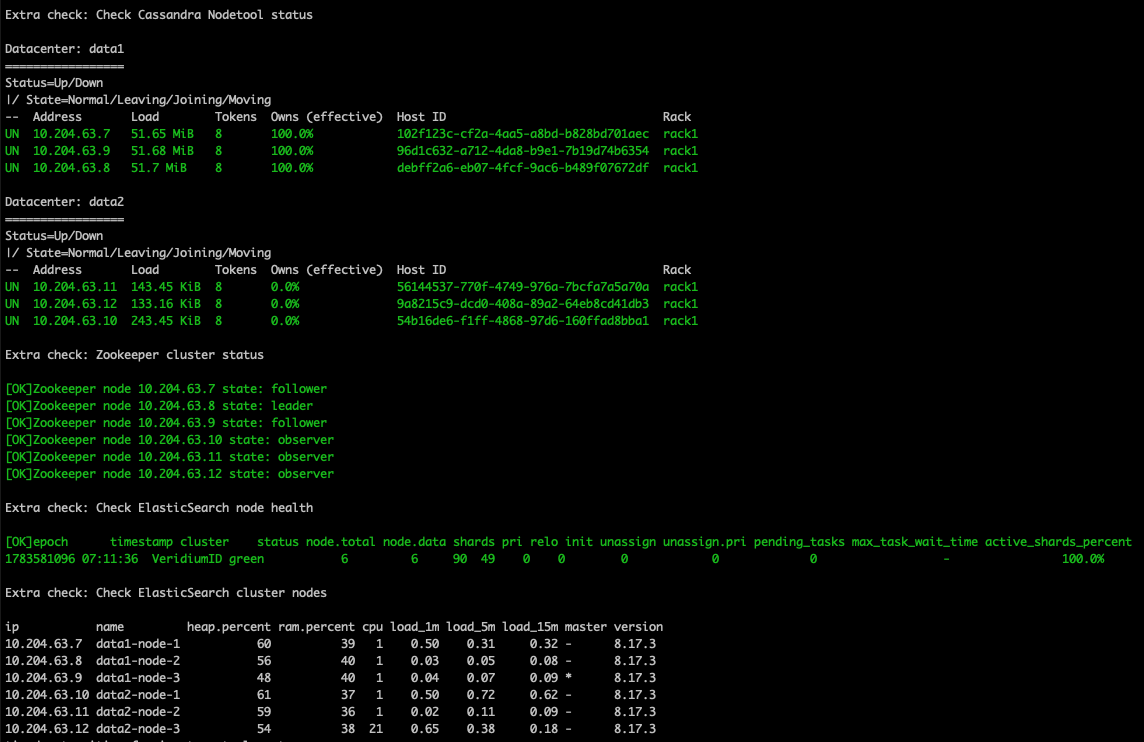
Add the Primary Datacenter persistence node (dev63-persistence-cdcr1-node-1, 10.204.63.7) to the CDCR cluster using the onboarding command:
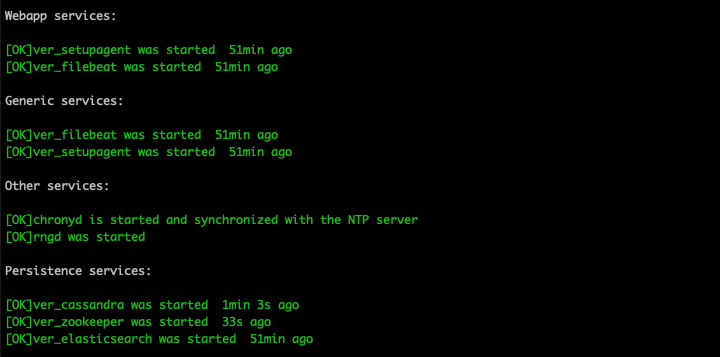
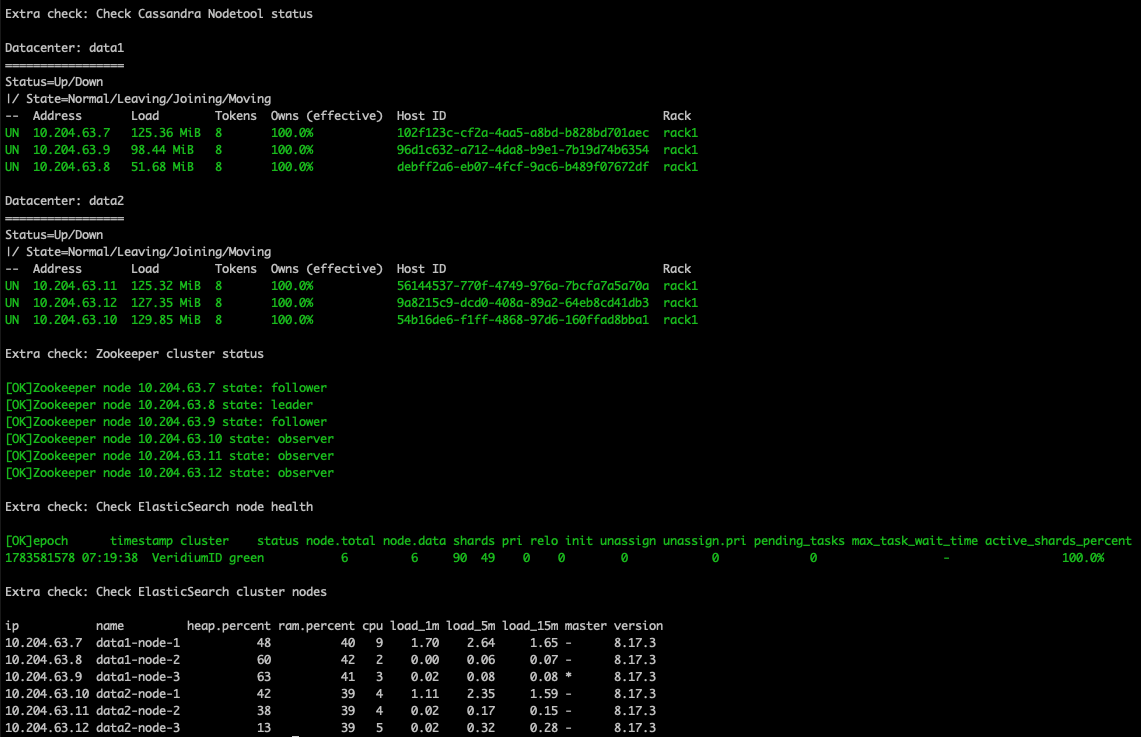
Add the Primary Datacenter persistence node (dev63-persistence-cdcr1-node-2, 10.204.63.8) to the CDCR cluster using the onboarding command:
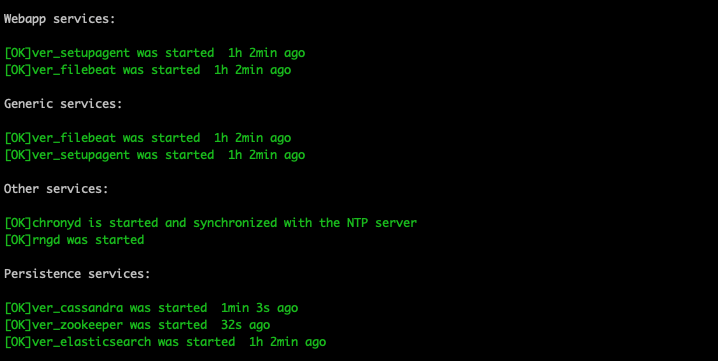
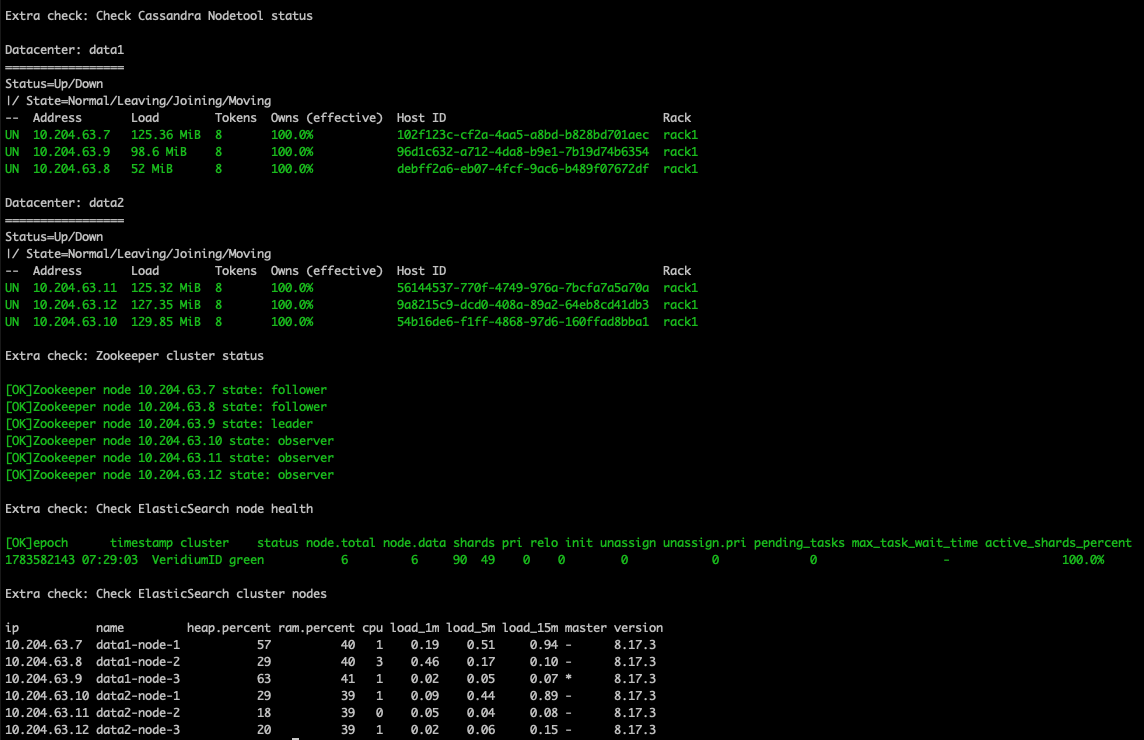
Add the Primary Datacenter persistence node (dev63-persistence-cdcr1-node-3, 10.204.63.9) to the CDCR cluster using the onboarding command:
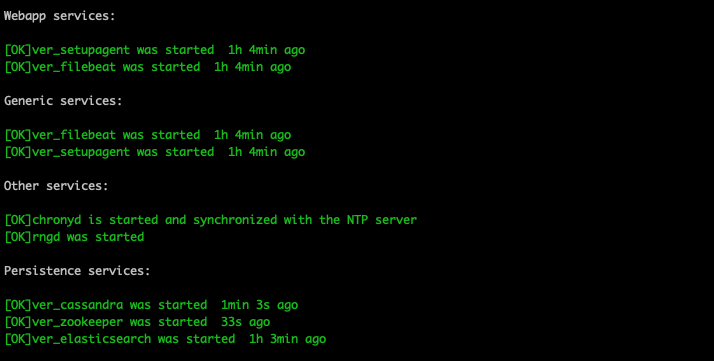
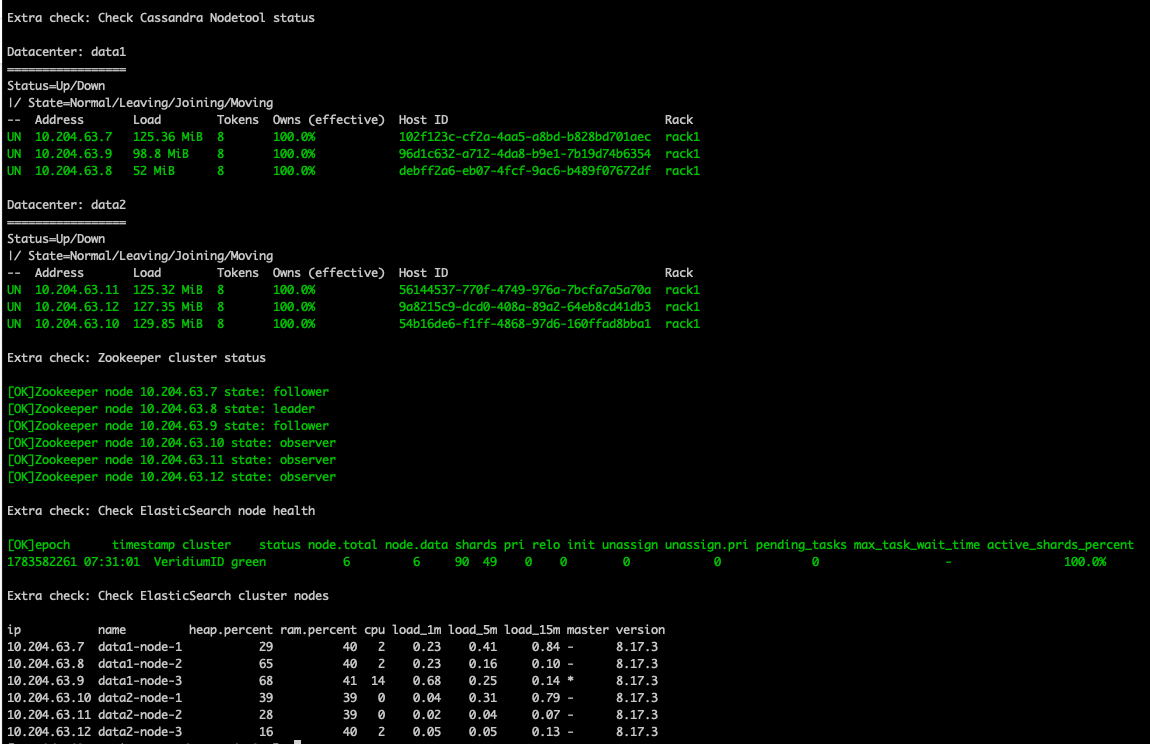
3.2 Replicate Data
After the cluster has been created, the data must be replicated to the Secondary Datacenter.
Run the following command on all persistence nodes in the Secondary Datacenter (New Datacenter).
Important: Execute the command one node at a time, waiting for each node to complete before proceeding to the next.
Command:
sudo bash /etc/veridiumid/scripts/veridiumid_cdcr.sh -p -n DATACENTER_TO_BE_ADDED
Note: Please replace DATACENTER_TO_BE_ADDED with your Secondary Datacenter name.
Actions Performed
-
Starts Cassandra replication
-
Updates Elasticsearch shard and replica allocation
-
Zookeeper data is automatically replicated when zookeeper has joined the cluster.
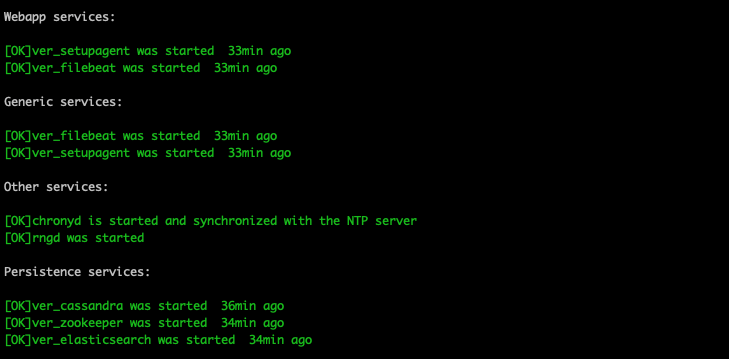
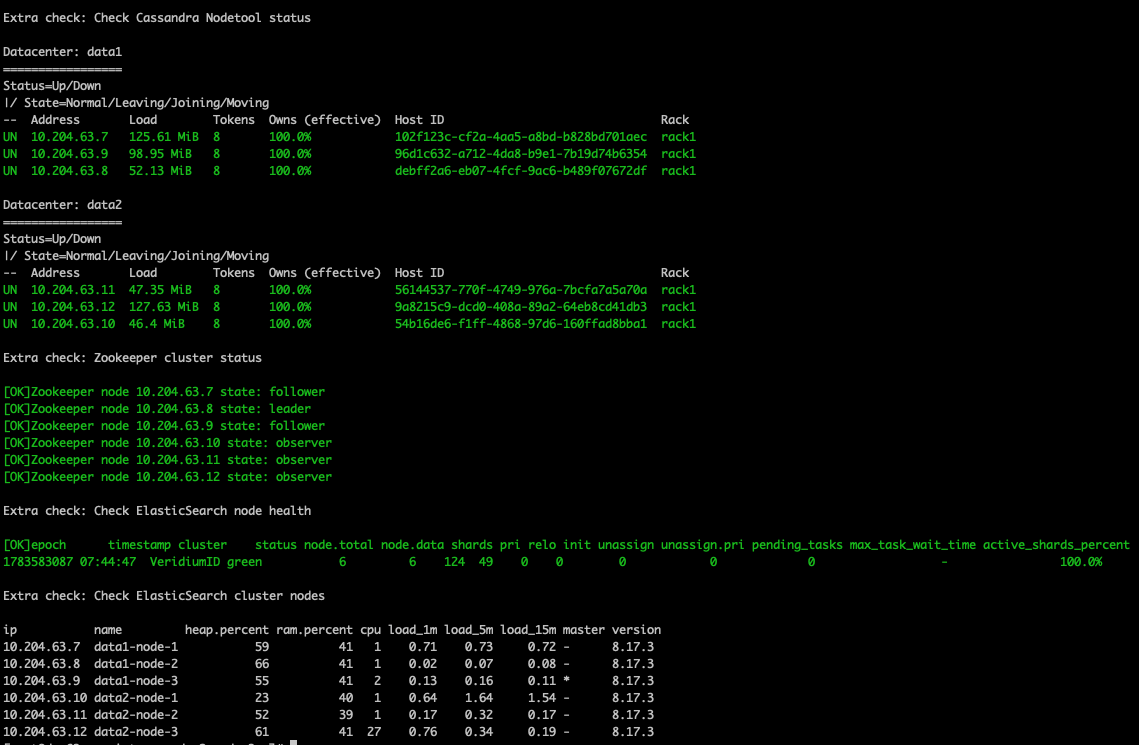
Validation
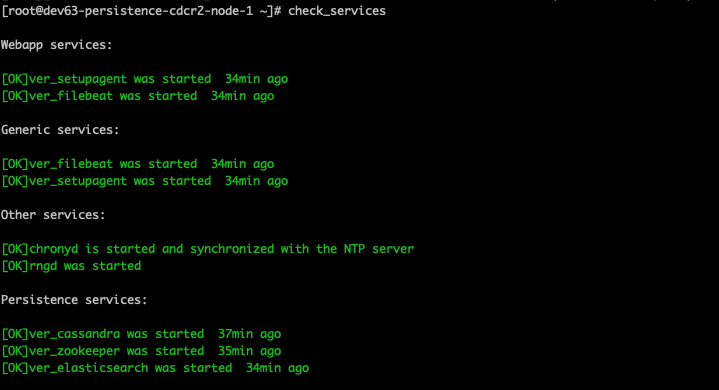
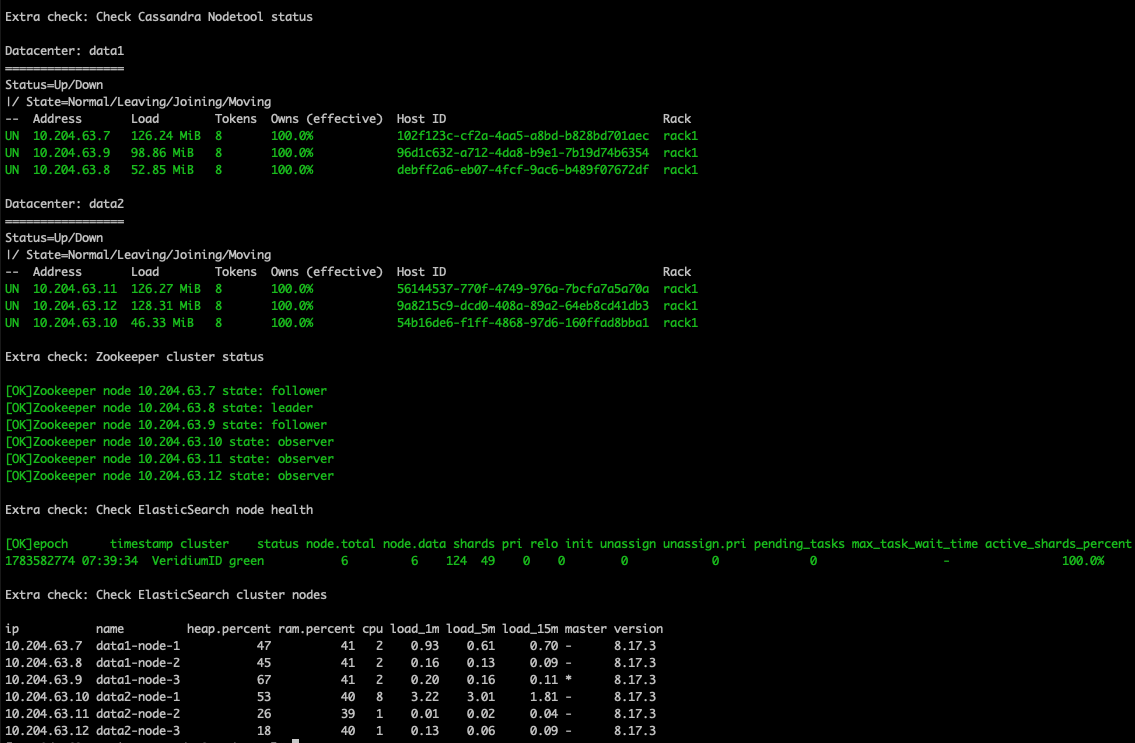
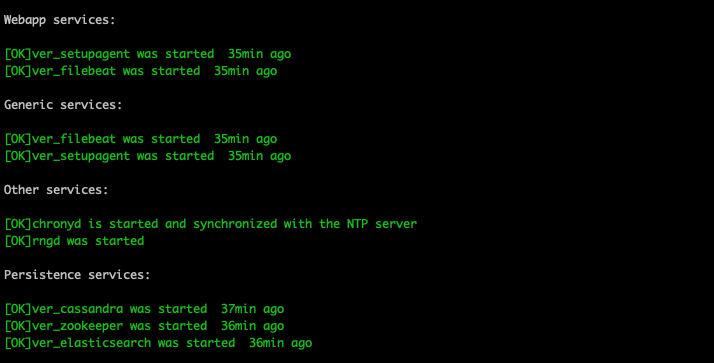
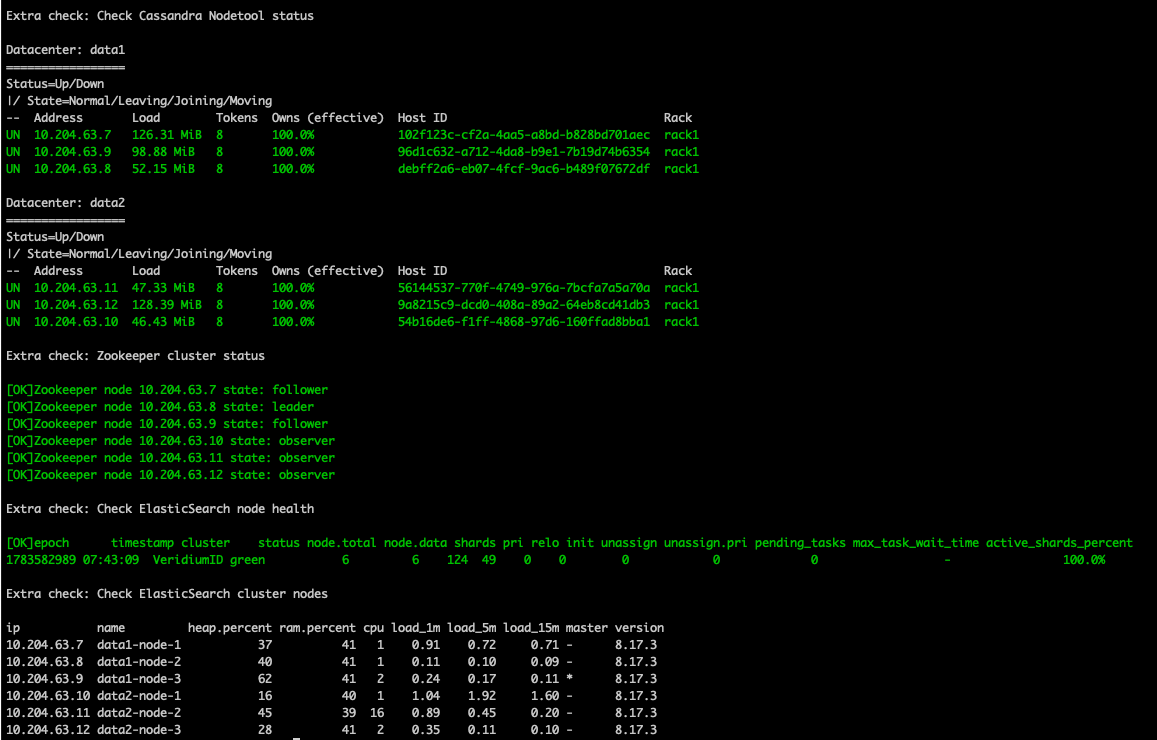
Check services will report green services and there is a zookeeper, elasticsearch and cassandra cluster containing all nodes from both datacenters.
Command:
bash /etc/veridiumid/scripts/check_services.sh
Example that everything looks good:
Verify the status of the Secondary Datacenter persistence node (dev63-persistence-cdcr2-node-1, 10.204.63.10) by running the check_service command:
Verify the status of the Secondary Datacenter persistence node (dev63-persistence-cdcr2-node-2, 10.204.63.11) by running the check_service command:
Verify the status of the Secondary Datacenter persistence node (dev63-persistence-cdcr2-node-3, 10.204.63.12) by running the check_service command:
Note: In case of errors you will see [ERR]
3.3 Configure WebApp Nodes
FQDN Considerations
Normaly, this is not needed, if the Secondary Datacenter installation was created with the same FQDNs as the Primary Datacenter (skip this FQDN configure if both datacenter are configured with the same FQDNs).
If the Secondary Datacenter (New Datacenter) uses a different FQDN than the Primary Datacenter, ensure that the Primary Datacenter FQDN can be resolved locally without relying on DNS by adding the appropriate entry to /etc/hosts on each WebApp node in the Secondary Datacenter.
On dev63-webapp-cdcr2-node-1 (10.204.63.3):
10.204.63.3 mydomain1.veridium.local

On dev63-webapp-cdcr2-node-2 (10.204.63.4):
10.204.63.4 mydomain1.veridium.local

Note: Replace the IP address with the appropriate WebApp node IP from the Secondary Datacenter and the hostname (mydomain1.veridium.local).
Configure the WebApp nodes by running the onboarding command on every WebApp node in the Secondary Datacenter (New Datacenter).
Important: Run the command on one node at a time. Wait for the command to complete successfully, then run the check_service command and verify that all services have started successfully (displayed in green) before proceeding to the next node.
Command :
sudo bash /etc/veridiumid/scripts/veridiumid_cdcr.sh -a -n DATACENTER_TO_BE_ADDED -z ZOOKEEPER_PROPERTIES_BASE64
Note: Use the onboarding command generated in Step 2.3 – Initialize CDCR. If required, append the optional parameters described earlier (such as -c to skip Cassandra or -e to skip Elasticsearch) before executing the command.
See below “Example that everything looks good” output for each command.
Actions Performed
-
Synchronizes zookeeper.properties.
-
Updates configuration files and service truststores.
-
Restarts all WebApp services.
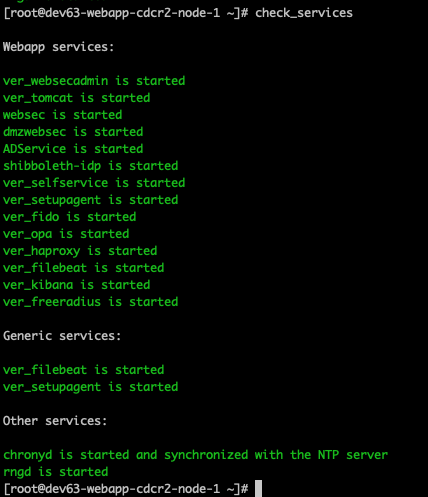
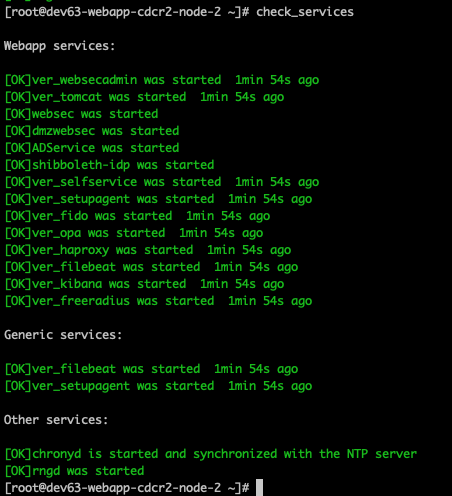
Validation
Verify that all services are reported as green by the check_service command on all webapp nodes in the Secondary Datacenter.
bash /etc/veridiumid/scripts/check_services.sh
Verify:
-
All services are running
-
No startup failures
Example that everything looks good:
Verify the status of the Secondary Datacenter webapp node (dev63-webapp-cdcr2-node-1, 10.204.63.3) by running the check_service command:
Verify the status of the Secondary Datacenter webapp node (dev63-webapp-cdcr2-node-2, 10.204.63.4) by running the check_service command:
4. Final Validation
After all nodes have been configured, verify that the Primary Datacenter and Secondary Datacenter are operating correctly using “check_services“ command.
Command:
bash /etc/veridiumid/scripts/check_services.sh
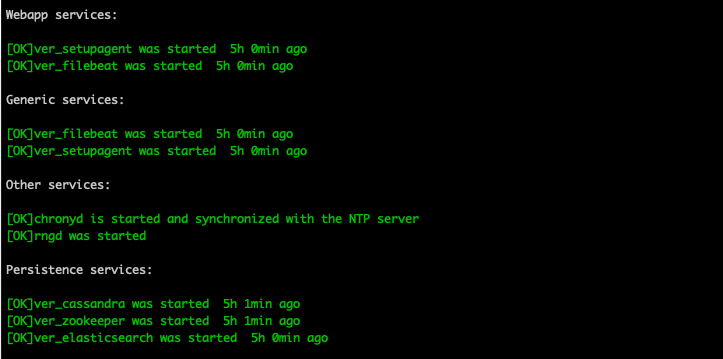
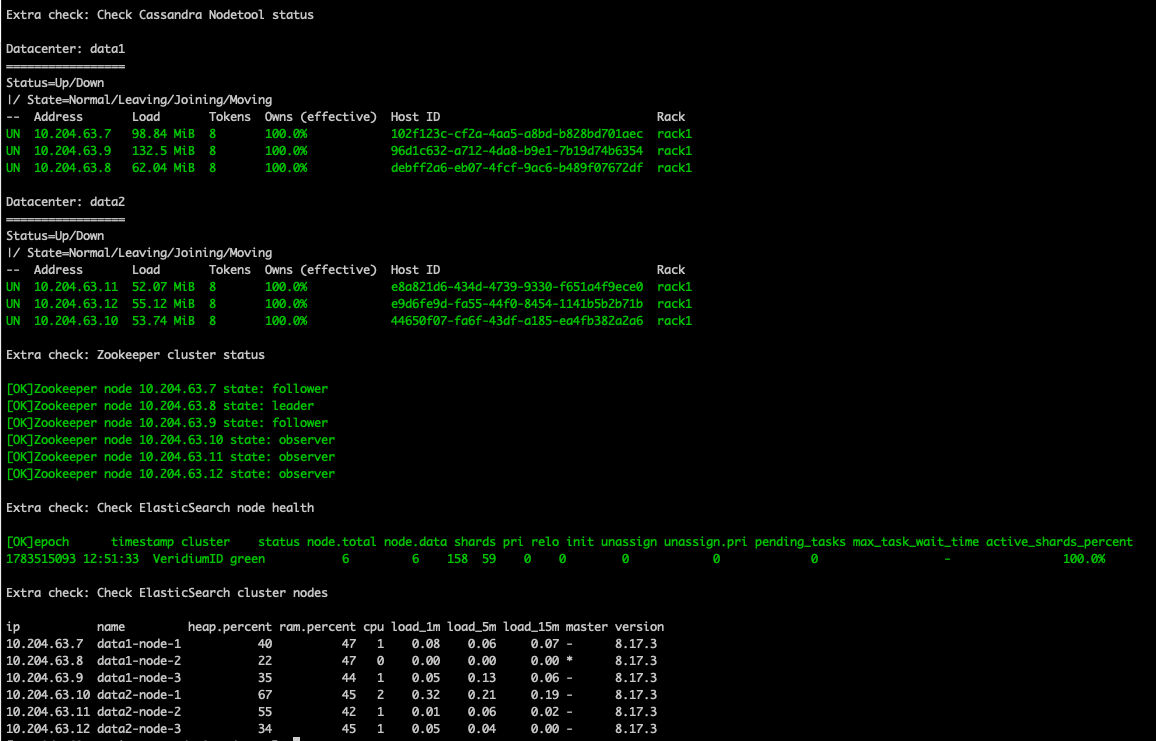
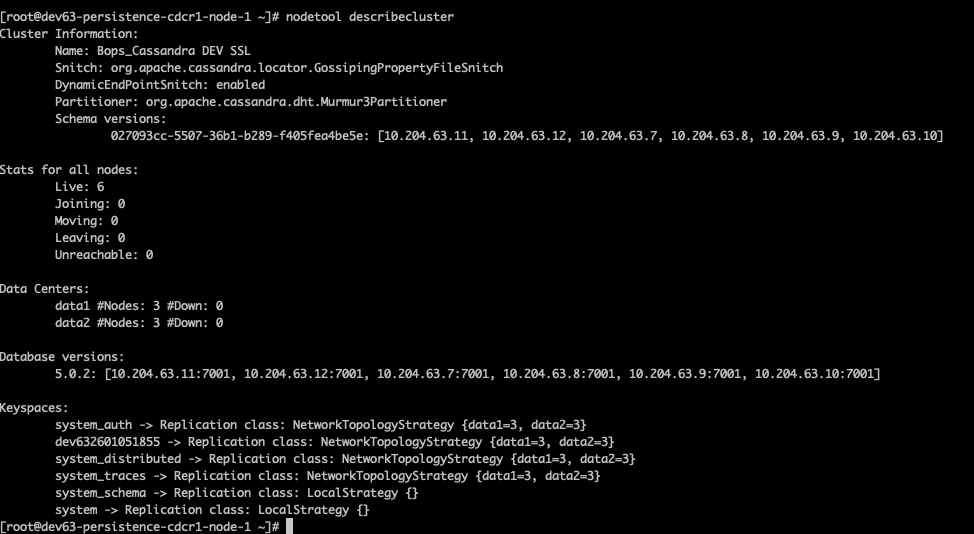
PERSISTENCE VALIDATION: Run the check_services and nodetool describecluster command on all Persistence nodes in both the Primary and Secondary Datacenters. Verify that all services are running successfully
Cassandra
Verify that all Cassandra nodes are Up and Normal.
Expected result:
-
All nodes are reported as UN (Up/Normal).
-
No nodes are in a joining, leaving, or down stat
ZooKeeper
Verify that the ZooKeeper ensemble is healthy.
Expected result:
-
Each node reports either leader or follower.
-
The ZooKeeper ensemble is healthy.
-
All expected nodes are participating in the ensemble.
Elasticsearch
Verify that the Elasticsearch cluster is healthy.
Expected result:
-
"status" : "green" -
All expected nodes have joined the cluster.
PERSISTENCE VALIDATION: Run the check_services command on all Persistence nodes in both the Primary and Secondary Datacenters. Verify that all services are running successfully.
Note: In case of errors you will see [ERR]
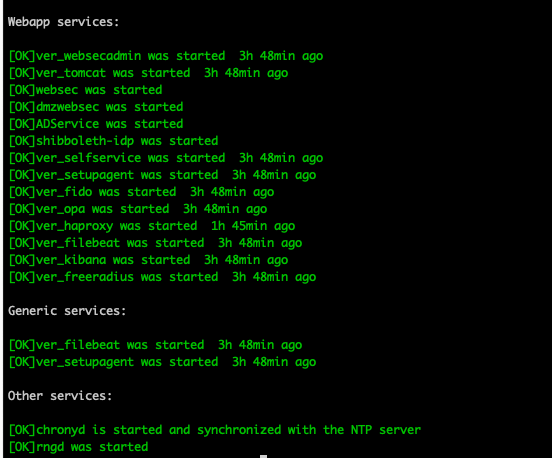
WEBAPP VALIDATION: Run the check_services command on all Webapp nodes in both the Primary and Secondary Datacenters. Verify that all services are running successfully
Note: Errors appear as [ERR]
Application Validation
Route client traffic to the Secondary Datacenter (New Datacenter) using the load balancer.
Verify the following functionality:
-
User authentication
-
User enrollment
-
User synchronization
-
Administration Portal
-
Self Service Portal
Expected result:
-
All authentication and enrollment flows complete successfully.
-
Both the Administration Portal and Self Service Portal are fully operational.
-
No application errors are reported in the logs.
5. Rollback
5.1 If the Initialize CDCR step fails, restore the previous configuration by running:
ZOO_BKP=/opt/veridiumid/backup/zookeeper/beforeCDCRCreation
sudo bash /opt/veridiumid/migration/bin/migration.sh -u $ZOO_BKP
Important: After the rollback completes successfully, restart the deployment procedure from Step 1.4 – VeridiumID CDCR Prerequisite.
5.2. if the Configure Persistence Nodes step fails run:
sudo bash /etc/veridiumid/scripts/veridiumid_cdcr.sh -d -n DATACENTER_TO_BE_ADDED
Note: In our case DATACENTER_TO_BE_ADDED is “data2”
6. Failure Recovery
Run the following commands on one VeridiumID Persistence node in the Primary Datacenter.
State Files
If a component must be reconfigured, remove the corresponding state file.
/opt/veridiumid/cassandra/conf/${DATACENTER_TO_BE_ADDED}-cassandra_cdcr_state.txt
/opt/veridiumid/elasticsearch/config/${DATACENTER_TO_BE_ADDED}-elasticsearch_cdcr_state.txt
/opt/veridiumid/zookeeper/conf/${DATACENTER_TO_BE_ADDED}-zookeeper_cdcr_state.txt
/opt/veridiumid/fido/conf/${DATACENTER_TO_BE_ADDED}-fido_cdcr_state.txt
/opt/veridiumid/freeradius/etc/${DATACENTER_TO_BE_ADDED}-freeradius_cdcr_state.txt
/opt/veridiumid/haproxy/conf/${DATACENTER_TO_BE_ADDED}-haproxy_cdcr_state.txt
/opt/veridiumid/kibana/config/${DATACENTER_TO_BE_ADDED}-kibana_cdcr_state.txt
/opt/veridiumid/migration/conf/${DATACENTER_TO_BE_ADDED}-migration_cdcr_state.txt
/opt/veridiumid/opa/conf/${DATACENTER_TO_BE_ADDED}-opa_cdcr_state.txt
/opt/veridiumid/selfservice/conf/${DATACENTER_TO_BE_ADDED}-selfservice_cdcr_state.txt
/opt/veridiumid/setupagent/conf/${DATACENTER_TO_BE_ADDED}-setupagent_cdcr_state.txt
/opt/veridiumid/tomcat/conf/${DATACENTER_TO_BE_ADDED}-tomcat_cdcr_state.txt
/opt/veridiumid/websecadmin/conf/${DATACENTER_TO_BE_ADDED}-websecadmin_cdcr_state.txt
Remove All CDCR Flags
sudo bash /etc/veridiumid/scripts/veridiumid_cdcr.sh -d -n DATACENTER_TO_BE_ADDED
Note: In our case DATACENTER_TO_BE_ADDED is “data2”
Cassandra Remove node if necessary
Verify Cassandra DescribeCluster before you remove the node:
Before removing the failed node, verify the current Cassandra cluster configuration by running:
nodetool describecluster
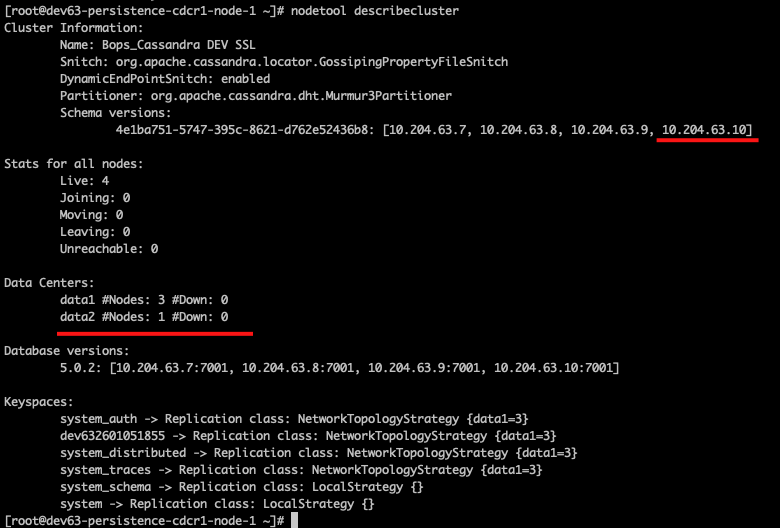
Verify that:
-
The cluster name is correct.
-
All expected datacenters are listed.
-
The partitioner is configured correctly.
-
There are no unexpected changes to the cluster configuration.
In the example, we want to remove the node 10.204.63.10 from Datacenter 2 (data2) because it failed and must be removed from the Cassandra cluster.
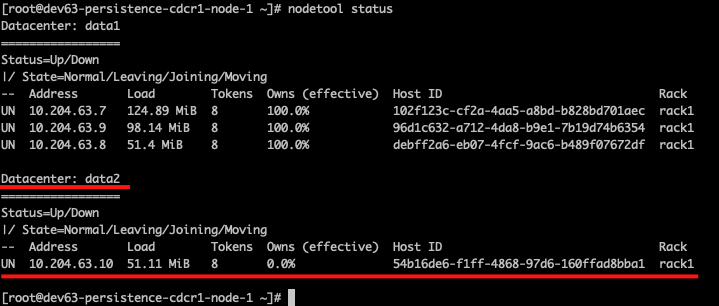
Check cluster:
First, run the nodetool status command to review the current cluster topology. The output shows:
-
Datacenter: data1 with three healthy nodes.
-
Datacenter: data2 with a single failed node (10.204.63.10) that needs to be removed.
To remove the failed node from the cluster, you first need to identify its Host ID, which is displayed in the nodetool status output. The Host ID will be used in the node removal command.
nodetool status
Remove node:
After identifying the Host ID of the failed node, remove it from the Cassandra cluster by running:
nodetool removenode HOSTID
Replace HOST_ID with the Host ID obtained from the nodetool status output.
Note: If the nodetool removenode command returns the following error:

this indicates that Cassandra still considers the node to be alive and reachable. As long as the node is online, nodetool removenode will not remove it from the cluster.
Instead, stop all VeridiumID services on 10.204.63.10 node in the Secondary Datacenter (data2) by running:
ver_stop
Wait until all services have stopped successfully, then run the nodetool removenode HOST_ID command again from a Cassandra node in the Primary Datacenter. Once the Secondary Datacenter nodes are offline, Cassandra will recognize the node as unavailable, allowing the removenode operation to complete successfully.
Run again “nodetool removenode" in the Primary Datacenter Persistence:

Verify the Cassandra Cluster
After the nodetool removenode command completes successfully, verify that the cluster is in the expected state.
Run the following commands:
nodetool status
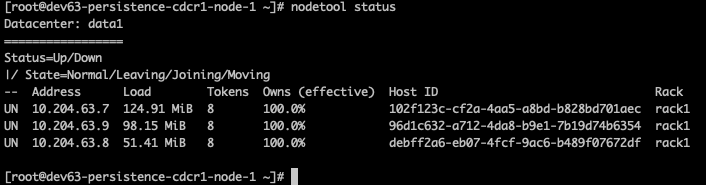
Verify that:
-
The removed node is no longer listed.
-
All remaining nodes are in the UN (Up/Normal) state.
-
The cluster topology matches the expected configuration.
Next, run:
nodetool describecluster
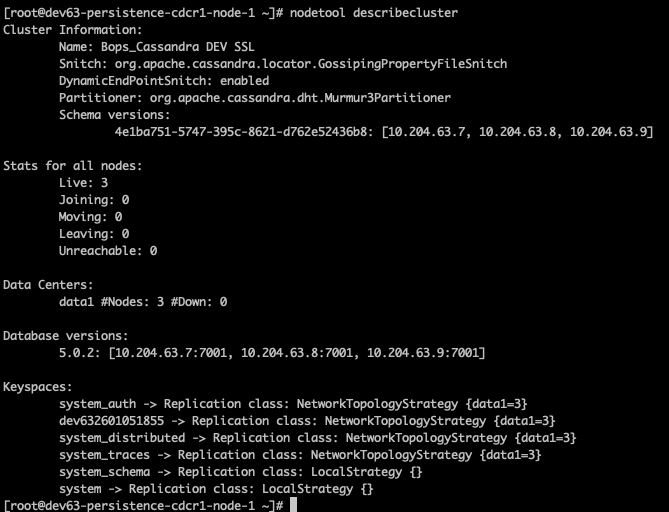
Verify that:
-
The cluster name is correct.
-
The datacenter topology is as expected.
-
The removed node is no longer part of the cluster.
-
There are no unexpected changes to the cluster configuration.
Restore ZooKeeper Configuration
ZOO_BKP=/opt/veridiumid/backup/zookeeper/beforeCDCRCreation
sudo bash /opt/veridiumid/migration/bin/migration.sh -u $ZOO_BKP
6. Remove Datacenter
In order to remove a datacenter from our setup, we need to know the Datacenter Name first.
Affected Servers (see the Overview → Secondary Datacenter) for the list of IPs
Determine the Secondary Datacenter Name
If you are unsure of the secondary datacenter name, run the following command on any node in the Secondary Datacenter:
sudo grep DATACENTER_TAG /etc/default/veridiumid/ver_migration | awk -F'=' '{print $2}'
Example:
our Datacenter name from Secondary Datacenter is “data2”.
6.1 Stop Services
Run the following commands on all nodes of the datacenter being removed, in our case all servers from Secondary Datacenter:
Important: Run the stop command sequentially across the servers, waiting approximately 1 minute between each server. This is especially important for the Persistence servers, as it allows Elasticsearch sufficient time to update the cluster state and elect new leader, follower, and observer nodes before the next server is stopped.
Stop the services
sudo bash /etc/veridiumid/scripts/veridium_services.sh stop
Disable services:
sudo bash /etc/veridiumid/scripts/veridium_services.sh disable
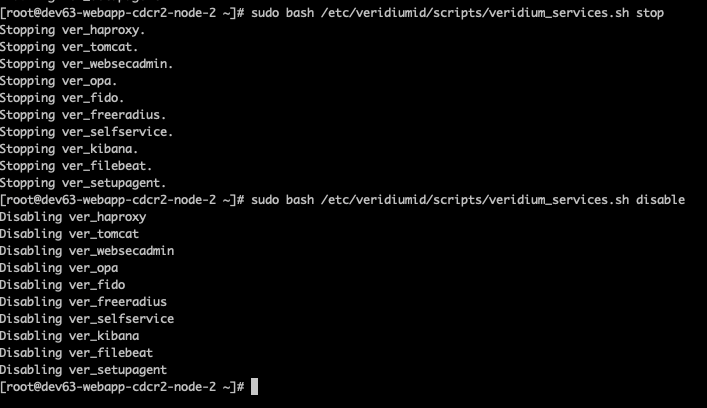
Example of services stopping and stopped:
The following output shows the expected state while services are stopping and after they have stopped successfully.
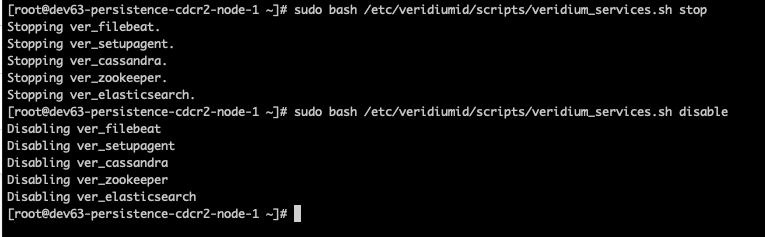
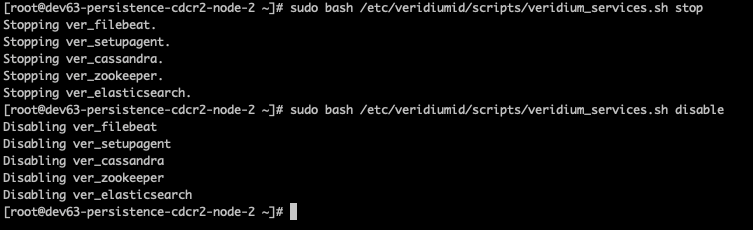
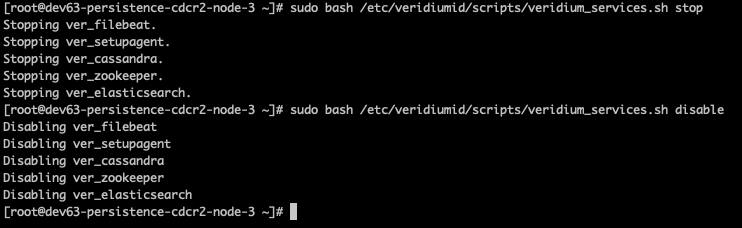
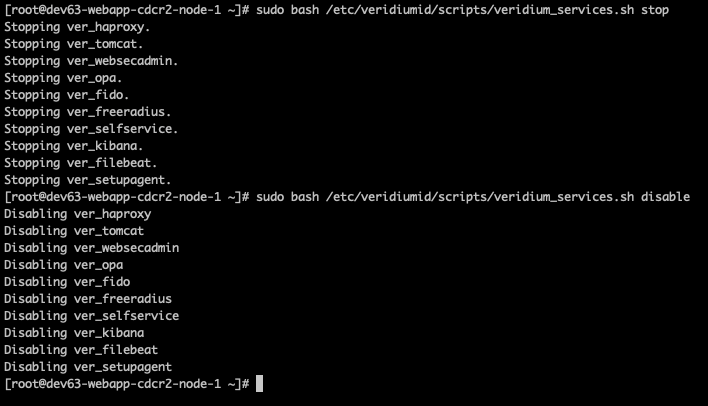
6.2 Remove Datacenter from Persistence Configuration
Run on all persistence nodes of the remaining Datacenters, in our example is Primary Datacenter.
|
dev63-persistence-cdcr1-node-1 |
VeridiumID Persistence |
10.204.63.7 |
|
dev63-persistence-cdcr1-node-2 |
VeridiumID Persistence |
10.204.63.8 |
|
dev63-persistence-cdcr1-node-3 |
VeridiumID Persistence |
10.204.63.9 |
Important: Run the following command one node at a time on the Persistence nodes in the Primary Datacenter only:
sudo bash /etc/veridiumid/scripts/remove_datacenter.sh -r DATACENTER_TO_BE_REMOVED
Note: In our case DATACENTER_TO_BE_REMOVED is “data2”.
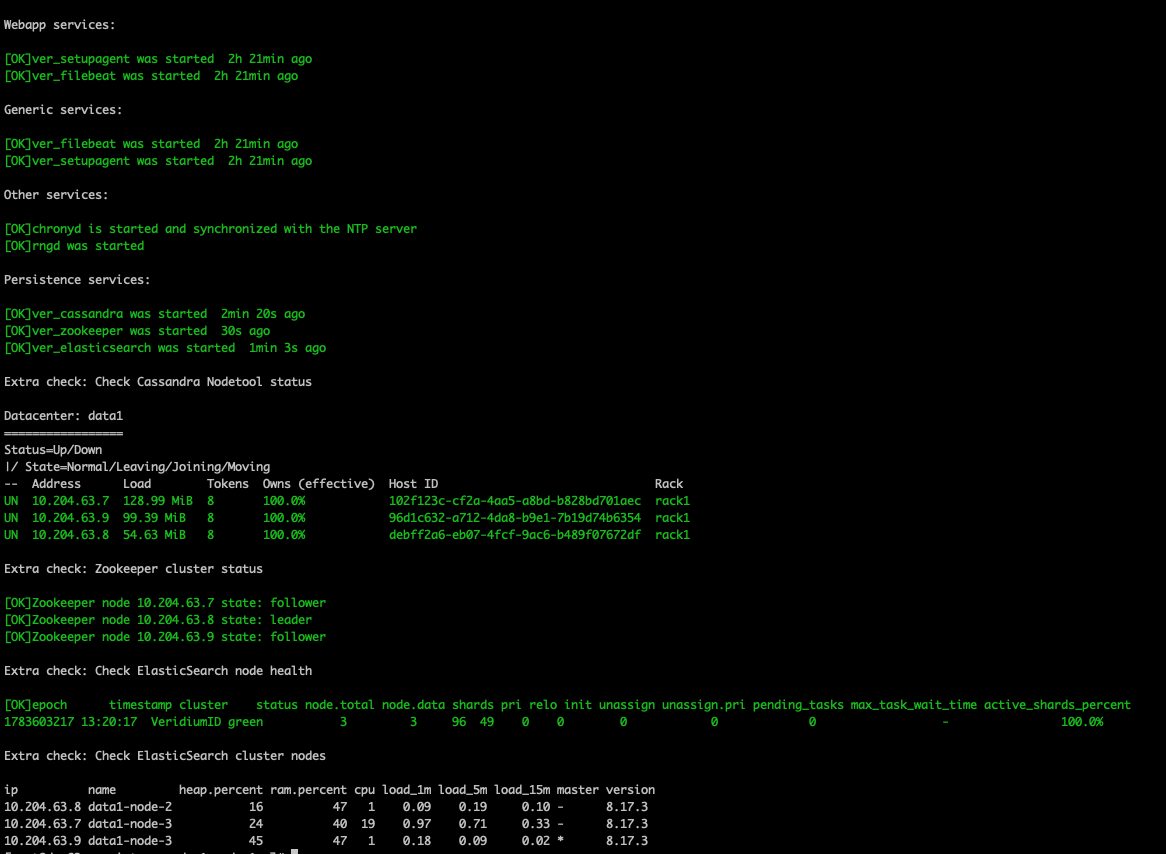
Example of the check_services command output after the Persistence Datacenter configuration:
6.3 Remove Datacenter from ZooKeeper Configuration
Run on one persistence node of the remaining Datacenters, in our example is Primary Datacenter.
sudo bash /etc/veridiumid/scripts/remove_datacenter.sh -z DATACENTER_TO_BE_REMOVED
Note: In our case DATACENTER_TO_BE_REMOVED is “data2”.
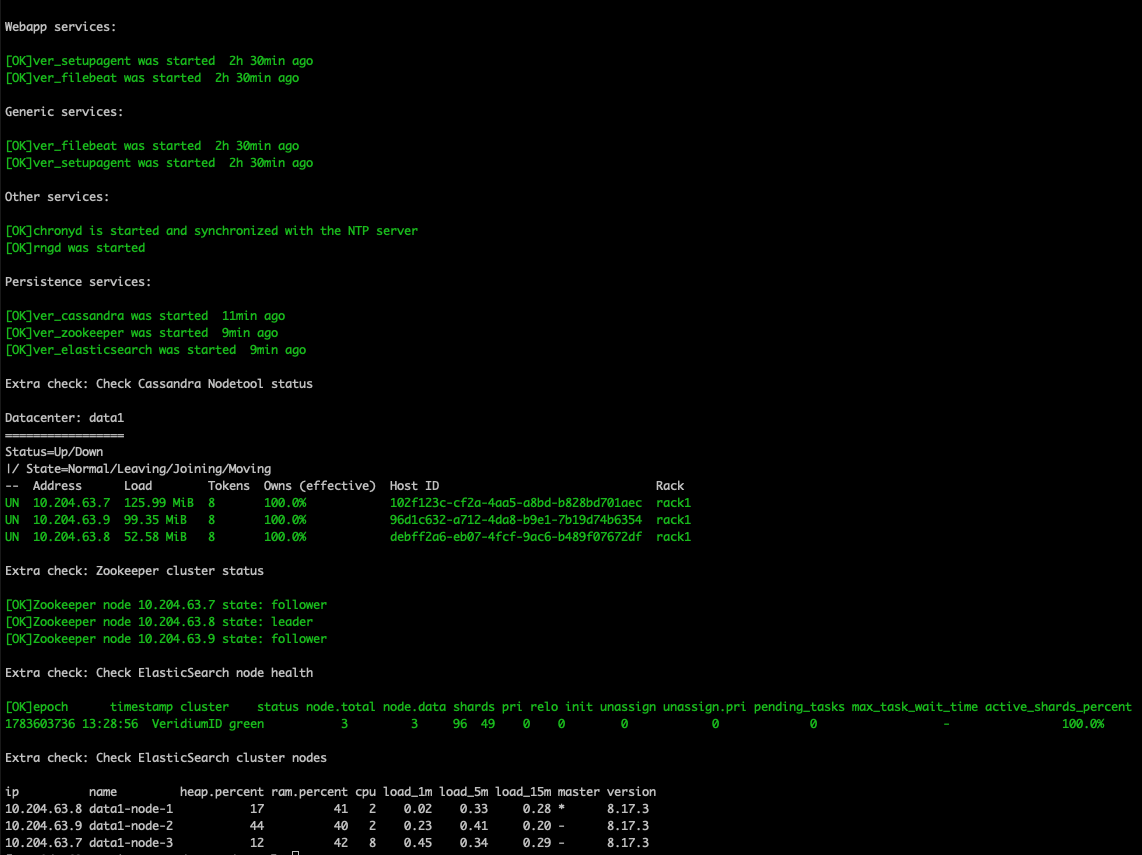
Example of the check_services command output after the Remove Datacenter from ZooKeeper Configuration:
Post-Removal Validation
bash /etc/veridiumid/scripts/check_services.sh
Verify all services are healthy and the removed datacenter no longer appears in cluster configuration.
Note: Errors appear as [ERR]