

This guide describes the process for migrating Veridium data from Cassandra to an Oracle Database.
The migration involves exporting data from Cassandra and importing it into Oracle using Veridium migration tools.
1. Security and Encryption
Data in Transit
Oracle Native Network Encryption can be enabled using the following configuration.
Oracle Server Configuration
SQLNET.ENCRYPTION_SERVER = REQUIRED
SQLNET.ENCRYPTION_TYPES_SERVER = (AES256)
Oracle Client Configuration
SQLNET.ENCRYPTION_CLIENT = REQUIRED
SQLNET.ENCRYPTION_TYPES_CLIENT = (AES256)
Encryption verification instructions are provided at the end of this document.
Data at Rest
Data at rest protection can be enabled using Veridium Data Protection.
Supported options:
-
Internal Veridium encryption (JCEKS)
-
Hardware Security Module (HSM)
Documentation:
https://docs.veridiumid.com/docs/v3.8/configuring-data-protection
2. Migration Overview
The migration consists of two phases.
Phase 1 — Preparation (No Downtime)
Performed by the client DBA team before the migration window.
Tasks:
-
Create Oracle schema
-
Create Veridium database user
-
Ensure network connectivity from Webapp servers to Oracle
-
Validate JDBC connection
Phase 2 — Migration (Downtime Required)
Expected downtime: ~1 hour 30 minutes
Migration steps:
-
Stop Veridium services (~5 minutes)
-
Export data from Cassandra (~1 hour)
-
Import data into Oracle
-
Start Veridium services (~5 minutes)
-
Run functional tests
Rollback Scenario
If issues occur:
-
Stop Veridium services
-
Reconfigure persistence back to Cassandra
-
Start services
-
Restore Elasticsearch data
Estimated rollback downtime: ~15 minutes
3. Oracle Database Preparation
This section must be executed by the DBA team.
3.1 Create Tablespace
Example:
CREATE TABLESPACE veridium_ts
DATAFILE 'veridium_ts01.dbf'
SIZE 1024M
AUTOEXTEND ON NEXT 512M
MAXSIZE UNLIMITED;
If UNLIMITED is not allowed, configure a limit such as 50GB.
3.2 Create User
CREATE USER veridium
IDENTIFIED BY <user-pwd>
DEFAULT TABLESPACE veridium_ts
QUOTA UNLIMITED ON veridium_ts;
Ensure quota is enabled:
ALTER USER veridium QUOTA UNLIMITED ON veridium_ts;
3.3 Grant Required Privileges
GRANT CREATE SESSION TO veridium;
GRANT CREATE TABLE TO veridium;
GRANT CREATE VIEW TO veridium;
GRANT CREATE SEQUENCE TO veridium;
GRANT CREATE PROCEDURE TO veridium;
GRANT CREATE TRIGGER TO veridium;
GRANT CREATE SYNONYM TO veridium;
GRANT CREATE TYPE TO veridium;
3.4 Configure Password Policy
The Veridium user must not have password expiration enabled.
Example configuration:
CREATE PROFILE VERIDIUM_PROFILE LIMIT PASSWORD_LIFE_TIME UNLIMITED;
ALTER USER veridium PROFILE VERIDIUM_PROFILE;
3.5 DBA Recommendations
The DBA team should also:
-
Configure daily statistics collection jobs
-
Monitor tablespace growth
4. Configure JDBC Connection
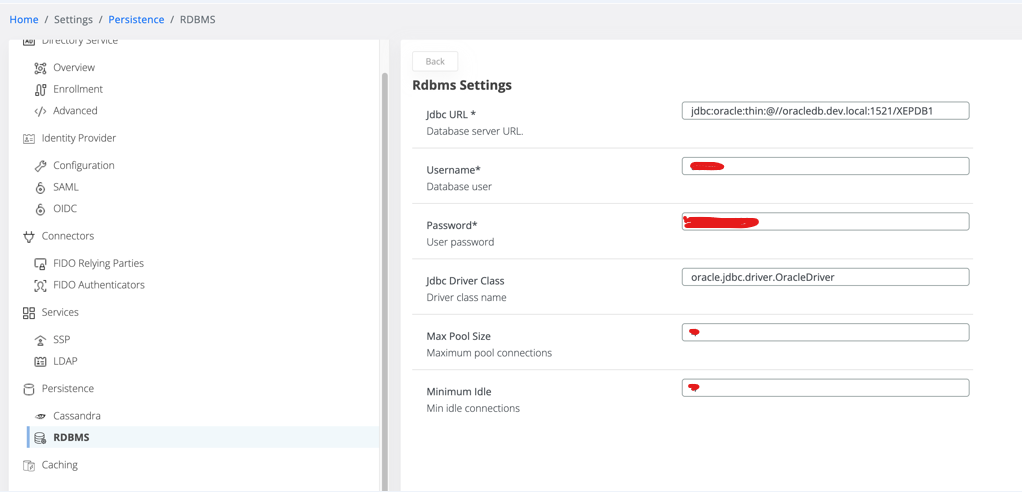
Open Websecadmin
Navigate to:
Settings → Persistence → RDBMS
Save the JDBC configuration.
Example configuration stored in config.json (Zookeeper):
"jdbc": {
    "jdbcUrl": "jdbc:oracle:thin:@//oracledb.dev.local:1521/XEPDB1",
    "jdbcDriverClass": "oracle.jdbc.driver.OracleDriver",
    "username": "USERNAME",
    "password": "PASSWORD"
}
UI Configuration Screenshot
Enable JDBC Encryption
Open Advanced Settings → config.json
Add the following properties under jdbc.additionalProperties:
"additionalProperties": {
  "oracle.net.encryption_client": "REQUIRED",
  "oracle.net.encryption_types_client": "(AES256)",
  "oracle.net.crypto_checksum_client": "REQUIRED",
  "oracle.net.crypto_checksum_types_client": "(SHA256)"
}
5. Create Oracle Schema Objects
Run the schema update tool:
bash /opt/veridiumid/migration/bin/rdbms_ops.sh --schema-update
This creates:
-
tables
-
indexes
-
sequences
-
triggers
required by Veridium.
6. Stop Veridium Services
Execute on all webapp nodes as root:
service ver_tomcat stop
service ver_websecadmin stop
service ver_fido stop
service ver_selfservice stop
7. Generate Cassandra Data Summary
Run on the persistence node.
This step records the number of records in Cassandra so it can be compared after migration.
bash /opt/veridiumid/migration/bin/rdbms_ops.sh --summary-cassandra
Save the output report.
8. Export Data from Cassandra
Run on the webapp node.
bash /opt/veridiumid/migration/bin/rdbms_ops.sh \
--cassandra-export \
--dir=<PATH_TO_DIRECTORY>
Example:
bash /opt/veridiumid/migration/bin/rdbms_ops.sh \
--cassandra-export \
--dir=/home/veridiumid/tmp_cass
9. Import Data into Oracle
Run on the webapp node:
bash /opt/veridiumid/migration/bin/rdbms_ops.sh \
--rdbms-import \
--dir=<PATH_TO_DIRECTORY>
Example:
bash /opt/veridiumid/migration/bin/rdbms_ops.sh \
--rdbms-import \
--dir=/home/veridiumid/tmp_cass
10. Collect Oracle Statistics
This step must be executed by the DBA.
BEGIN
  DBMS_STATS.GATHER_SCHEMA_STATS(
    ownname          => 'veridium',
    estimate_percent => DBMS_STATS.AUTO_SAMPLE_SIZE,
    cascade          => TRUE,
    degree           => DBMS_STATS.AUTO_DEGREE
  );
END;
11. Validate Imported Data
Run the following query to compare row counts with the Cassandra summary report.
SELECT table_name, num_rows
FROM all_tables
WHERE owner = 'VERIDIUM'
ORDER BY table_name ASC;
12. Switch Application Profile to Oracle
Run on all webapp nodes:
bash /opt/veridiumid/migration/bin/rdbms_ops.sh --change-profile-rdbms
13. Start Veridium Services
Execute as root:
service ver_tomcat start
service ver_websecadmin start
service ver_fido start
service ver_selfservice start
14. Post-Migration Monitoring
Recommended actions:
-
Monitor system performance
-
Generate Oracle AWR reports on the second day
-
Observe performance during the first week of operation
15. Rollback Procedure
⚠ Rollback will discard data written to Oracle after migration.
Stop Services
service ver_tomcat stop
service ver_websecadmin stop
service ver_fido stop
service ver_selfservice stop
Switch Persistence Back to Cassandra
bash /opt/veridiumid/migration/bin/rdbms_ops.sh --change-profile-cassandra
Export Data from Oracle
bash /opt/veridiumid/migration/bin/rdbms_ops.sh \
--rdbms-export \
--dir=<PATH_TO_DIRECTORY>
Example:
bash /opt/veridiumid/migration/bin/rdbms_ops.sh \
--rdbms-export \
--dir=/home/veridiumid/tmp_rdbms
Import Data Back into Cassandra
bash /opt/veridiumid/migration/bin/rdbms_ops.sh \
--cassandra-import \
--dir=<PATH_TO_DIRECTORY>
Example:
bash /opt/veridiumid/migration/bin/rdbms_ops.sh \
--cassandra-import \
--dir=/home/veridiumid/tmp_rdbms
Start Services
service ver_tomcat start
service ver_websecadmin start
service ver_fido start
service ver_selfservice start
Restore Elasticsearch Data
Delete the affected indices:
eops -x=DELETE -p=/veridium.accounts-000001
eops -x=DELETE -p=/veridium.profiles-000001
eops -x=DELETE -p=/veridium.fido_devices-000001
eops -x=DELETE -p=/veridium.devices-000001
Rebuild Elasticsearch data:
/opt/veridiumid/migration/bin/elk_ops.sh --update-settings

/opt/veridiumid/migration/bin/migrate_to_elk.sh -a
/opt/veridiumid/migration/bin/migrate_to_elk.sh -d
/opt/veridiumid/migration/bin/migrate_to_elk.sh -p
/opt/veridiumid/migration/bin/migrate_to_elk.sh -f
16. Verify Encryption
Run an Oracle query to inspect active connections.
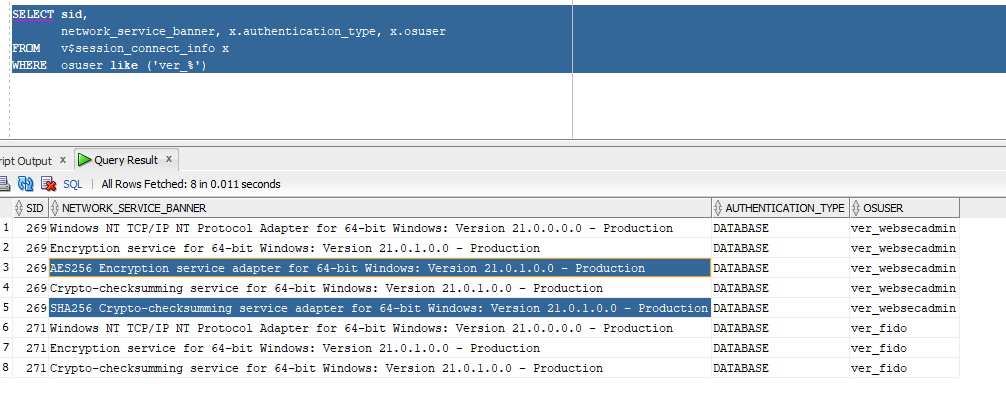
Expected encryption services:
AES256 Encryption service adapter
SHA256 Crypto-checksumming service adapter