Standard Enrolment
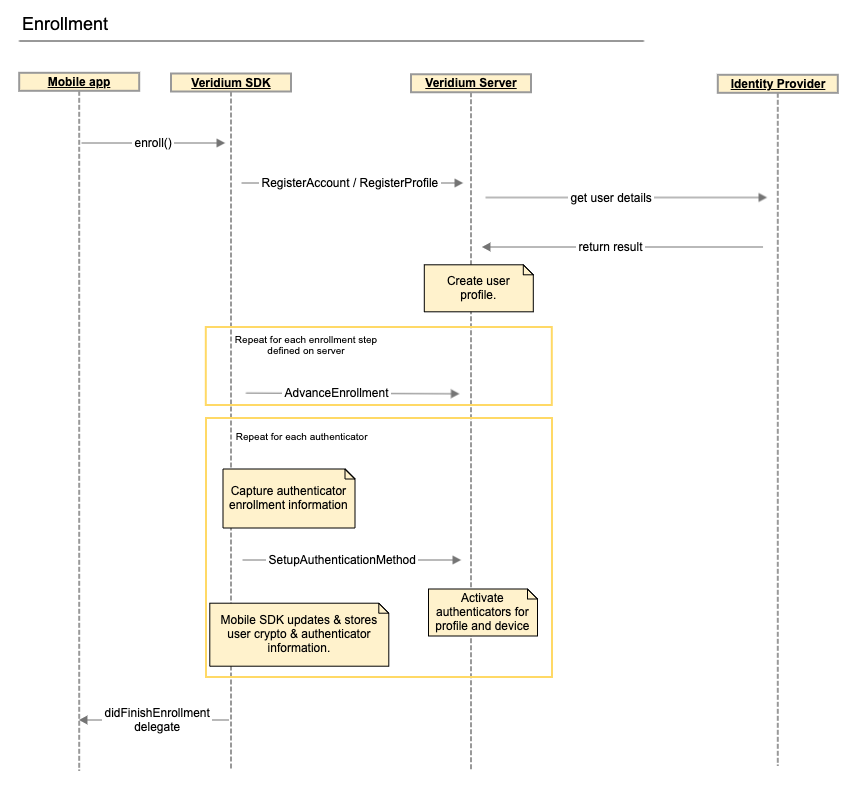
The first step in using VeridiumID for authentication from a user's perspective is to enroll his profile (identity from the target 3rd party system) and authenticator data. The flow diagram is shown below.
Process Flow
The Mobile Client drives this process because the client owns and manages the user's information (both authenticator data and digital identity). The simplest way to enrol a user is to use the SDK's enroll() method. This way the Mobile Client, through the Veridium Mobile SDK, first pairs with a VeridiumID server by scanning an Enrolment QR code (either the static one from Admin Dashboard or a user customized one distributed by email), then issues a registration request to this VeridiumID server through a direct HTTPS channel. The registration request is composed entirely by the SDK by gathering all necessary information about the device, user, user's digital identity in the 3rd party system, and cryptographic information used in subsequent authentication flows through direct user interaction or background processes.
For iOS, you need to pass a enrollment configuration object.
class EnrollmentHandler: NSObject {

    ...

    func onEnroll()
    {
        VIDMobileSDK.shared().enrollDelegate = self
        let config = VIDEnrollmentConfig()
        VIDMobileSDK.shared().enroll(config: config)
    }
}

extension EnrollmentHandler : VIDEnrollDelegate {
    //MARK VIDEnrollDelegate delegate methods
    public func didFinishEnrollment(response: VIDEnrollResponse) {
    }

    public func didCancelEnrollment() {
    }

    public func didFailEnrollment(error: VIDError) {
    }

}
For android, a simple call for “new VeridiumIdRegisterRequest.Builder().build()” will gather up all necessary biometric information which the server will need. The resulting VeridiumIdRegisterRequest will be passed as parameter to the enroll() method.
public class EnrollmentHandler extends Activity {

    public void enroll(){
        VeridiumIdRegisterRequest registerRequest = new VeridiumIdRegisterRequest.Builder().build();
        VeridiumMobileSDK.getInstance().enroll(registerRequest).launchPendingIntent(this, RC_ENROLL);
    }

    @Override
    protected void onActivityResult(int requestCode, int resultCode, @Nullable Intent data)
    {
        if (requestCode == RC_ENROLL && resultCode == RESULT_OK) {
            VeridiumIdErrorResponse errorResponse = data.getParcelableExtra(VeridiumMobileSDK.VERIDIUMID_KEY_ERROR_EXTRA);
            if(errorResponse != null) {
                // Enrollment failed
            }else{
                // Enrollment successful
            }
        }
    }
}
NOTE
For any additional profiles enrolled just call the enroll method again.
If the user is already known by the app, or it is desired for a custom enrolment process of user data, the registration form provided by the Mobile SDK can be bypassed by filling in the userEnrollmentToken field in the enroll() method. The parameter is expected to be a stringified json with keys expected by the enrolment steps setup in the Integration section in Admin Dashboard.
If there is a well known Veridium server that the app always pairs with, the Enrolment QR scanning process can be bypassed by supplying the serverPairingBase64Token parameter in the enroll() method. The value should be equal to the content of the Enrolment QR.
Setup Enrolment Steps
The Admin Dashboard offers an easy way of customising the enrolment experience by combining a set of predefined enrolment steps.

Steps | Description |
|---|---|
AD Enrolment | By setting up an LDAP connection from Admin Dashboad → Configuration → Services → LDAP and choosing this enrolment step will validate user credentials by querying a Directory service through LDAP protocol. |
Username Form Enrolment | Simple sample for enrolling a user by asking for the username or email address. This only validates the email formatting. Best used together with the Code Validation secondary step. |
JWT Enrolment | This is a generic mechanism that can be used whenever the user was already validated in a previous step. If the user is already known (was validated on the mobile app through credentials, was just enrolled in the system through a self-service) biometric information can be attached to that identity. This identity can be sent to the VeridiumID server through a JWT message signed with a predefined public-private key pair properly setup on the integration server and the VeridiumID server. See Enrolment with JWT for details. |
Proxy Enrolment | Deprecated |
Code Validation | This is a step that challenges the user to enter a validation code received as SMS or email. E.g. if the first enrolment step was AD, the user's email is automatically extracted from the AD Identity Provider and a validation code is sent. The same happens if the phone number is available. |
Code Validation Channel | Used together with the 'Code Validation' step to specify what are the channels to use for sending the validation code to the user. |
Admin Validation | A system administrator authorizes the enrollment of users. |

