
This article provides the step by step configuration of SPNEGO SAML authentication flow. The process consists of the following steps:
-
Create the Kerberos keytab file
-
Configure SPNEGO in Veridium Manager
-
Enable SPNEGO on end-users devices.
Create Kerberos keytab file
-
Connect to the Windows Domain controller and create a Kerberos service account (new user account) in the Active directory.
Please use “Active Directory Users and Computers” and create the new user under de.local Users
The service account does not require any other group except for the default one.
The service account requires to have a non expiring password set.
2. Identify the service principal name that should be used in the keytab. Kerberos uses DNS for this, so a dns query would provide the answer:
nslookup <<identity provider domain>> // e.g. shib.dev1.veridium-dev.com or develop.veridium-dev.com
3. Create a Kerberos keytab file
-
If the service was already used in a different service, the previous SPN should be cleared. Run the following commands to verify and delete any mapped SPN.
setspn -L *serviceaccount* # provides back the current registered SPN
setspn -D <<spn retrieved from previous command>> *serviceaccount*
-
Open a PowerShell console as Administrator, run it on folder (e.g: Desktop) and create the keytab file by adapting this command.
ktpass /out veridium.keytab /princ HTTP/**veridiumservername.domain.com**@DOMAIN.LOCAL `
       /pass passwordforkeytab `
       /mapuser *serviceaccount*@DOMAIN.LOCAL /ptype KRB5_NT_PRINCIPAL +DumpSalt /crypto *crypto_options*
**veridiumservername.domain.com** - should be the DNS name of the server hosting the Shibboleth server (for example: shib-poc.veridium-dev.com). Attention! for AWS hosted servers, the veridiumservername.domain.com must be the dns name of the nlb.
-
DOMAIN.LOCAL - MUST be in upper case and should reflect your Active Directory domain name (for example: DEV.LOCAL)
-
passwordforkeytab - This is required to complete the command but is not needed for configuration in Shibboleth. This needs to match the password of user from AD
-
*serviceaccount*@DOMAIN.LOCAL - This is the user account created in the previous step in domain\username format (for example: spnego@DEV.LOCAL)
-
*crypto_options* - configure what cryptography algorithms to be used when validating the tokens on the SP side. common values are All , AES256-SHA1.
-
e.g:
-
ktpass /out veridium.keytab /princ HTTP/shib-aerolocal.veridium-dev.com@AERO.LOCAL /pass passwordforkeytab /mapuser aero\spnego /ptype KRB5_NT_PRINCIPAL
for further information use this link
-
-
After running the command,
-
recover from PS the FULL “/princ” parameter value (e.g.: HTTP/shib-aerolocal.veridium-dev.com@DOMAIN.LOCAL )
-
a file named veridium.keytab will be created in the current directory (e.g.Desktop) of the PowerShell console and copy the file to clipboard. It will be later uploaded on Admin Dashboard
-
-
Repeat this process for any additional AD forests that you have
More information about ktpass may be found here https://learn.microsoft.com/en-us/windows-server/administration/windows-commands/ktpass.
Here is an example used to create an AES256-SHA1 only keytab for dev1 environment
ktpass /out dev1.keytab /princ HTTP/dev1-public-nlb-5c8ef4d6cb4ccdff.elb.eu-central-1.amazonaws.com@DEV.LOCAL /pass Testing123# /mapuser spnego@DEV.LOCAL /ptype KRB5_NT_PRINCIPAL /crypto AES256-SHA1
Configure SPNEGO in Veridium Manager
-
Navigate to Settings / Connectors / SAML / SPNEGO
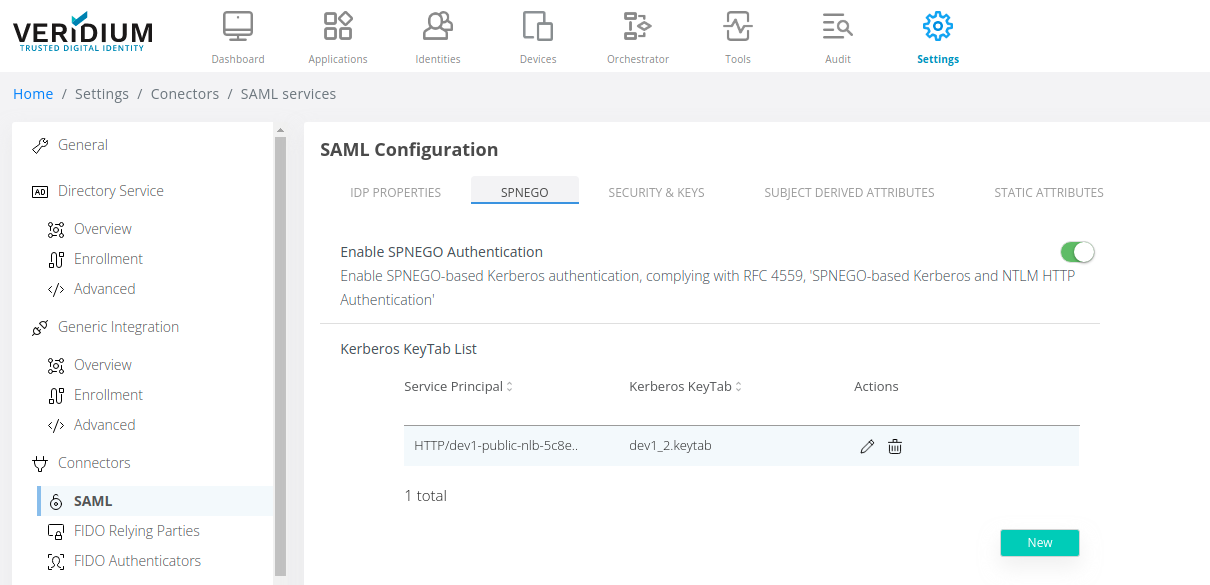
2. Enable SPNEGO authentication and click on New
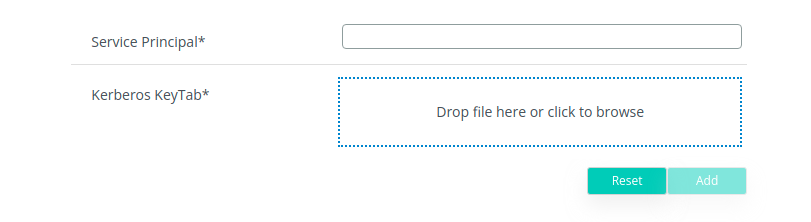
3. Upload the generated keytab and edit the Service Principal used to create it (the full HTTP/**veridiumservername.domain.com**@DOMAIN.LOCAL) and click on Add
4. Click on Save in the right side of the screen:

5. Navigate to Applications and select the SAML application for which SPNEGO will be used.
6. Click on the Edit button on the right side of the application name

7. Change the Authentication Flow to SPNEGO, Veridium Journey and click on Save:

Enable SPNEGO on end-users devices
SPNEGO relies on the HTTP Negociate authentication scheme (WWW-Authenticate: Negociate) and requires that the browsers are aware of this configuration.
This may be enabled for most devices that are aware of Kerberos authentication like Windows, Linux, Mac OS, ChromeOS, iOS or Android devices.
Windows
If the machine is domain joined, it automatically receives a kerberos token during the login session. It is also possible to obtain a kerberos token for a machine outside of domain as long as it has connection to the KDC. Use klist get upn
Use klist for validate and obtain new kerberos tickets: https://learn.microsoft.com/en-us/windows-server/administration/windows-commands/klist
Internet Explorer
To be able to use SPNEGO connect to a Windows node that is connected to the domain used.
-
Configuration for Internet Explorer and Microsoft Edge:
-
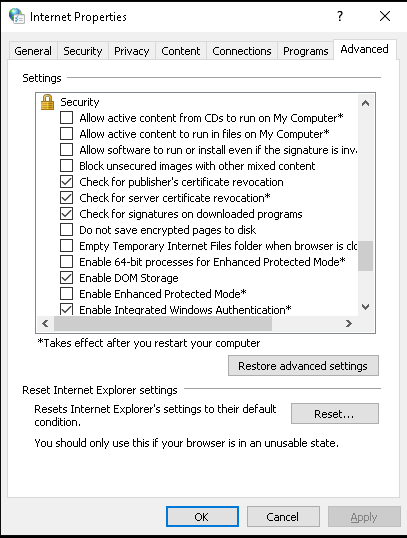
Open Internet options and navigate to Security → Local Intranet
-
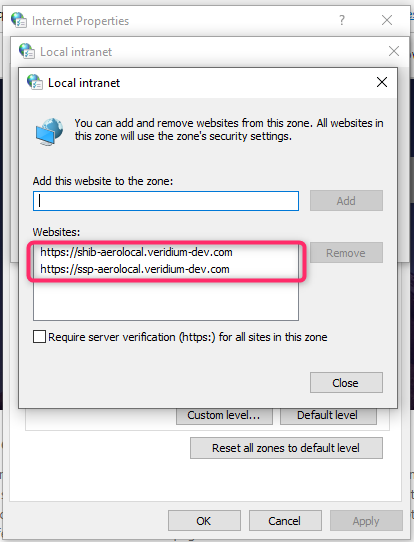
Click on Sites then Advanced and add the Shibboleth URL
-
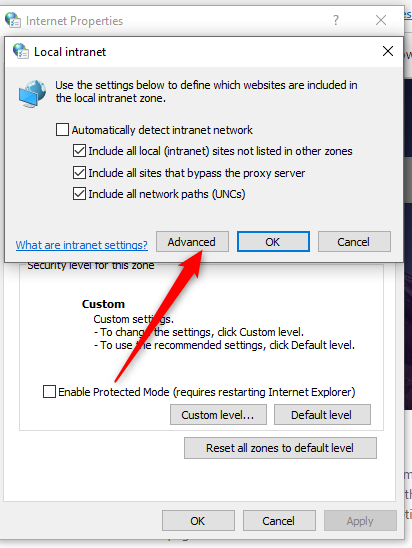
Click on Custom Level button and make sure to have Automatic logon only in Intranet zone enabled under User Authentication → Logon
-
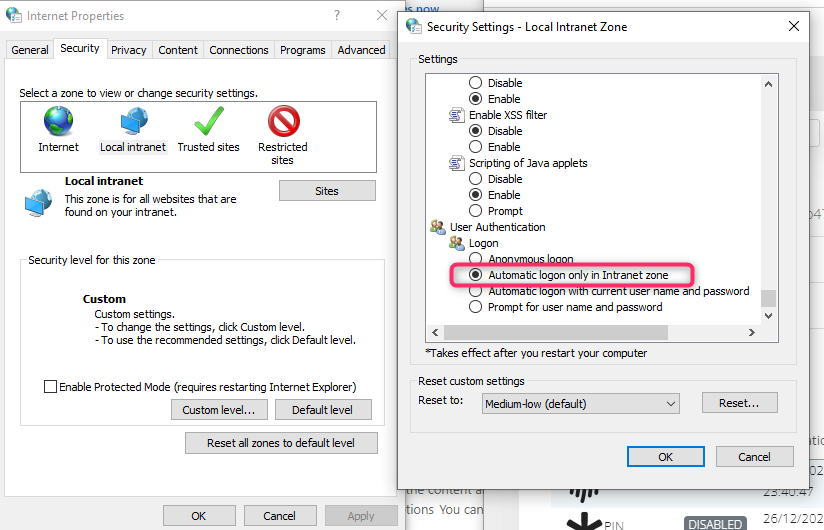
Navigate to Advanced and activate Enable Integrated Windows Authentication under Security
-
-
Save the configuration
-
Google Chrome or Microsoft Edge
Local testing configuration
-
Right click on the Chrome shortcut and select properties
-
Under target add the following at the end of the line:
-
--auth-server-whitelist="SHIB_URL" --auth-negotiate-delegate-whitelist="SHIB_URL"
-
Where SHIB_URL is Shibboleth’s FQDN
-
Update below command for example:
Example 1: "C:\Program Files\Google\Chrome\Application\chrome.exe" --auth-server-whitelist="shib.develop.veridium-dev.com" --auth-negotiate-delegate-whitelist="shib.develop.veridium-dev.com" -
Save the configuration
-
Global configuration
-
Open regedit and navigate to
-
for Google Chrome Computer\HKEY_LOCAL_MACHINE\SOFTWARE\Policies\Google\Chrome
-
for Microsoft Edge Computer\HKEY_LOCAL_MACHINE\SOFTWARE\Policies\Microsoft\Edge
2. Create the following keys:
-
AuthNegotiateDelegateAllowlist(https://chromeenterprise.google/policies/#AuthNegotiateDelegateAllowlist ), type String, value FQDN of the IDP (e.g. develop.veridium-dev.com)
-
AuthServerAllowlist (https://chromeenterprise.google/policies/#AuthServerAllowlist ), type String, value FQDN of the IDP (e.g. develop.veridium-dev.com)
-
AmbientAuthenticationInPrivateModesEnabled (optional) (https://chromeenterprise.google/policies/?policy=AmbientAuthenticationInPrivateModesEnabled ), type integer, value 3 (enables Kerberos SSO for all browser instances, nomal, guest or incognito).
3. Restart the browser or reload policies from chrome://policy.
If ADFS is used as an IDP, you must run (from a PowerShell window)
Set-ADFSProperties -WIASupportedUserAgents (((Get-ADFSProperties).WIASupportedUserAgents)+'Mozilla/5.0')
on the ADFS server to allow the proper UserAgents for Windows Integrated Authentication and enable Windows Authentication under Authentication Methods in Intranet section in ADFS administration console:

Mozilla Firefox
-
Open Mozilla Firefox and access about:config
-
Search for and modify the entry named network.negotiate-auth.trusted-uris by entering the FQDN of the IDP.
Mac OS
If the machine is domain joined, it automatically receives a kerberos token during the login session. It is also possible to obtain a kerberos token for a machine outside of domain as long as it has connection to the KDC.
You can use kinit to obtain the krbtgt ticket for a domain user and klist -a to verify if the ticket was received properly. To clear a token use kdestroy command.
kinit -r 12h -f -p -l 12h user@DOMAIN.LOCAL
Google Chrome
Run the following commands to setup the allowed server lists to grant access to kerberos tickets
defaults write com.google.Chrome AuthServerAllowlist "shib.dev1.veridium-dev.com,*.veridium-dev.com"
defaults write com.google.Chrome AuthNegotiateDelegateAllowlist "shib.dev1.veridium-dev.com,*.veridium-dev.com"
Restart chrome or reload policies from chrome://policy.
Mozilla Firefox
-
Open Mozilla Firefox and access about:config
-
Search for and modify the entry named network.negotiate-auth.trusted-uris by entering the name of the IDP.