
1. Configure Access to the nodes
To access the VeridiumID application the internal and external FQDNs will need to be configured either in the clients DNS or directly into the hosts file on the local machine.
List of FQDNs:
# In case of SNI deployment
# Internal FQDNs
Admin Dashboard : admin-intFQDN
Self Service Portal: ssp-intFQDN
Websec API: intFQDN
Shibboleth Internal (Identity Provider): shib-intFQDN
# External FQDNs
Shibboleth External (Identity Provider): shib-extFQDN
Self Service Portal: ssp-extFQDN
DMZ Websec API: dmz-extFQDN
Websec API: extFQDN
# In case of Ports deployment
intFQDN: 9444, 9987, 443, 8945
extFQDN: 9987, 443, 8944, 8544
# Where intFQDN and extFQDN are the FQDNs provided during the installation.
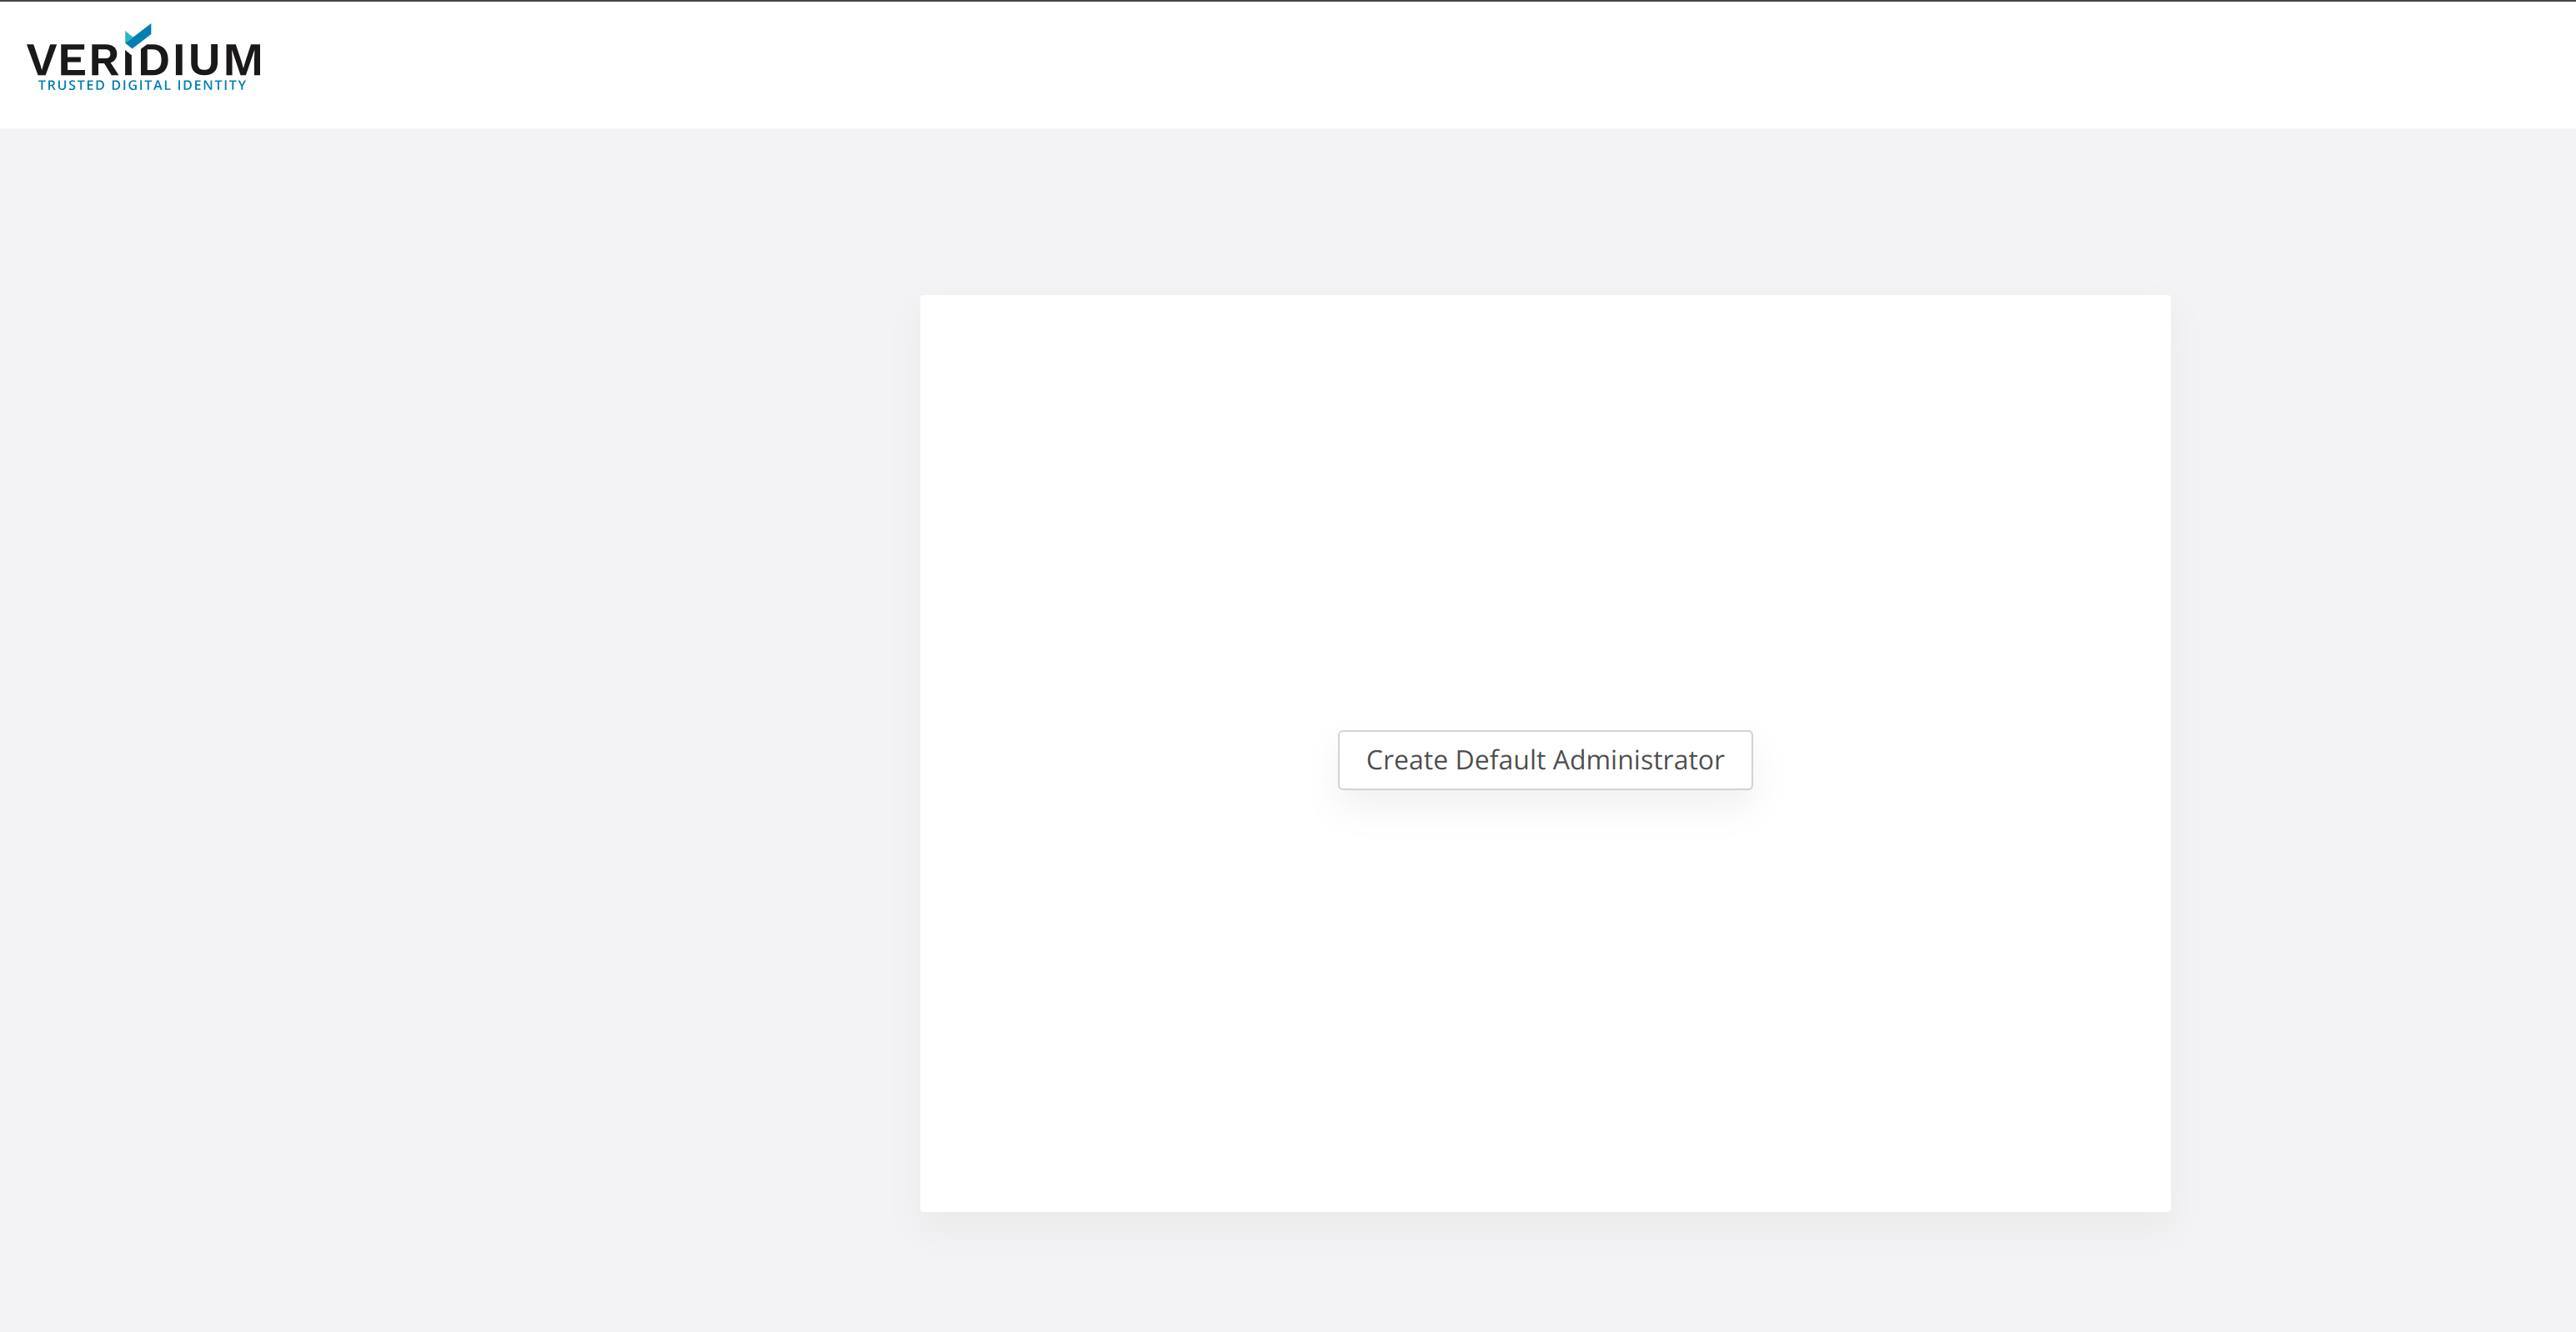
2. Access the Admin Dashboard and generate the default admin certificate
After configuring access to the Admin Dashboard’s FQDN connect to it using the following URL:
-
in case of SNI deployment: https://admin-intFQDN/veridium-manager
-
in case of ports deployment: https://intFQDN:9444/veridium-manager
After accessing the Admin Dashboard click on Create Default Administrator:
Then complete the form and click on Save to download the Admin certificate:
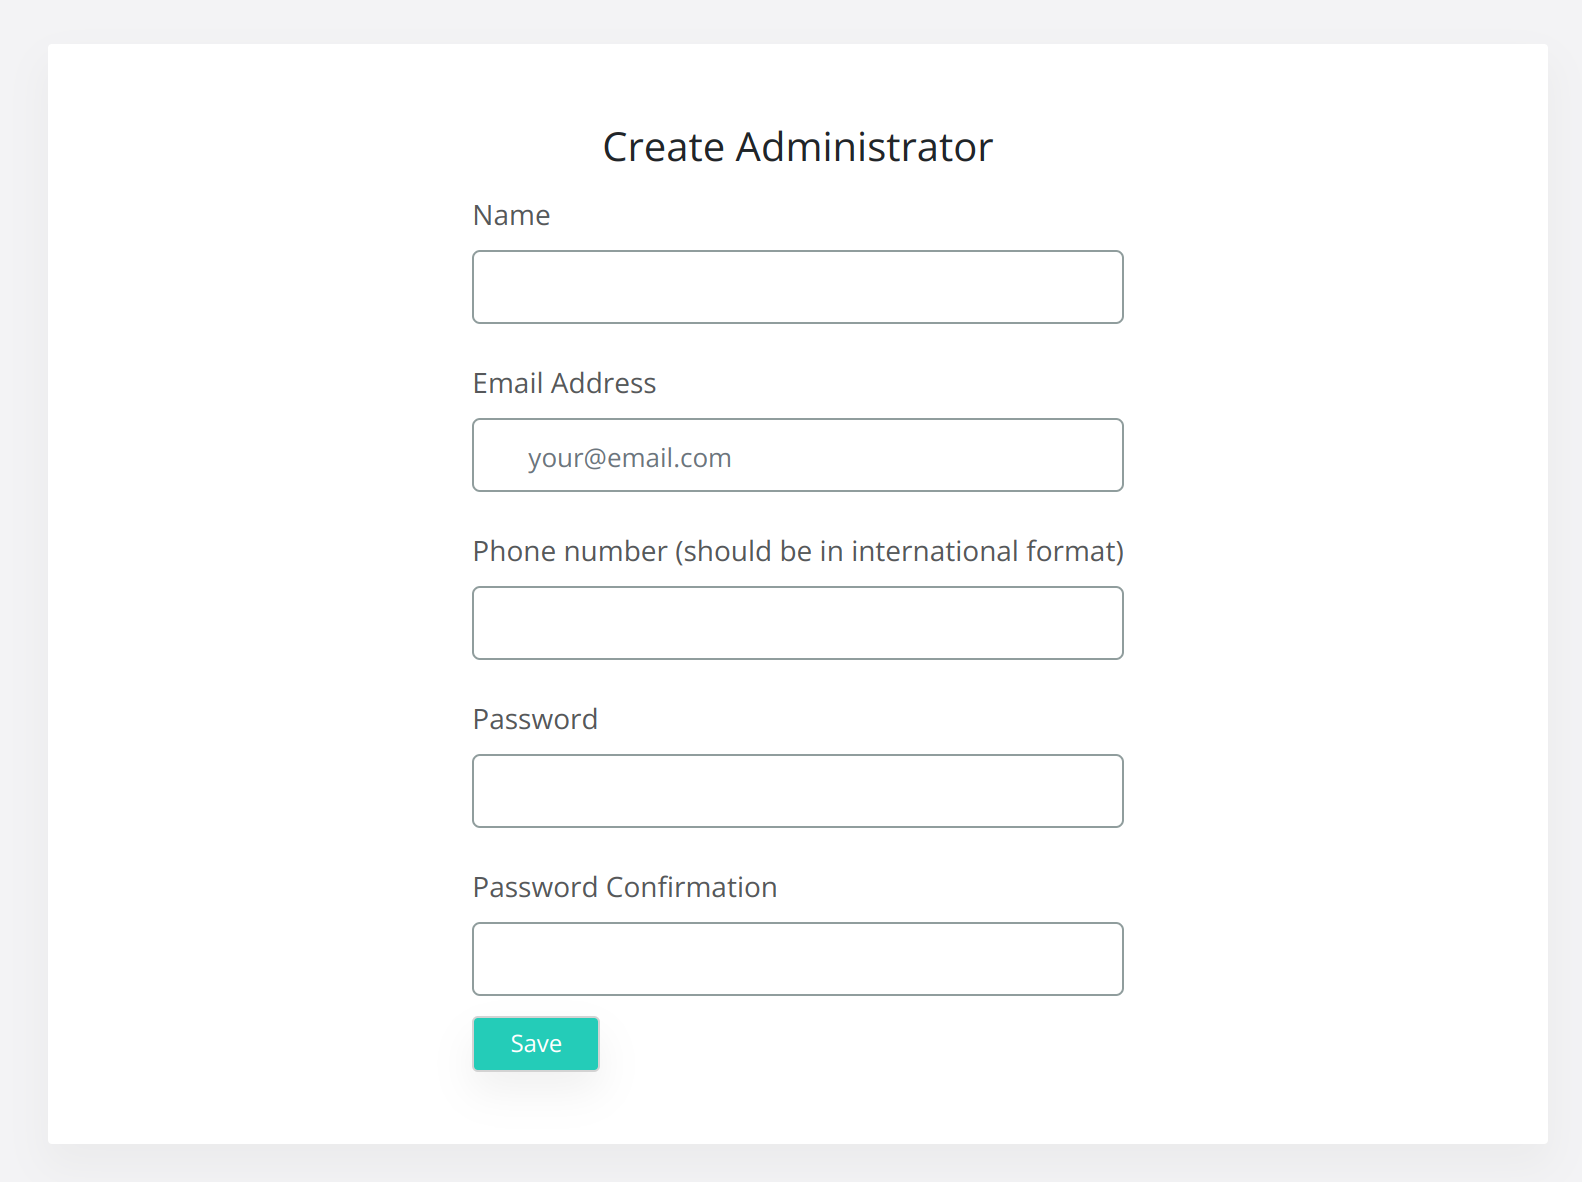
After downloading the certificate add it to your local machine’s keystore or to the browser’s keystore and access the Dashboard in a new browser session, or an incognito window.
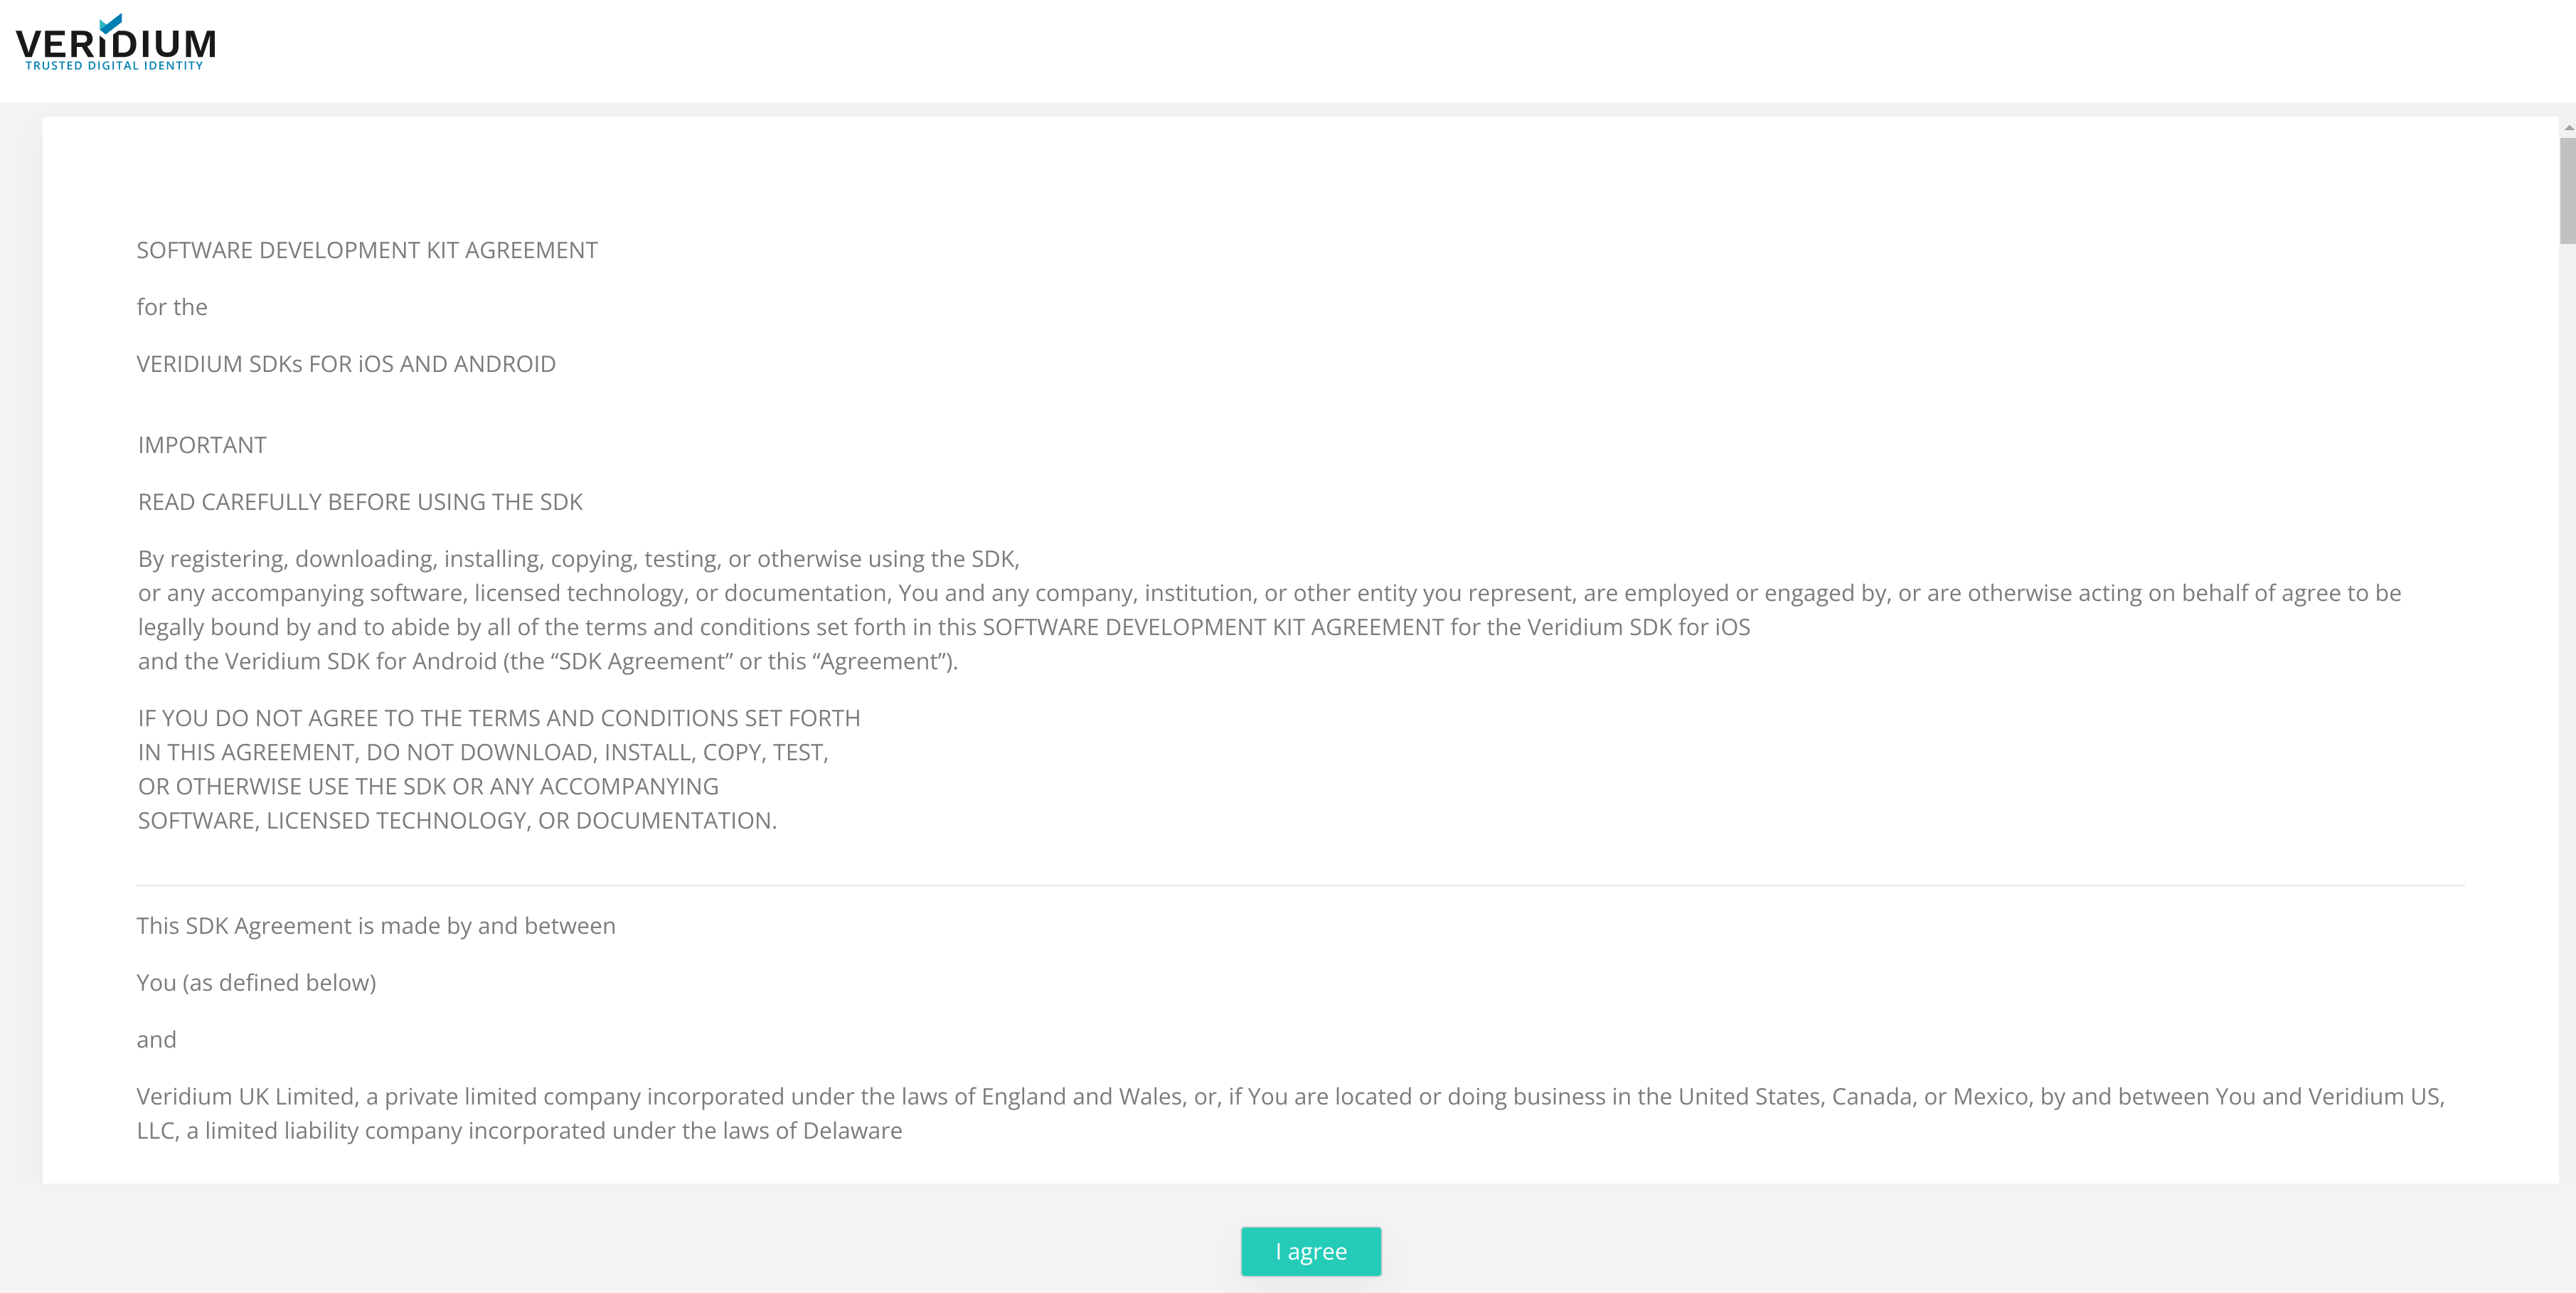
During the new access provide the certificate to access the Dashboard and accept the license:
3. Configure Services
For VeridiumID to work the following services will need to be configured:
-
LDAP connection
-
Email server connection (*Optional)
-
Twilio/SMS Gateway connection (*Optional)
-
License configuration
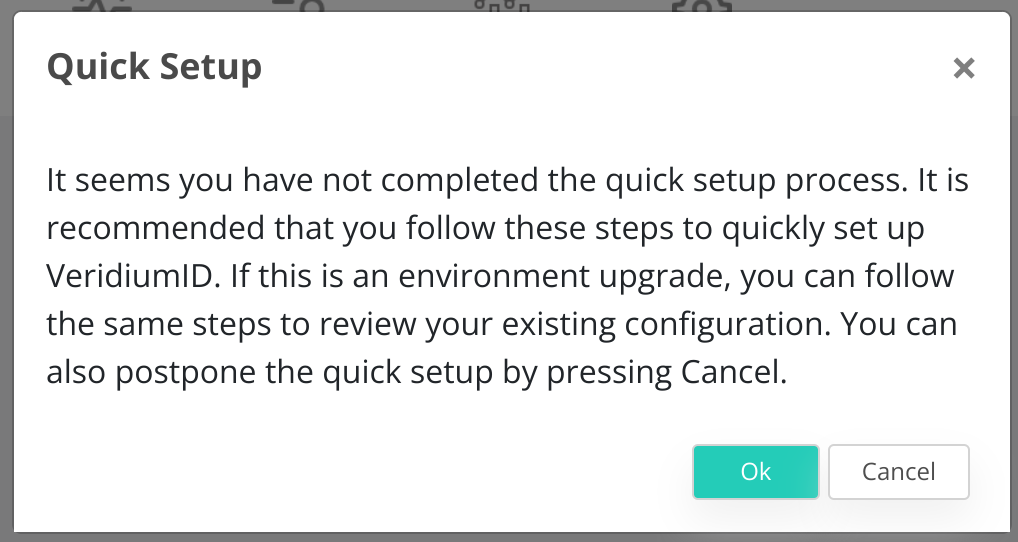
All services mentioned above can be configured by accessing the Quick Setup tab. To access this tab you can either:
-
Click on OK on the following notification (appears only when the services are not already configured → after the installation):
-
Select the Quick Actions icon from the Admin Dashboard (in the right side of the screen):

3.1 Configure LDAP connection
To configure the LDAP connection complete the following form with the correct credentials:
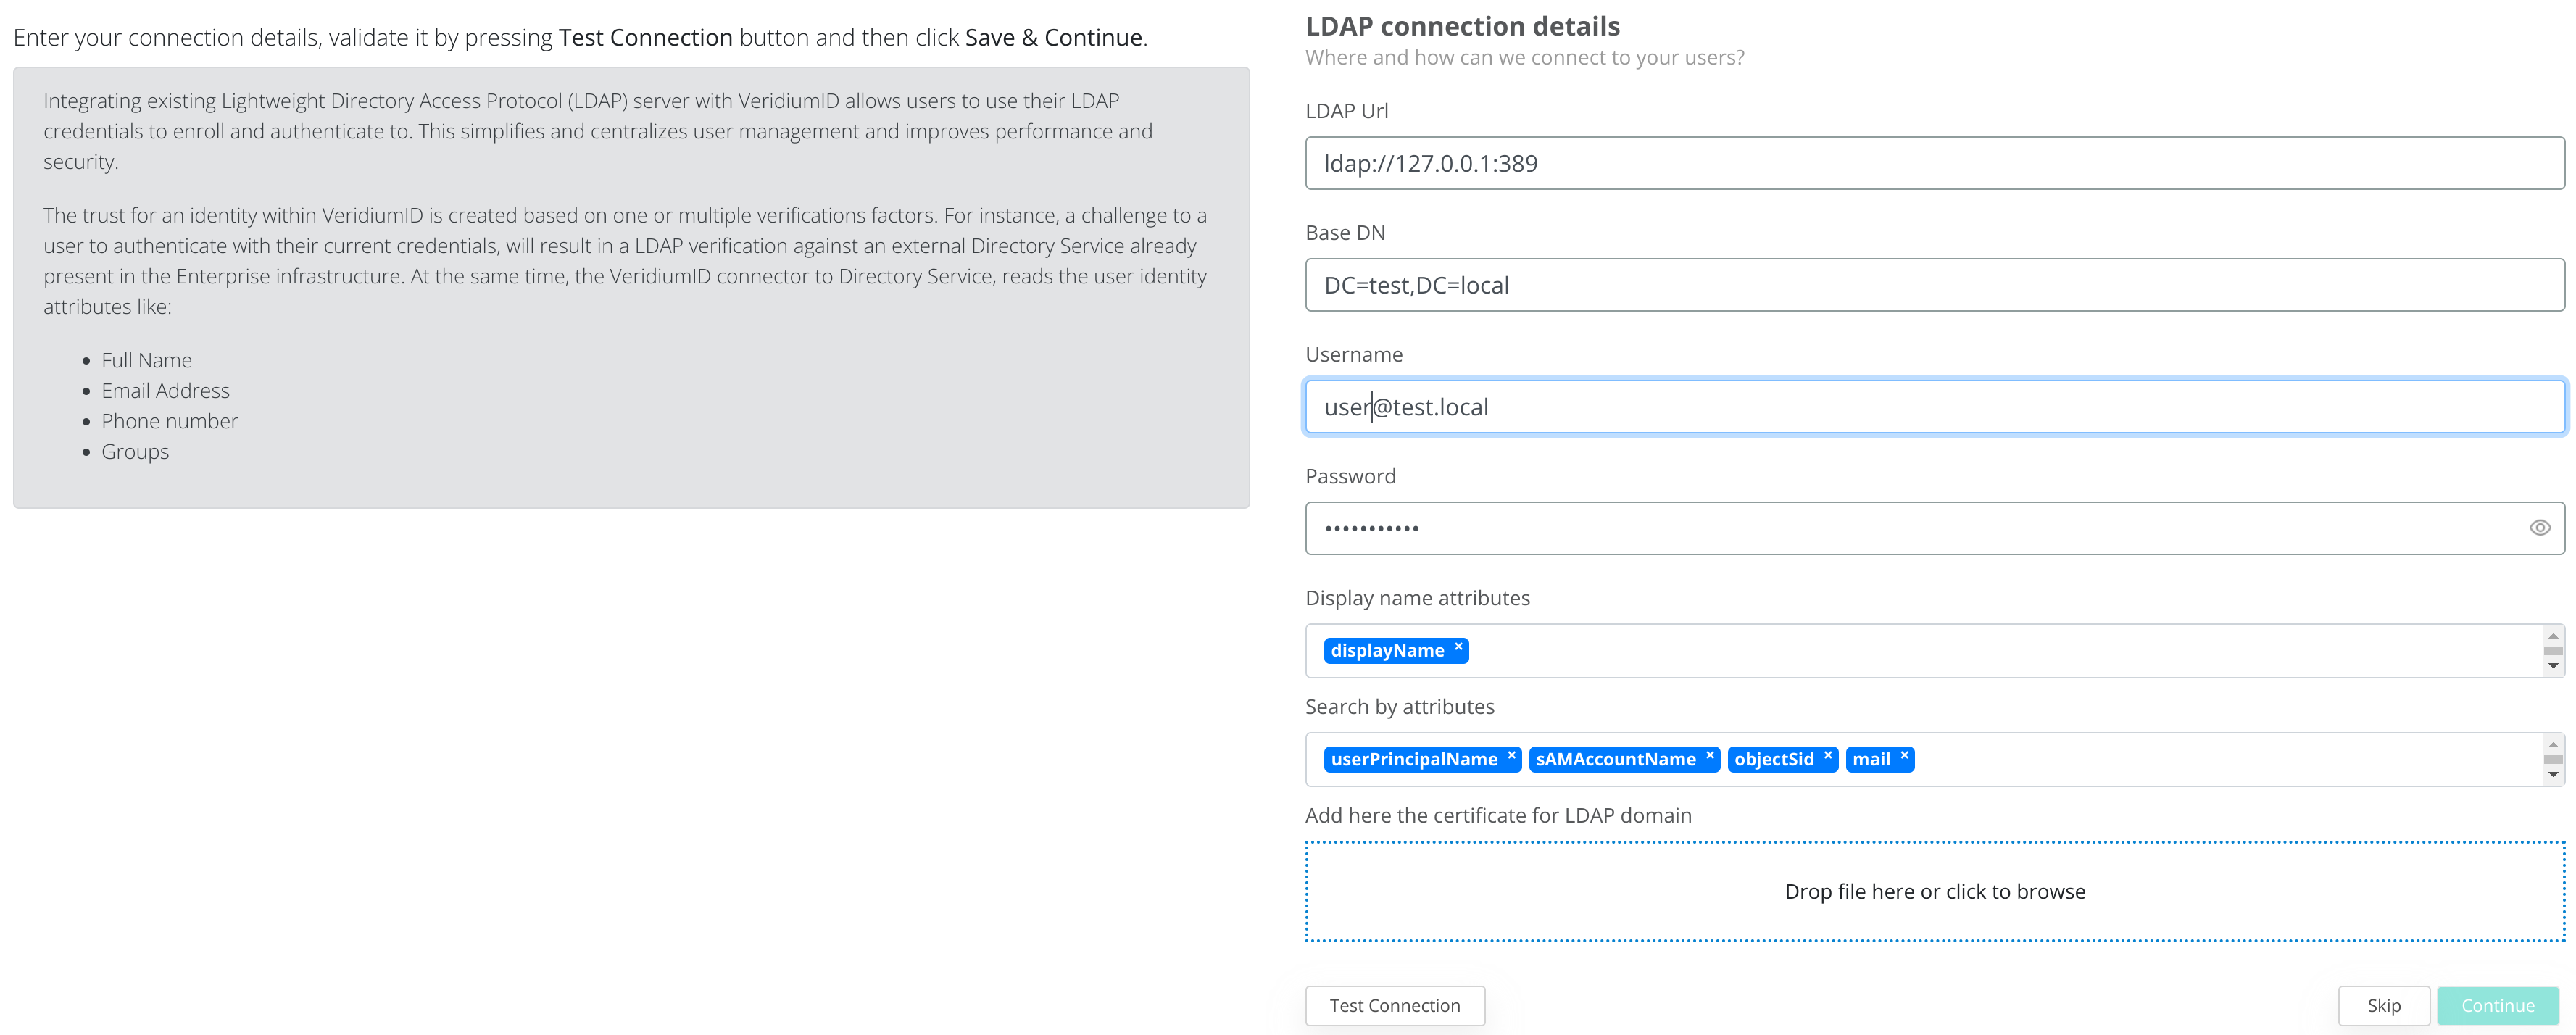
Make sure to have connectivity between the VeridiumID Webapplication nodes and the LDAP server. To check connectivity, connect using SSH to the VeridiumID nodes and run the following command: nc -vz LDAP_SERVER_IP PORT
To save the LDAP connection, first click on Test Connection and afterwards on Continue.

The next step will be to select which LDAP groups will be allowed to use VeridiumID applications, or leave the Allowed Groups empty to allow all groups. Click on Continue to go to the next step.
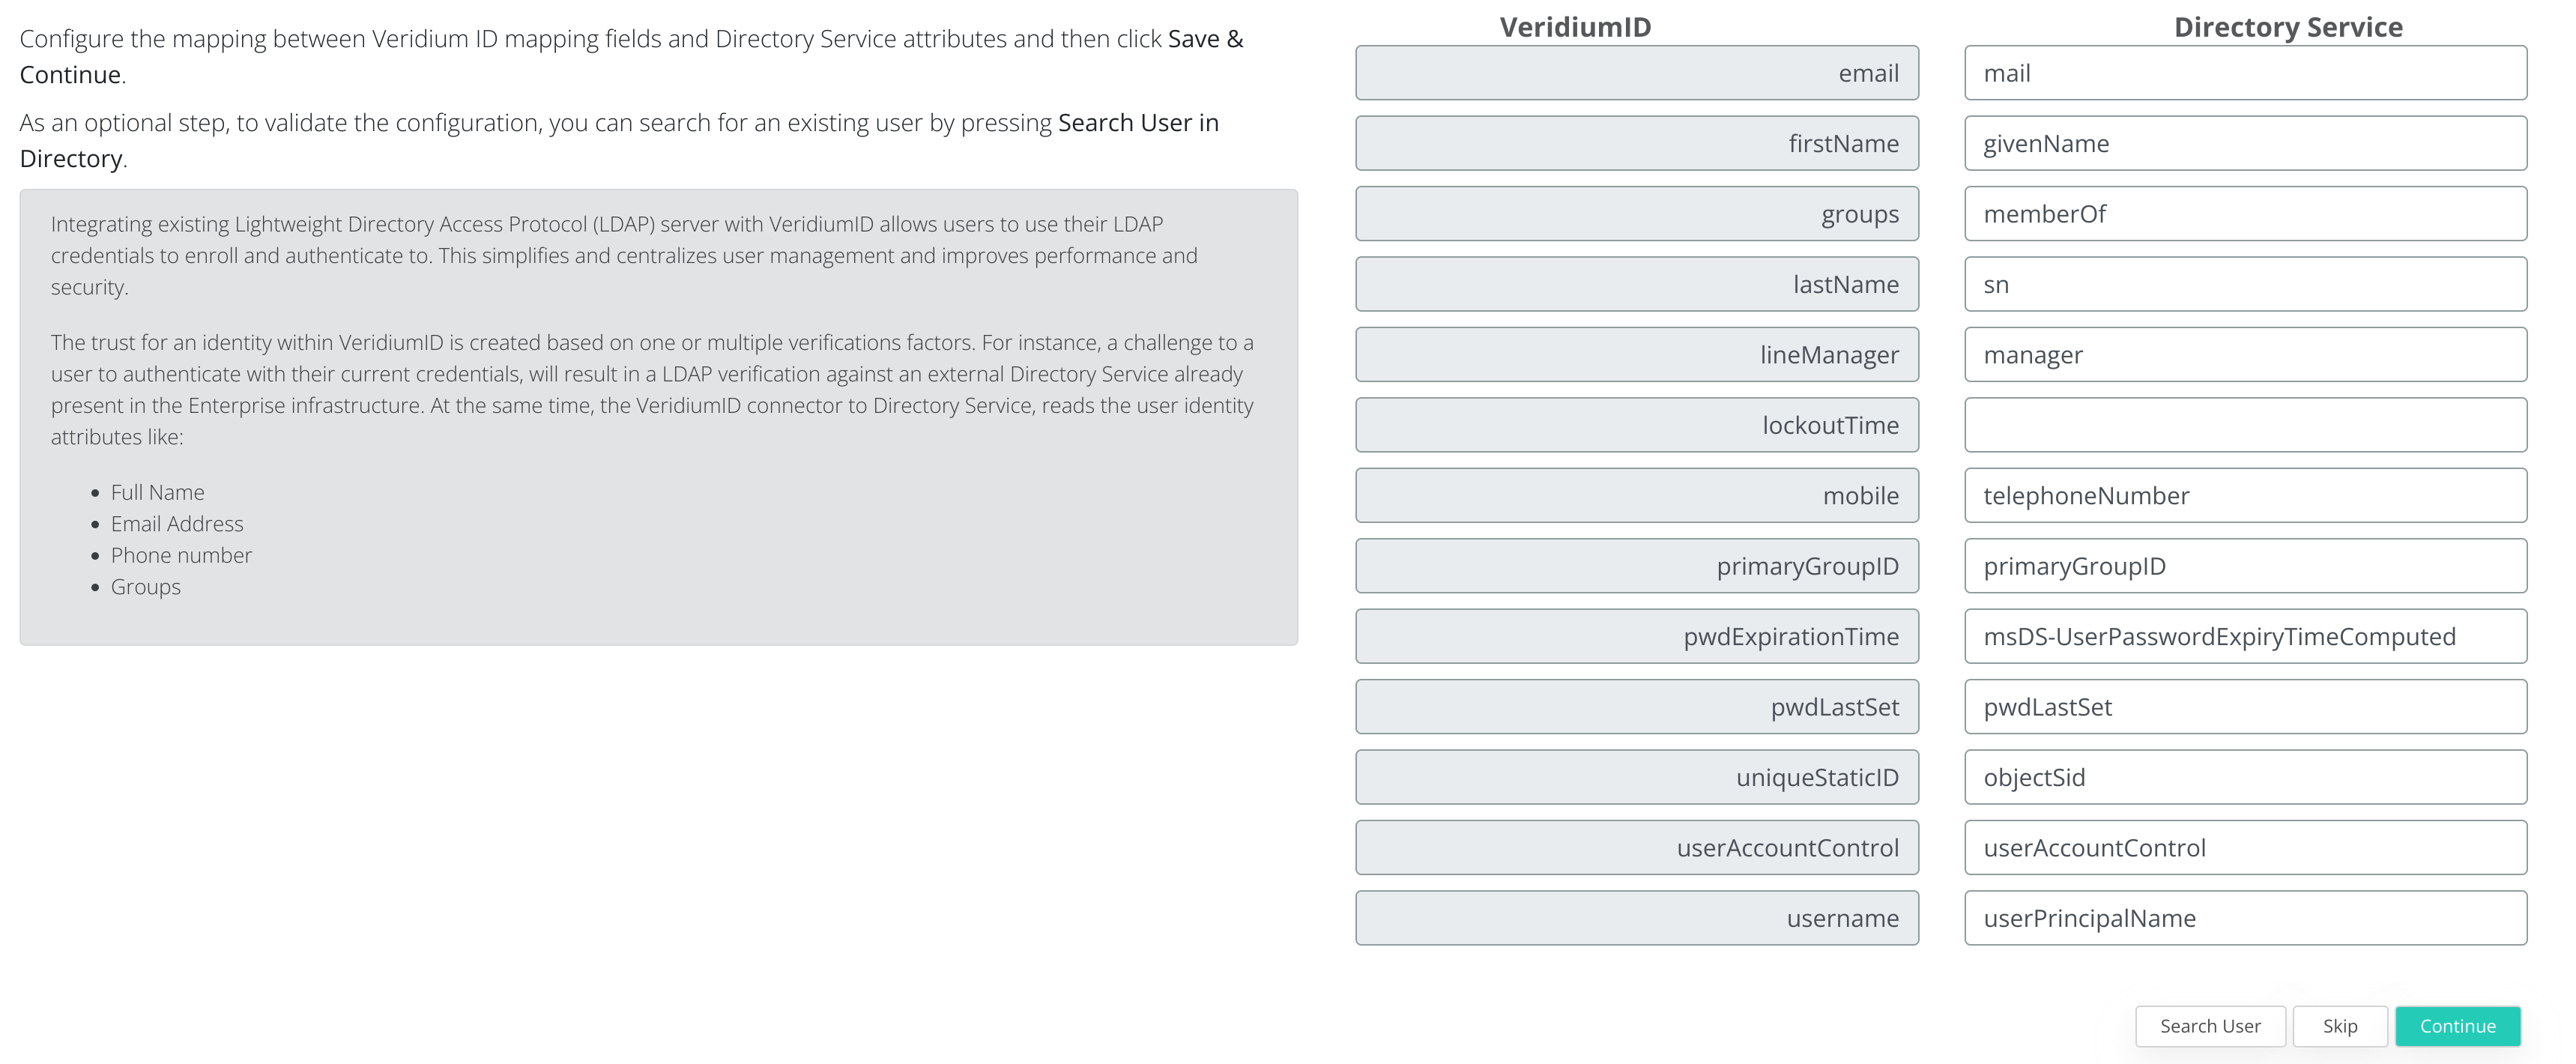
This step above is OPTIONAL and can be skipped. During this step you can test the LDAP query by clicking on Search User. To go to the next step click on Continue.
3.2 License configuration
During this step the VeridiumID license will be added to the server.

Either Drag & Drop the license archive or click in order to browse for the license archive.
In order to obtain a valid license archive, please contact VeridiumID.
After selecting the license archive click on Continue to advance to the next step.
3.4 Email Server configuration
During this step the configuration of the Email server will be made.
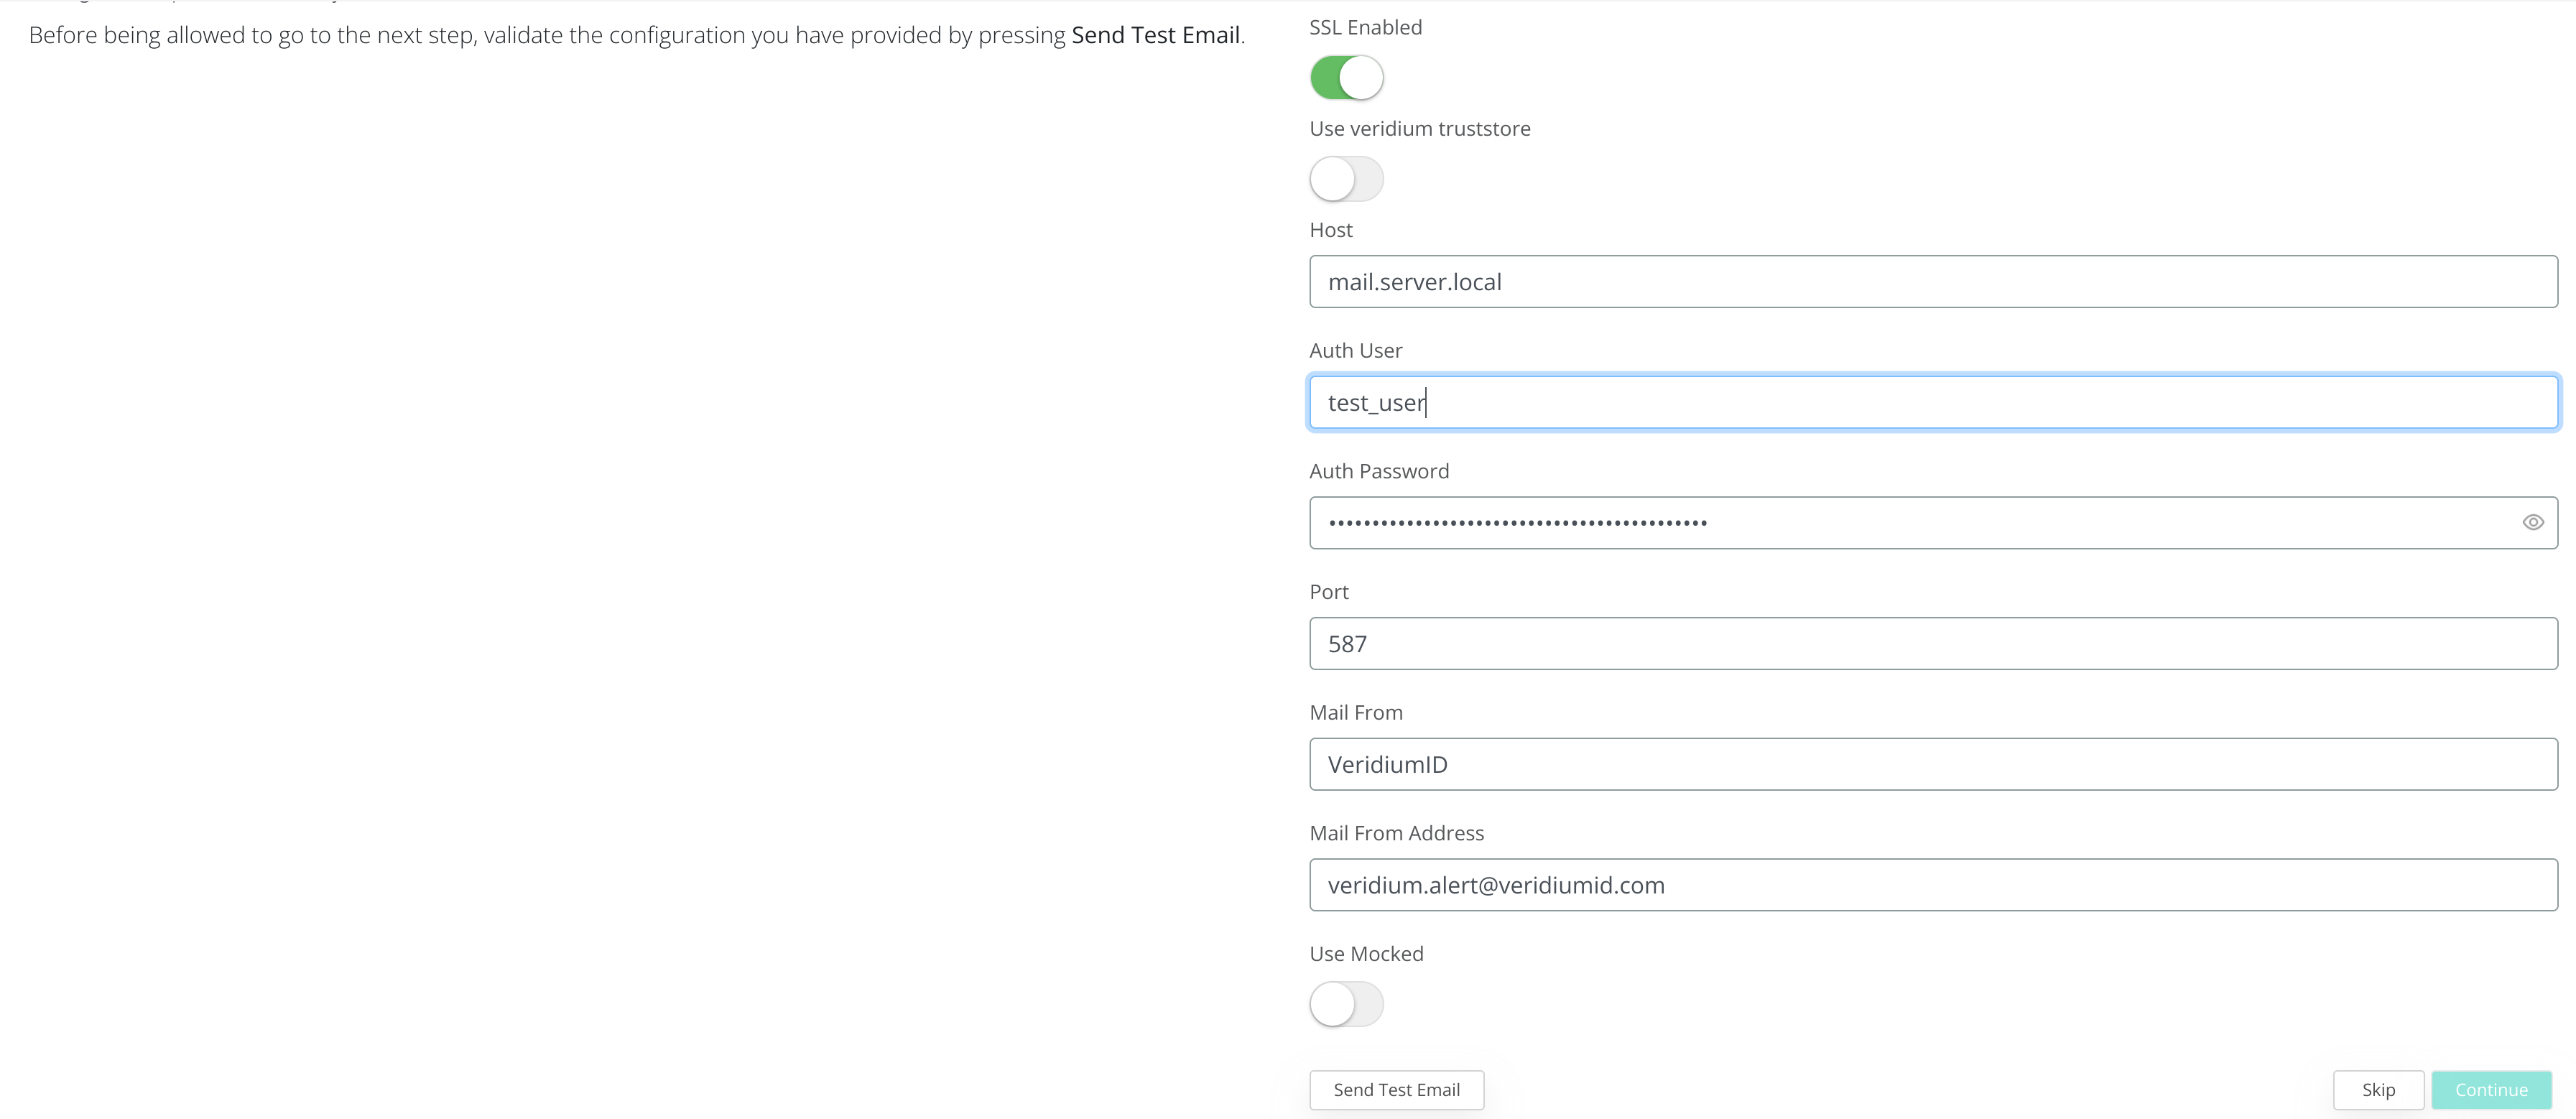
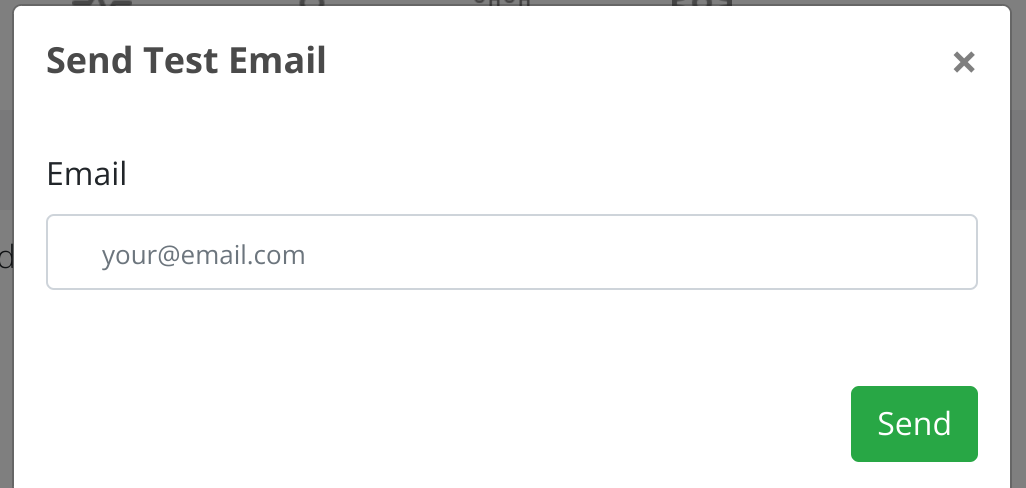
After completing the form, to test the connection click on Send Test Email and provide a valid email address.
After testing the email configuration click on Continue to advance.
3.4 SMS server configuration
During this step you can configure either the SMS Gateway or add you Twillio account in order to enable SMS usage from VeridiumID server.
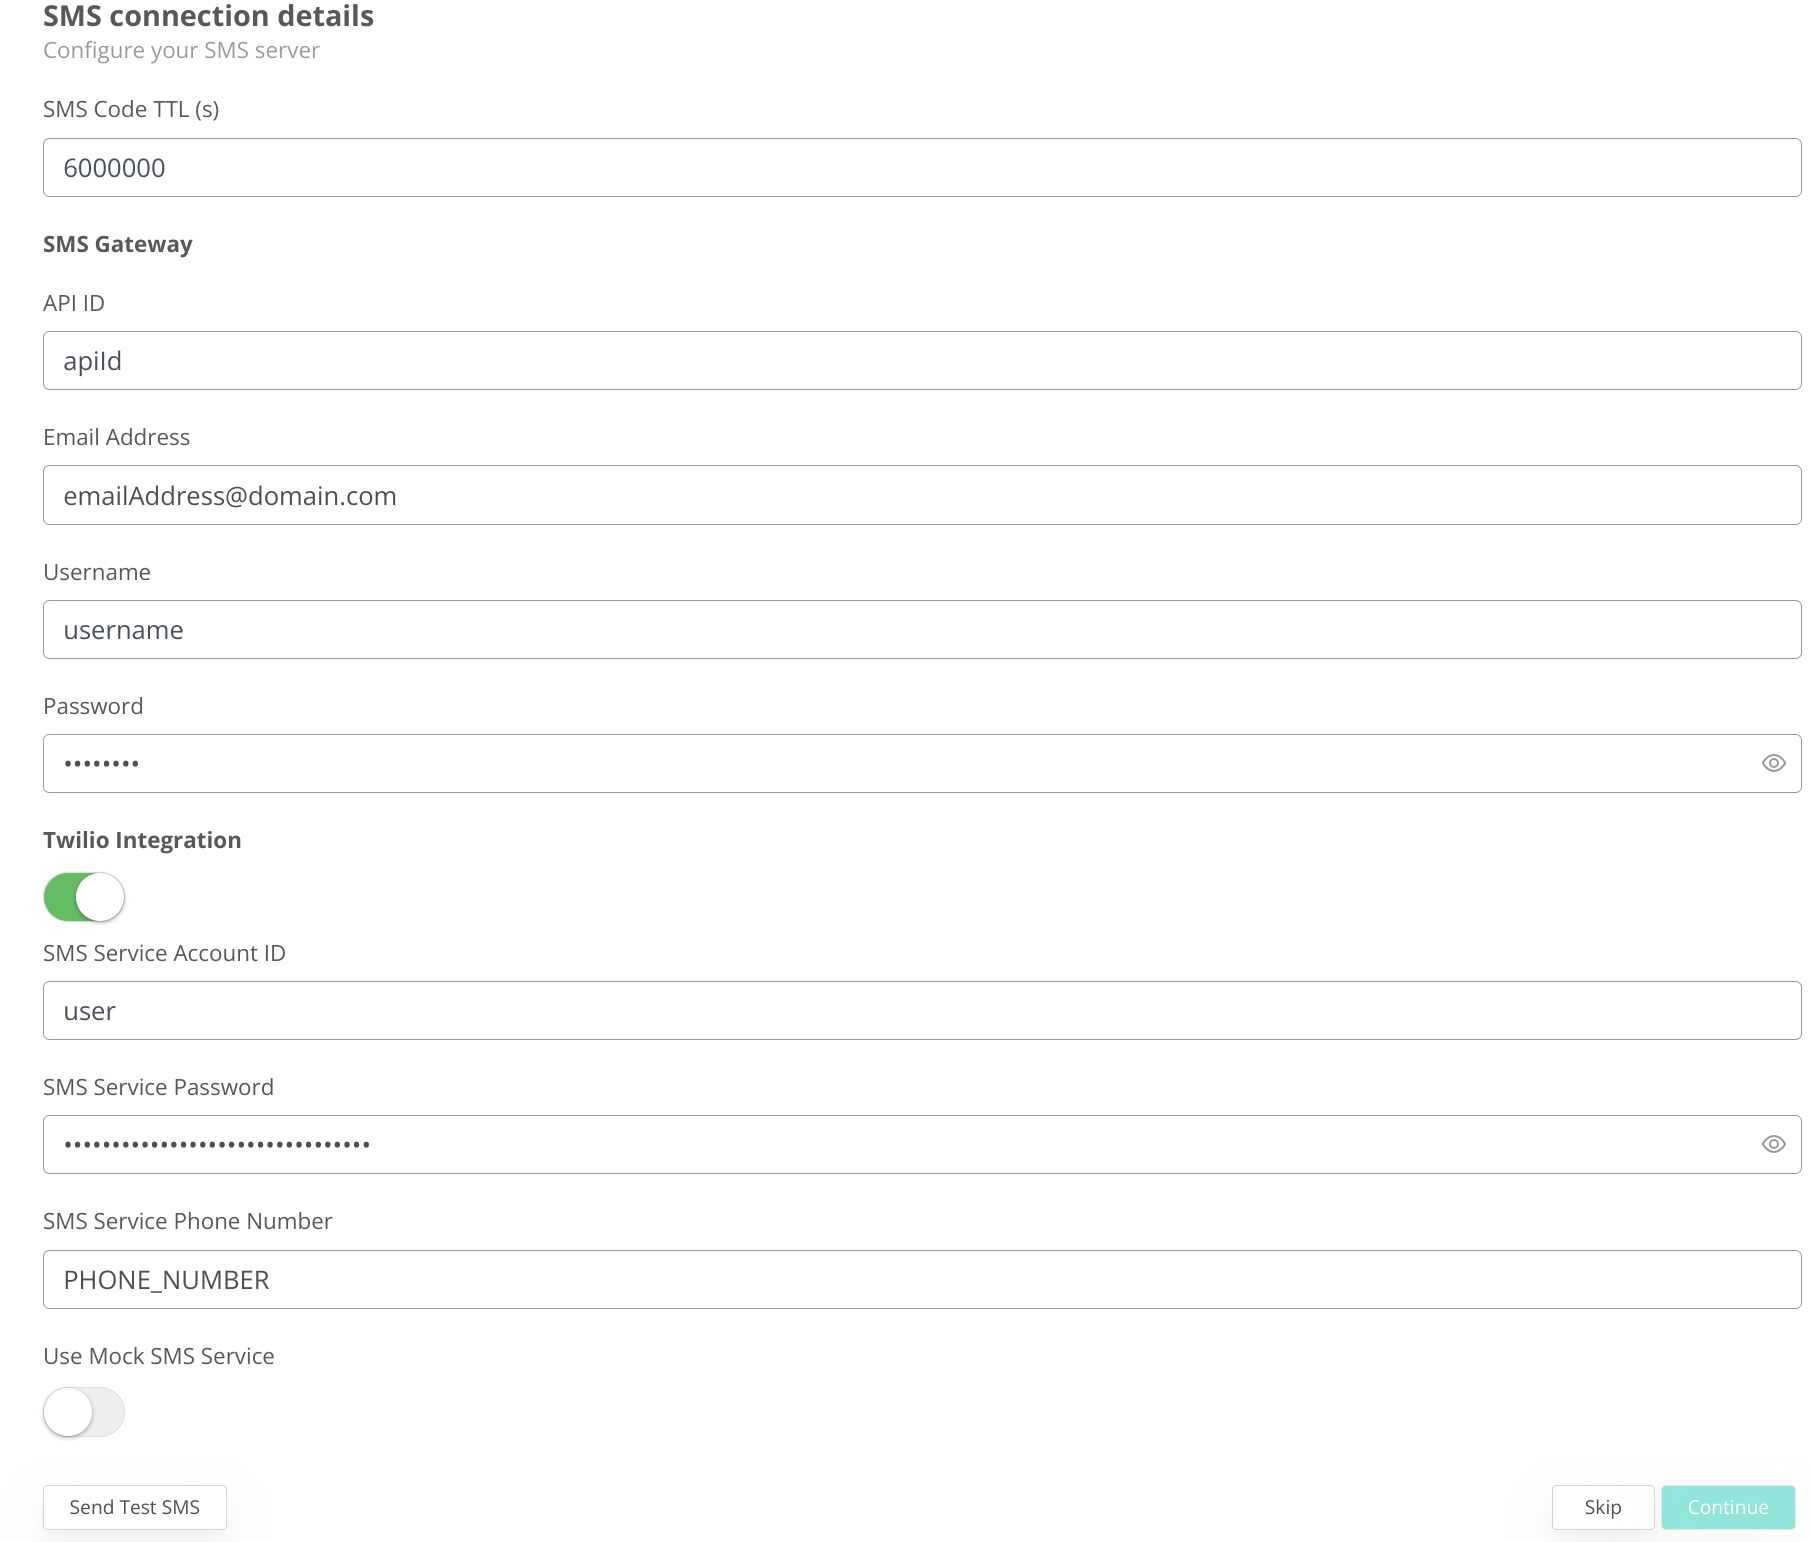
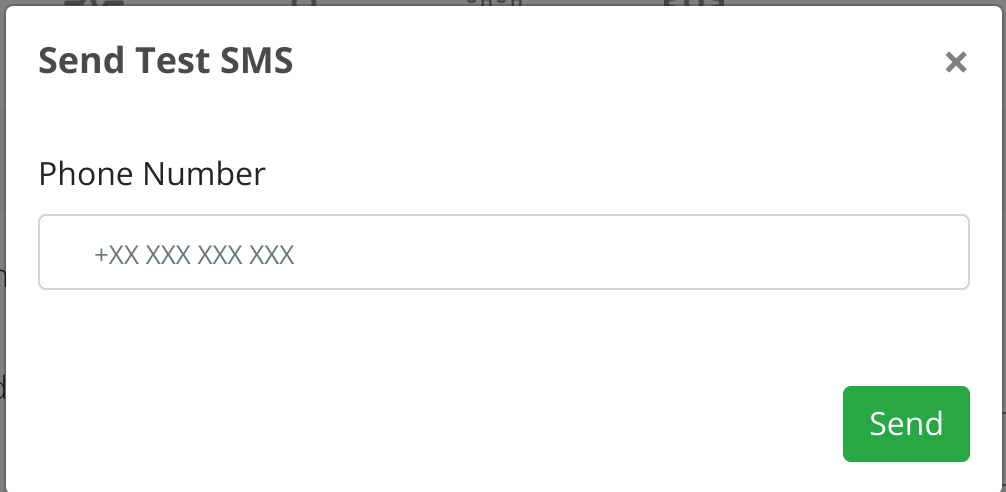
To test the configuration click on Send Test SMS and provide a valid phone number (with country code):
To advance click on Continue.
3.5 Finishing the configuration
During this step the QR code used for enrolling VeridiumID mobile applications will be presented.
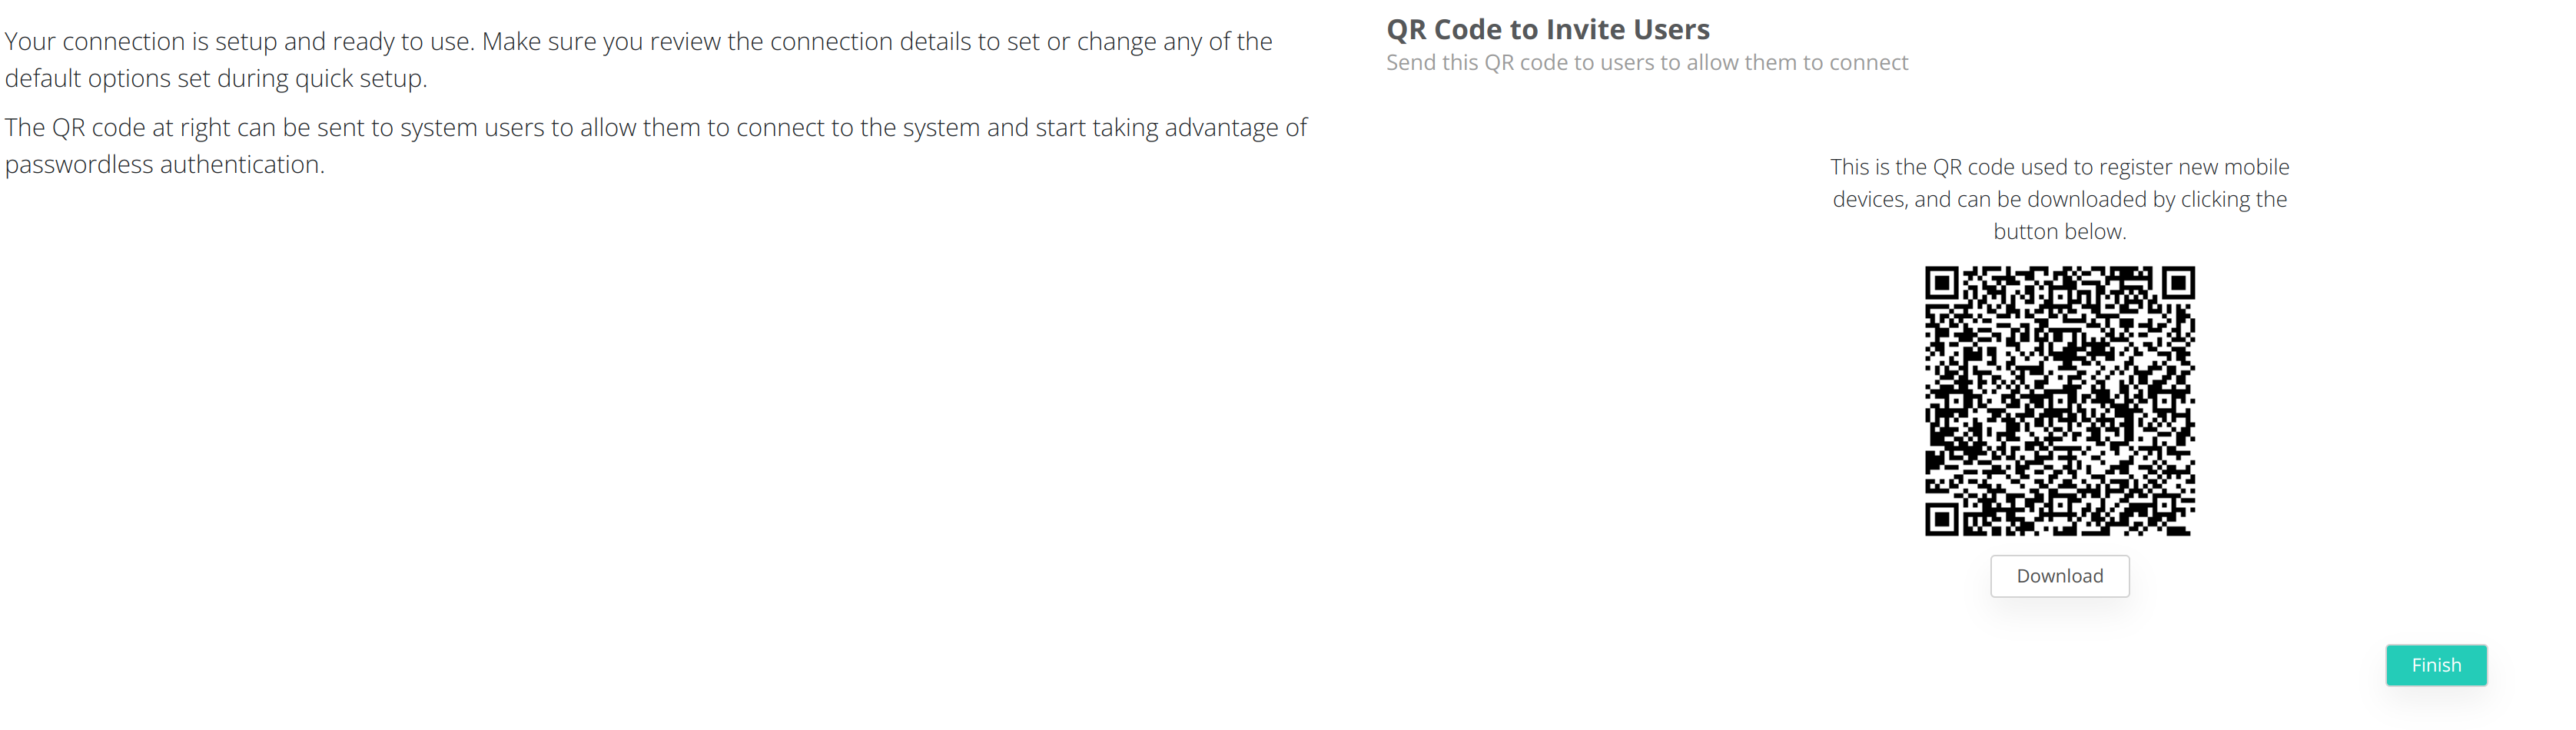
To finish the configuration click on Finish.
4. Update domain certificates
During the deployment a self-signed certificate is generate in order to complete the deployment.
To change it the VeridiumID server will require two certificates containing the full-chain of the domain (one for the internal domain and another for the external).
The certificates will need to be in PEM format containing the following:
-
Private key of the domain certificate
-
Full Chain certificate of the domain (including all Intermediate CAs and the main CA certificate)
To validate the certificate you can run the following command on any Webapplication node:
## run this on all WEBAPP servers
bash /etc/veridiumid/scripts/check_domain_cert.sh PATH_TO_CERTIFICATE.pem
## if there is a P12_cert, this is the procedure to change the certificates in all places.
## follow the steps from procedure output:
bash /etc/veridiumid/scripts/convert_haproxy_cert.sh PATH_TO_P12_CERT.p12
\cp conversion_result/server.pem /etc/veridiumid/haproxy/server.pem
systecmtl restart ver_haproxy
\cp conversion_result/ca_root.pkcs12 /opt/veridiumid/websecadmin/certs/ca_root.pkcs12
systemctl restart ver_websecadmin
\cp conversion_result/server.pem /opt/veridiumid/freeradius/etc/raddb/certs/server.pem
\cp conversion_result/server.pem /opt/veridiumid/freeradius/etc/raddb/certs/client.pem
systemctl restart ver_freeradius
## apply this procedure for internal and external certificate, in order to have different server.pem for different entries.
4.1 Update HaProxy configuration
Copy both (internal and external) certificates to /etc/veridiumid/haproxy directory, and rename them to serverInt.pem and serverExt.pem.
Change their permissions using the following commands as root:
chown veridiumid:veridiumid serverInt.pem
chown veridiumid:veridiumid serverExt.pem
The next step will be to modify the /etc/veridiumid/haproxy/haproxy.cfg file.
Modify /etc/veridiumid/haproxy/server.pem to:
-
if the frontend or backend contains the string ext then /etc/veridiumid/haproxy/serverExt.pem
-
if the frontend/backend contains the string int or it does not contain nor int or ext then /etc/veridiumid/haproxy/serverInt.pem
Save the file and validate the HaProxy configuration and the restart the service by using the following commands as root:
# To validate the HaProxy configuration you can use the following:
# Alias
haproxy_cfg
# Full command
/opt/veridiumid/haproxy/sbin/haproxy -c -V -f /etc/veridiumid/haproxy/haproxy.cfg
# To restart the HaProxy service
service ver_haproxy restart
4.2 OPA service configuration
The Open Policy Agent service will require to have the internal domain trusted. In order to configure this we will need to copy the serverInt.pem to /etc/pki/ca-trust/source/anchors directory.
Use the following commands as root user:
# Copy certificate to the local CAs directory
cp /etc/veridiumid/haproxy/serverInt.pem /etc/pki/ca-trust/source/anchors
# Add the local domain certificate to the local truststore
update-ca-trust force-enable
update-ca-trust extract
# Restart OPA service
service ver_opa restart
If the change was done successfully in the OPA log file (/var/log/veridiumid/opa/opa.out) you will se a message similar to the following:
{"level":"info","msg":"Bundle loaded and activated successfully. Etag updated to \"\"2138382620\"\".","name":"veridium","plugin":"bundle","time":"2024-04-12T15:55:03+03:00"}
4.3 Import new domain certificates to the VeridiumID Truststore.
Connect to the Admin Dashboard and navigate to Settings → Certificates → Truststores and click on Add Truststore (from the right side of the screen).
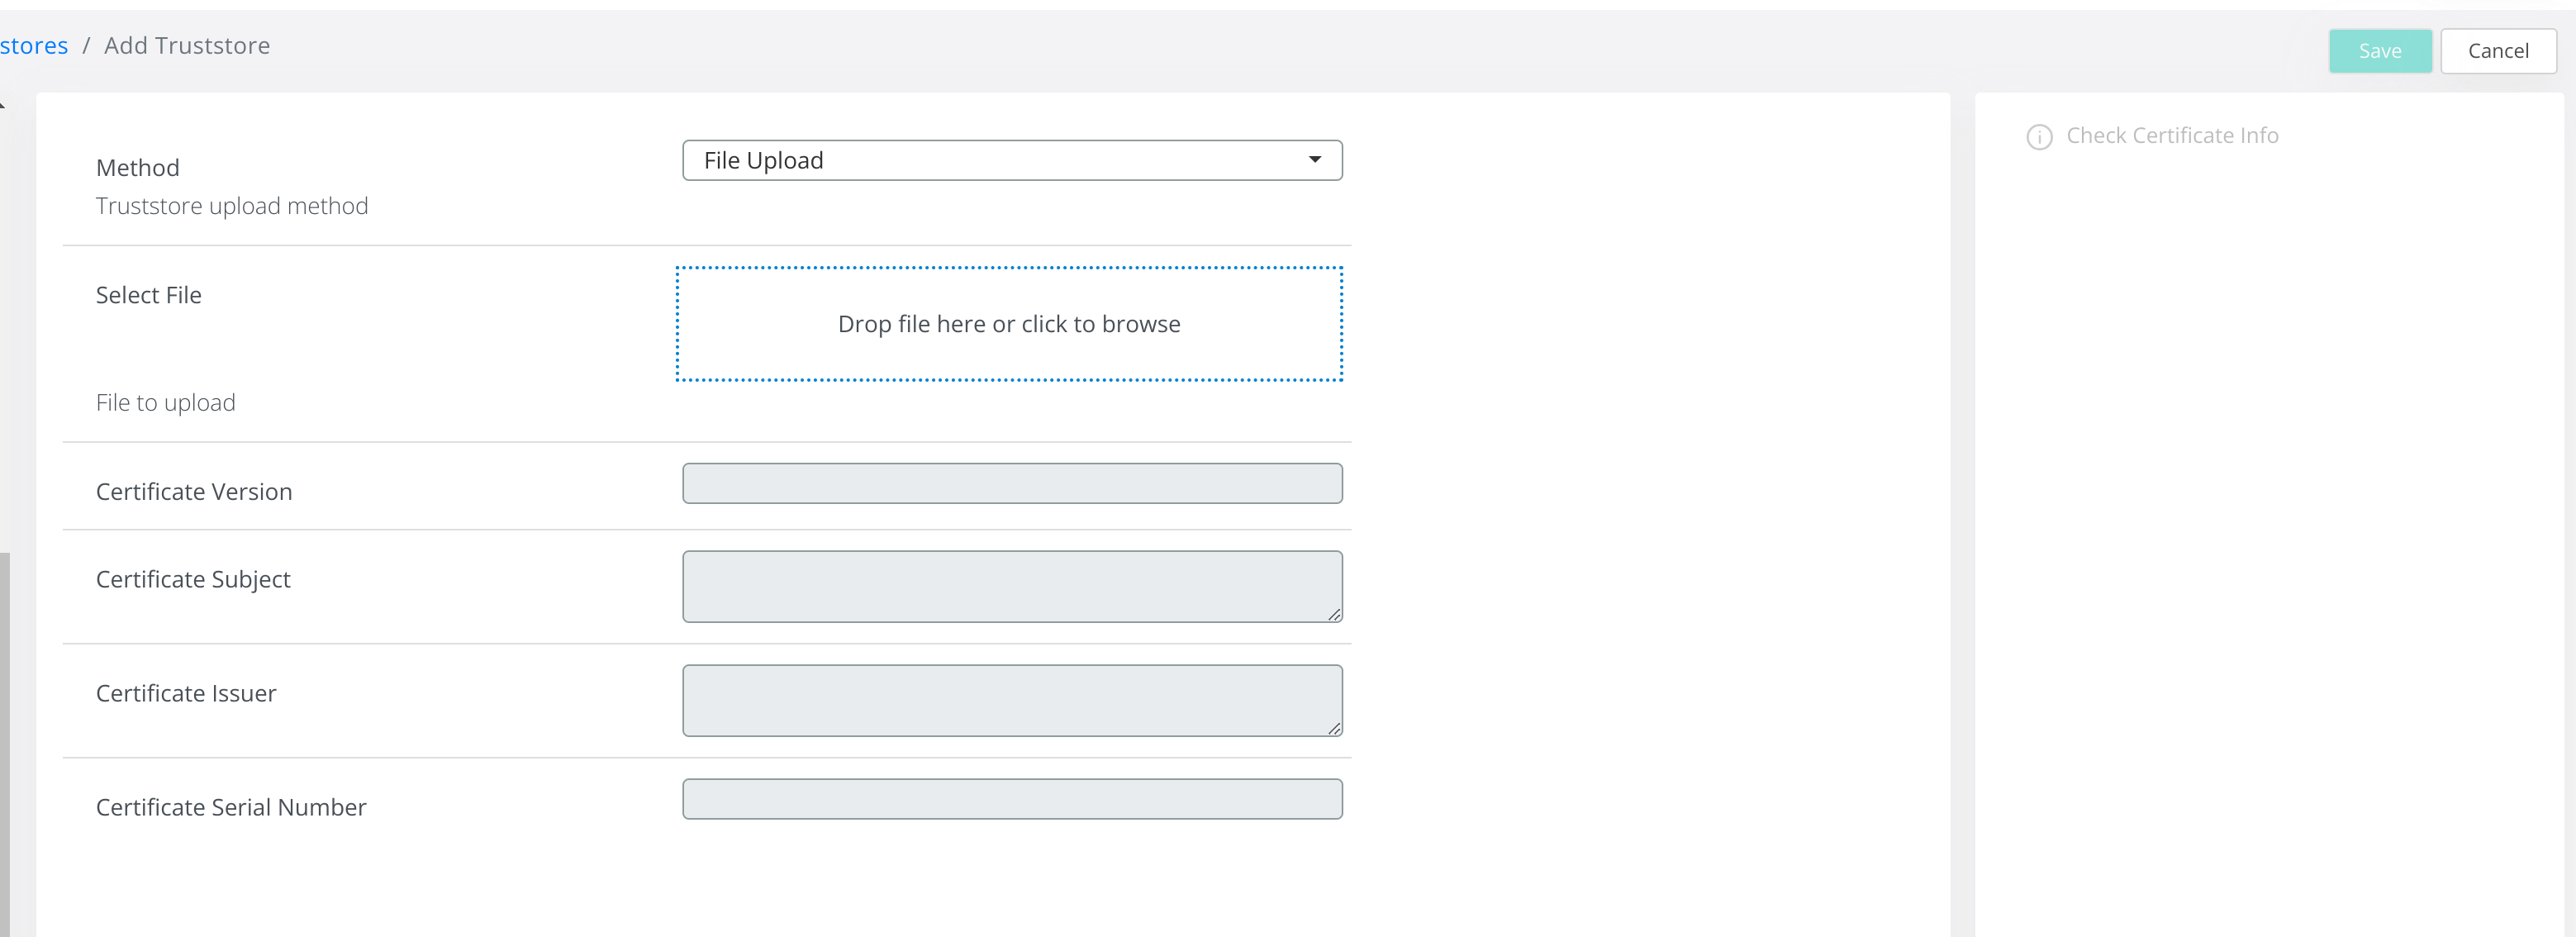
Provide the certificate file, or switch from File Upload to Certificate Content and copy the full content of the certificate.
Then click on Check Certificate Info and afterwards on Save in order to add the new certificate to the VeridiumID Truststore.
PLEASE REMOVE the self signed certificates used for the installation.
After removing, go to Certificates → Service Credentials and run Press the Check icon for each service.
4.4 Enable Certificate Pinning
Access the Admin Dashboard and navigate to Settings → Certificates → Pinning and enable the feature from the right side of the screen.

After this to create pins for the new domain certificates click on Upload Certificate for pin certificate and upload the new External domain certificates.