
1. Prerequisites
-
It is important to have a separate mounted volume, /vid-app and to have sufficient space -100Gb minimum, in this location on each node.
-
You must have deployed the VeridiumID persistence servers.
Preinstall these packages on ILP and VeridiumID persistence machines:
## install on ILP
sudo yum -y install java-17-openjdk bc chrony logrotate libffi-devel bzip2-devel xz-devel openssl-devel pcre-devel systemd-devel zlib-devel dmidecode curl unzip wget rsync net-tools jq rng-tools python3-pip python3-pyyaml python3-jinja2 make gcc perl

## install on VeridiumID persistence:
sudo yum -y install bc python3-pyyaml python3-jinja2 libffi-devel dmidecode curl unzip wget rsync net-tools jq rng-tools make gcc
2. Create and Prepare the Temporary Installation Directory (on the machine we want to start the installation)
TMP_DEST="/vid-app/install278"
##in case does not exists, please create the folder and assign ownership on this folder to deployment user:
sudo mkdir -p $TMP_DEST && sudo chown $(whoami):$(whoami) $TMP_DEST && sudo chmod 755 $TMP_DEST
3. Verify Space and Installation Location
-
ILP should be installed under the
/vid-appfolder. -
Ensure that this folder is mounted and that there is at least 100 GB available for both Webapp and Persistence.
-
You can check available space using:
df -h
Note: The installer ZIP file is 4.5 GB, and when uncompressed it requires about 7.9 GB.
4. Download UBA installer (on the machine we want to start the installation)
|
Name |
URL |
SHA256 |
MD5 |
|---|---|---|---|
|
uba-onprem-installer-2.7.8.zip |
167199a3b853e2ba876868f236791da6cb1f3978 |
7633b4d91bef9325c399387f4748eeb8 |
wget -P $TMP_DEST --user <NEXUS_USER> --password <NEXUS_PASSWORD> https://veridium-repo.veridium-dev.com/repository/UBAInstallerOnPrem/2.7.8/uba-onprem-installer-2.7.8.zip
unzip ${TMP_DEST}/uba-onprem-installer-2.7.8.zip -d ${TMP_DEST}
5. Generate a ssh key to do the installation
5.1 Generate an SSH key pair on the server where the installation process is initiated:
ssh-keygen
This creates a private key (~/.ssh/id_rsa) and a public key (~/.ssh/id_rsa.pub).
5.2 Add the public key to all servers, including the one where the key was generated:
-
On the same (local) server, append the public key to
authorized_keys:cat ~/.ssh/id_rsa.pub >> ~/.ssh/authorized_keys -
On all other servers, copy the contents of
~/.ssh/id_rsa.pubfrom the local server and append it to~/.ssh/authorized_keys:vi ~/.ssh/authorized_keys
6. Configure variables file
vi ${TMP_DEST}/uba-onprem-installer/variables.yaml
SSH_USER: <the user for which you have generated the ssh key>
WEBAPP_CONTACT_POINTS: IP1,IP2
PERSISTENCE_CONTACT_POINTS: IP3,IP4,IP5
# if the certifiate is for domain: *.ilp.veridium-dev.com, this should be the format in the document:
CLUSTERSUFFIX: ilp.veridium-dev.com
DOMAINSEPARATOR: "."
UBA_VERSION: "2.7.8"
7. Start the installation process
cd ${TMP_DEST}/uba-onprem-installer
## check if the prereq are installed
./check_prereqs.sh
## start the installation process
./uba-installer.sh
## after the installation, please run below command on UBA Webapp and VeridiumId persistence nodes, to be sure that everything is successfully installed:
sudo bash /opt/veridiumid/uba/scripts/uba_check_services.sh
8. Configuring the domain certificate (OPTIONAL - can be done after installation)
Generate server.pem - make sure your certificate includes all necessary SANs, such as:
[alt_names]
DNS.1 = ingestion{{ DOMAINSEPARATOR }}{{ CLUSTERSUFFIX }}
DNS.2 = tenant{{ DOMAINSEPARATOR }}{{ CLUSTERSUFFIX }}
DNS.3 = users{{ DOMAINSEPARATOR }}{{ CLUSTERSUFFIX }}
cp <your_certificate> /opt/veridiumid/uba/haproxy/ssl/server.pem
9. Generate a tenant for veridiumid-server, with a random uuid (ONE TIME)
# connect as veridiumid user:
sudo su - veridiumid
TMP_DEST="/vid-app/install278"
bash ${TMP_DEST}/uba-onprem-installer/generate_tenant_platform.sh `uuidgen`
To verify successful initialisation, go to a persistence node in cqlsh and check if the following tables contain data:
use uba;
expand on;
select * from tenants;
# should contain one entry, the tenant we registered
select * from global_model_latest_with_tenant;
# should contain one entry, the global context model
select count(1) from features_ordered_by_time;
# should contain 100+ entries, wait until the count doesn’t change then start doing authentications
10. Optional - Configure Load Balancing
You should configure the following entries in the main load-balancer to balances traffic to the two UBA webapp machines. Example configuration for a HAProxy balancer:
frontend uba_webapp_443
    bind *:443
    mode tcp
    tcp-request inspect-delay 5s
    tcp-request content accept if { req_ssl_hello_type 1 }
    use_backend backend_uba
backend backend_uba
    mode tcp
    balance leastconn
    stick match src
    stick-table type ip size 1m expire 1h
    option ssl-hello-chk
    option tcp-check
    tcp-check connect port 443
    server webappserver1 10.203.90.3:443 check id 1
    server webappserver2 10.203.90.4:443 check id 2
Where 10.203.90.3 is the IP of UBA machine1 and 10.203.90.4 is the IP of UBA machine2.
11. Integration of the UBA with the VeridiumID Application
On the webapp machines of veridiumid-server (on each machine), we need to add the following lines in /etc/hosts file, where the IP is the load balancer IP in front of ILP services or directly one ILP webapp node.
## edit /etc/hosts, where ilp.veridium-dev.com is the CLUSTERSUFFIX configured at
## the beggining of the installation in variables.yaml
10.203.90.3 tenant.ilp.veridium-dev.com
10.203.90.3 ingestion.ilp.veridium-dev.com
10.203.90.3 users.ilp.veridium-dev.com
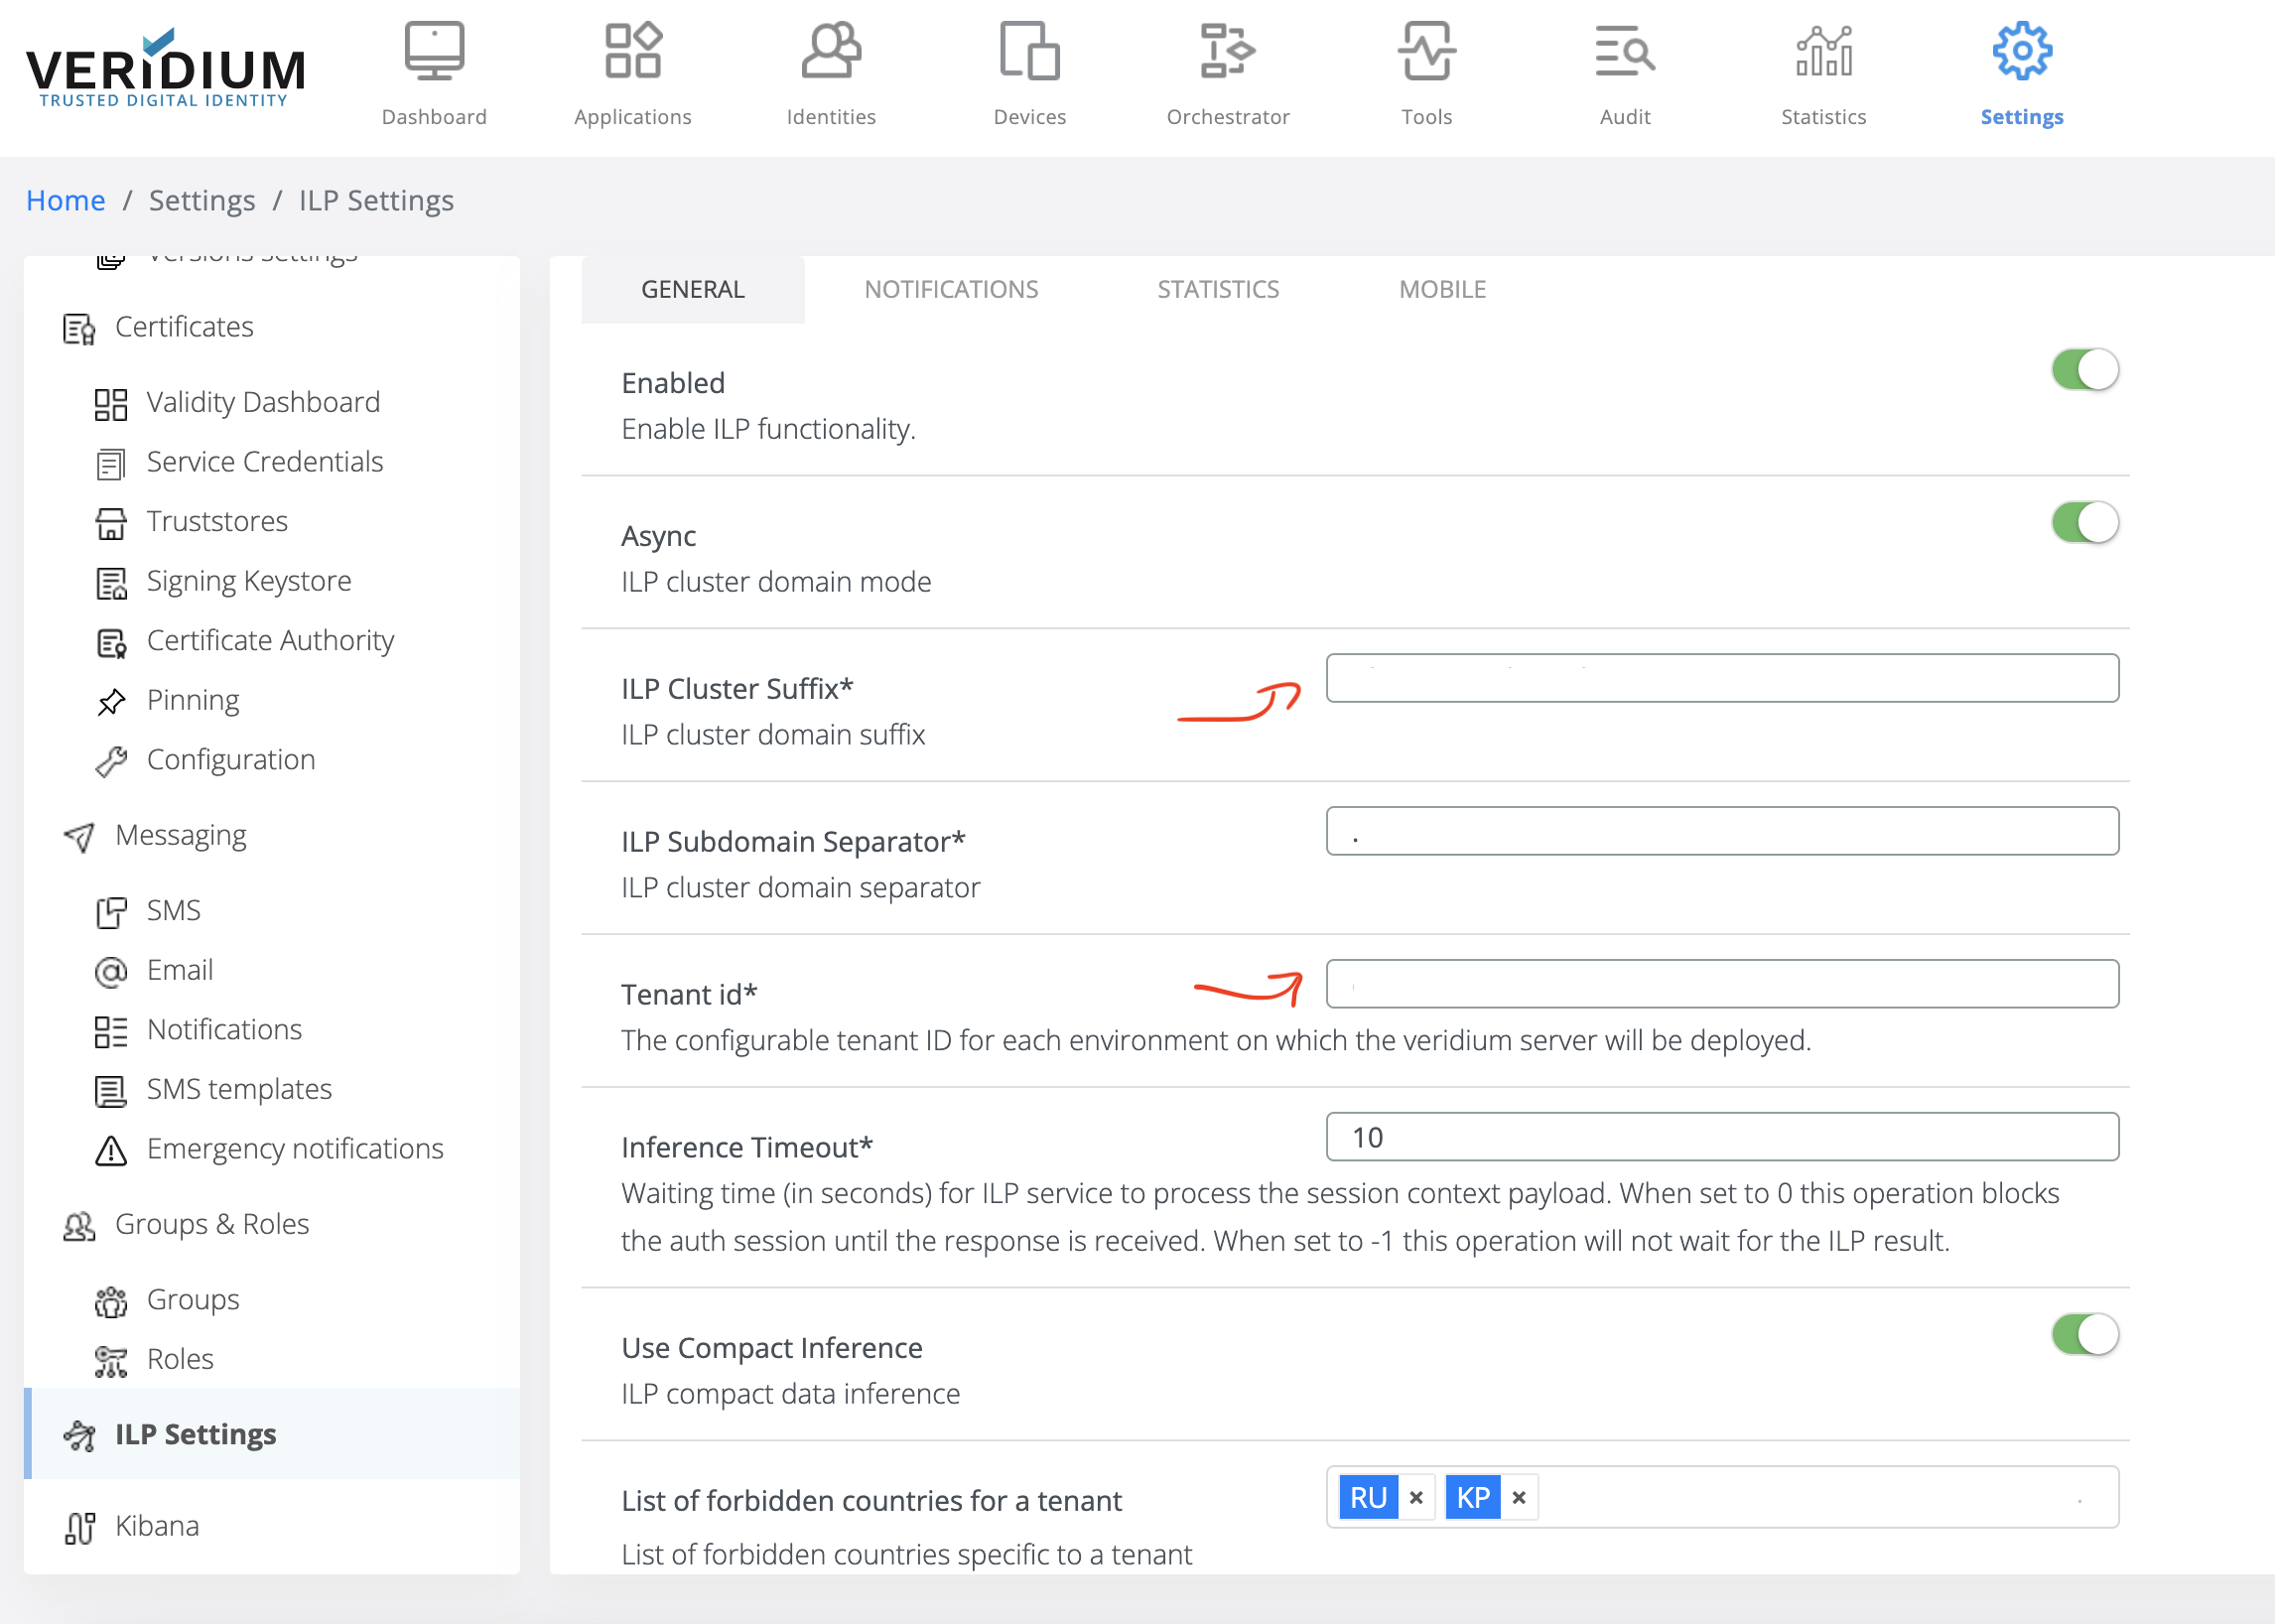
11.1 Login to WebSecAdmin go to Settings → ILP Settings and config as per below example
General subsection:
-
Enabled: (ON)
-
UBA CLUSTER SUFFIX: in our case will be “
CLUSTERSUFFIX" from variables.yaml -
UBA Subdomain Separator: in our case will be “
DOMAINSEPARATOR“ from variables.yaml - normally is “.” -
Tenant Id*: in our case will be your tenant id or the uuid you generated in step 5.
-
Use Compact Inference: (ON)
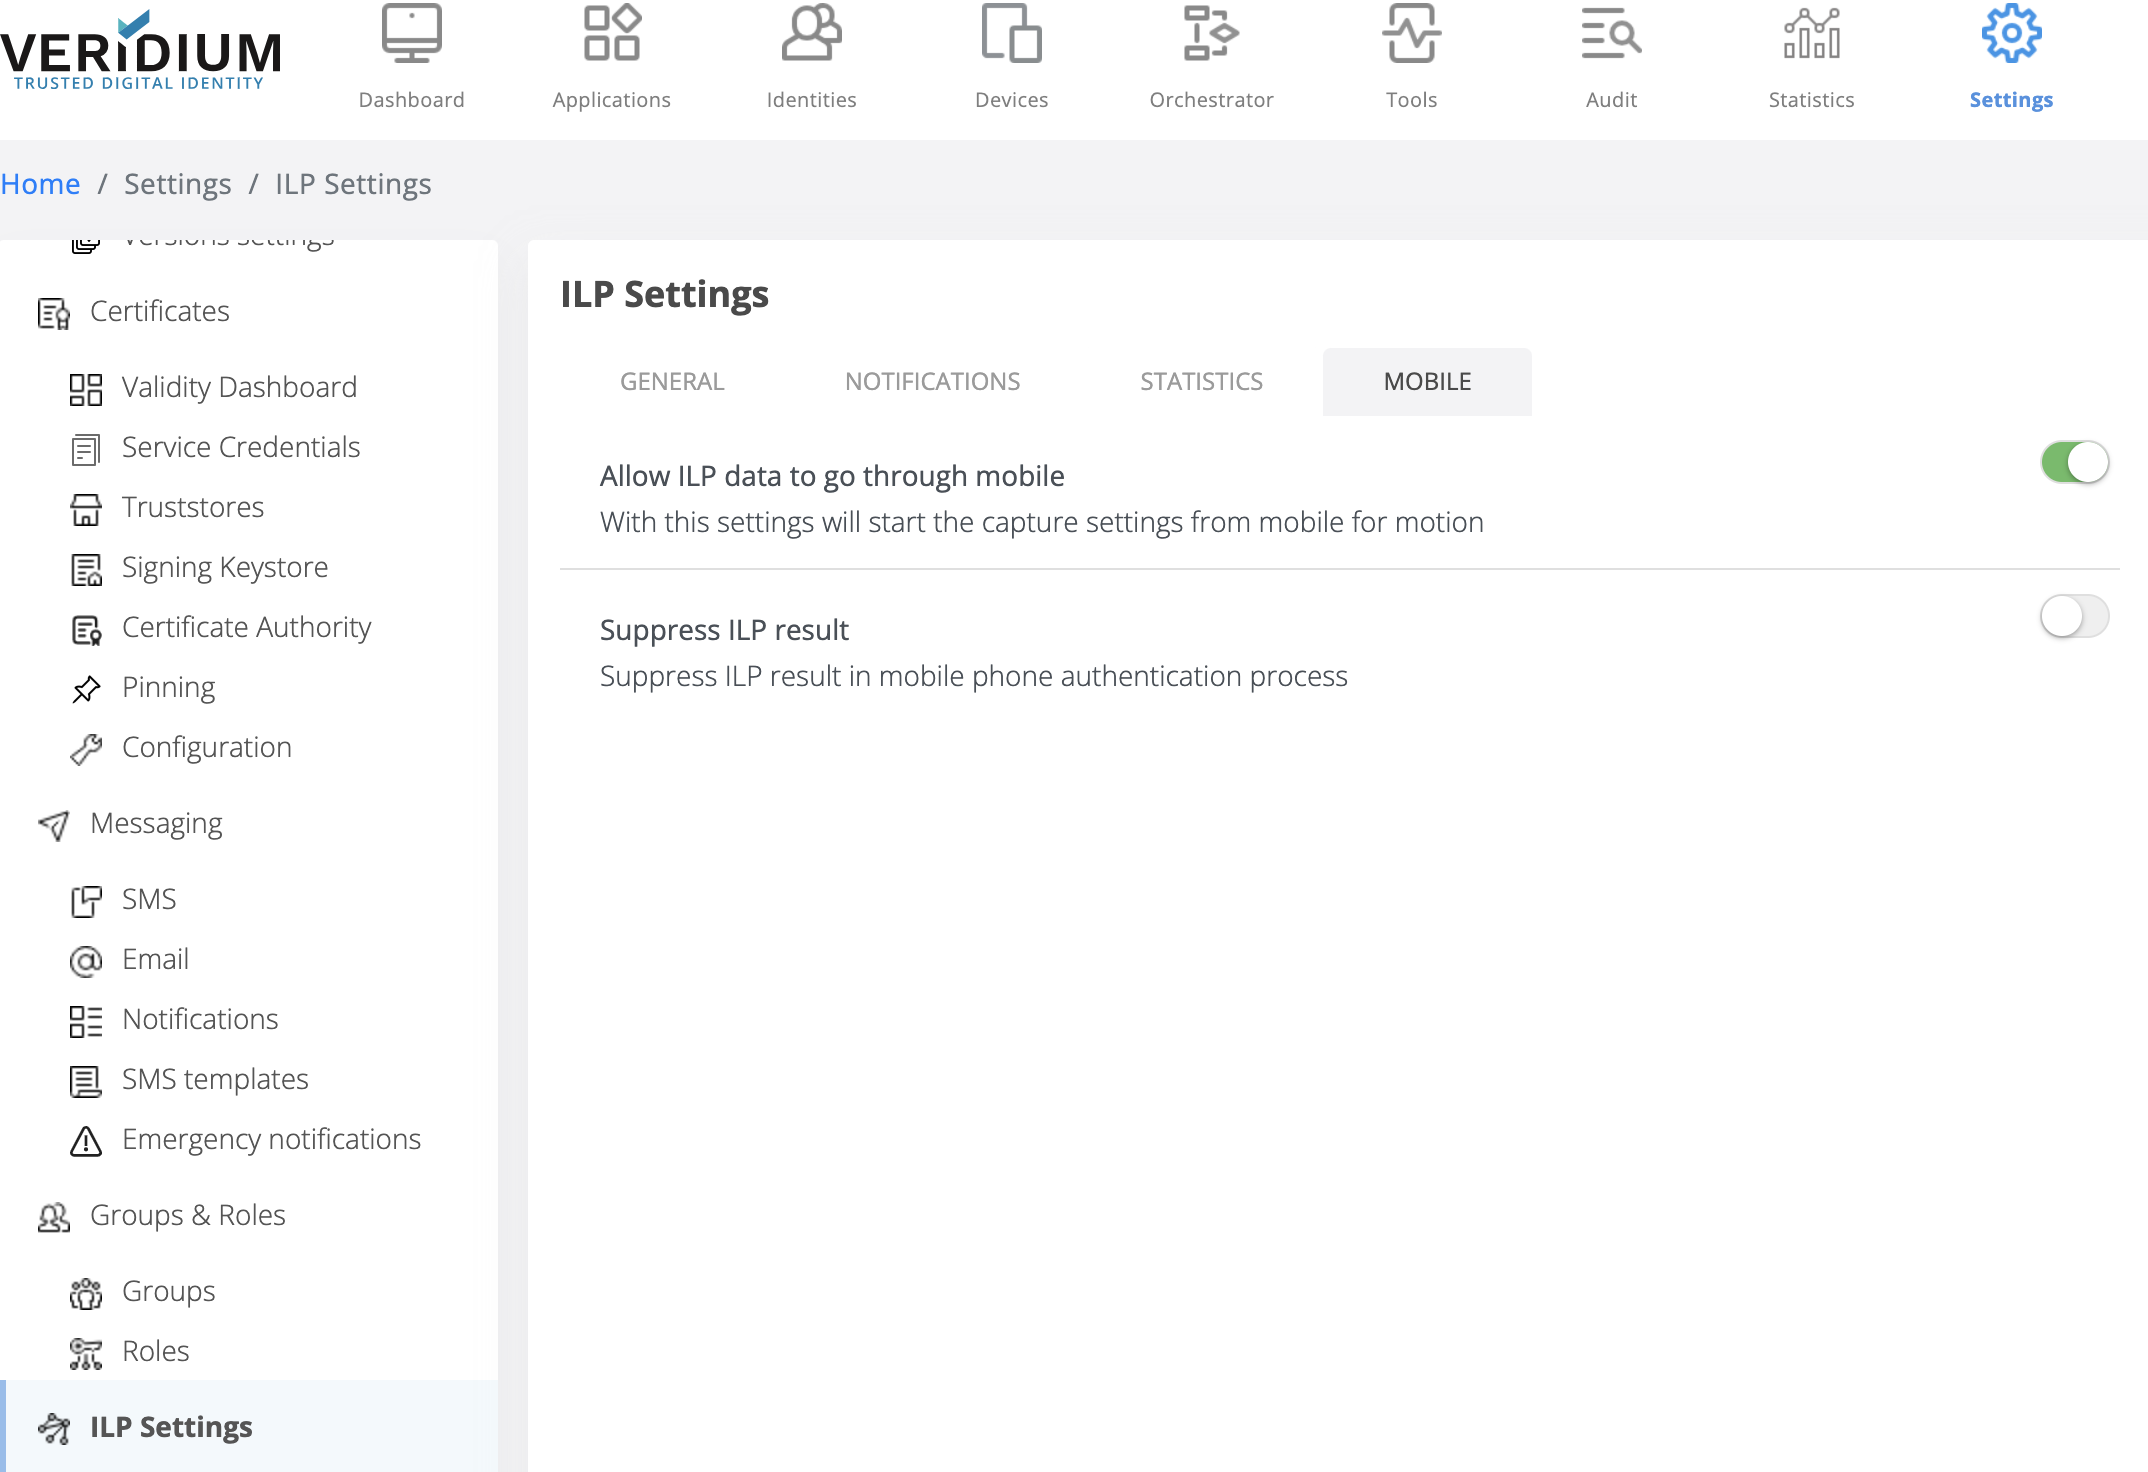
Mobile subsection:
-
Set Allow UBA data to go through mobile → ON
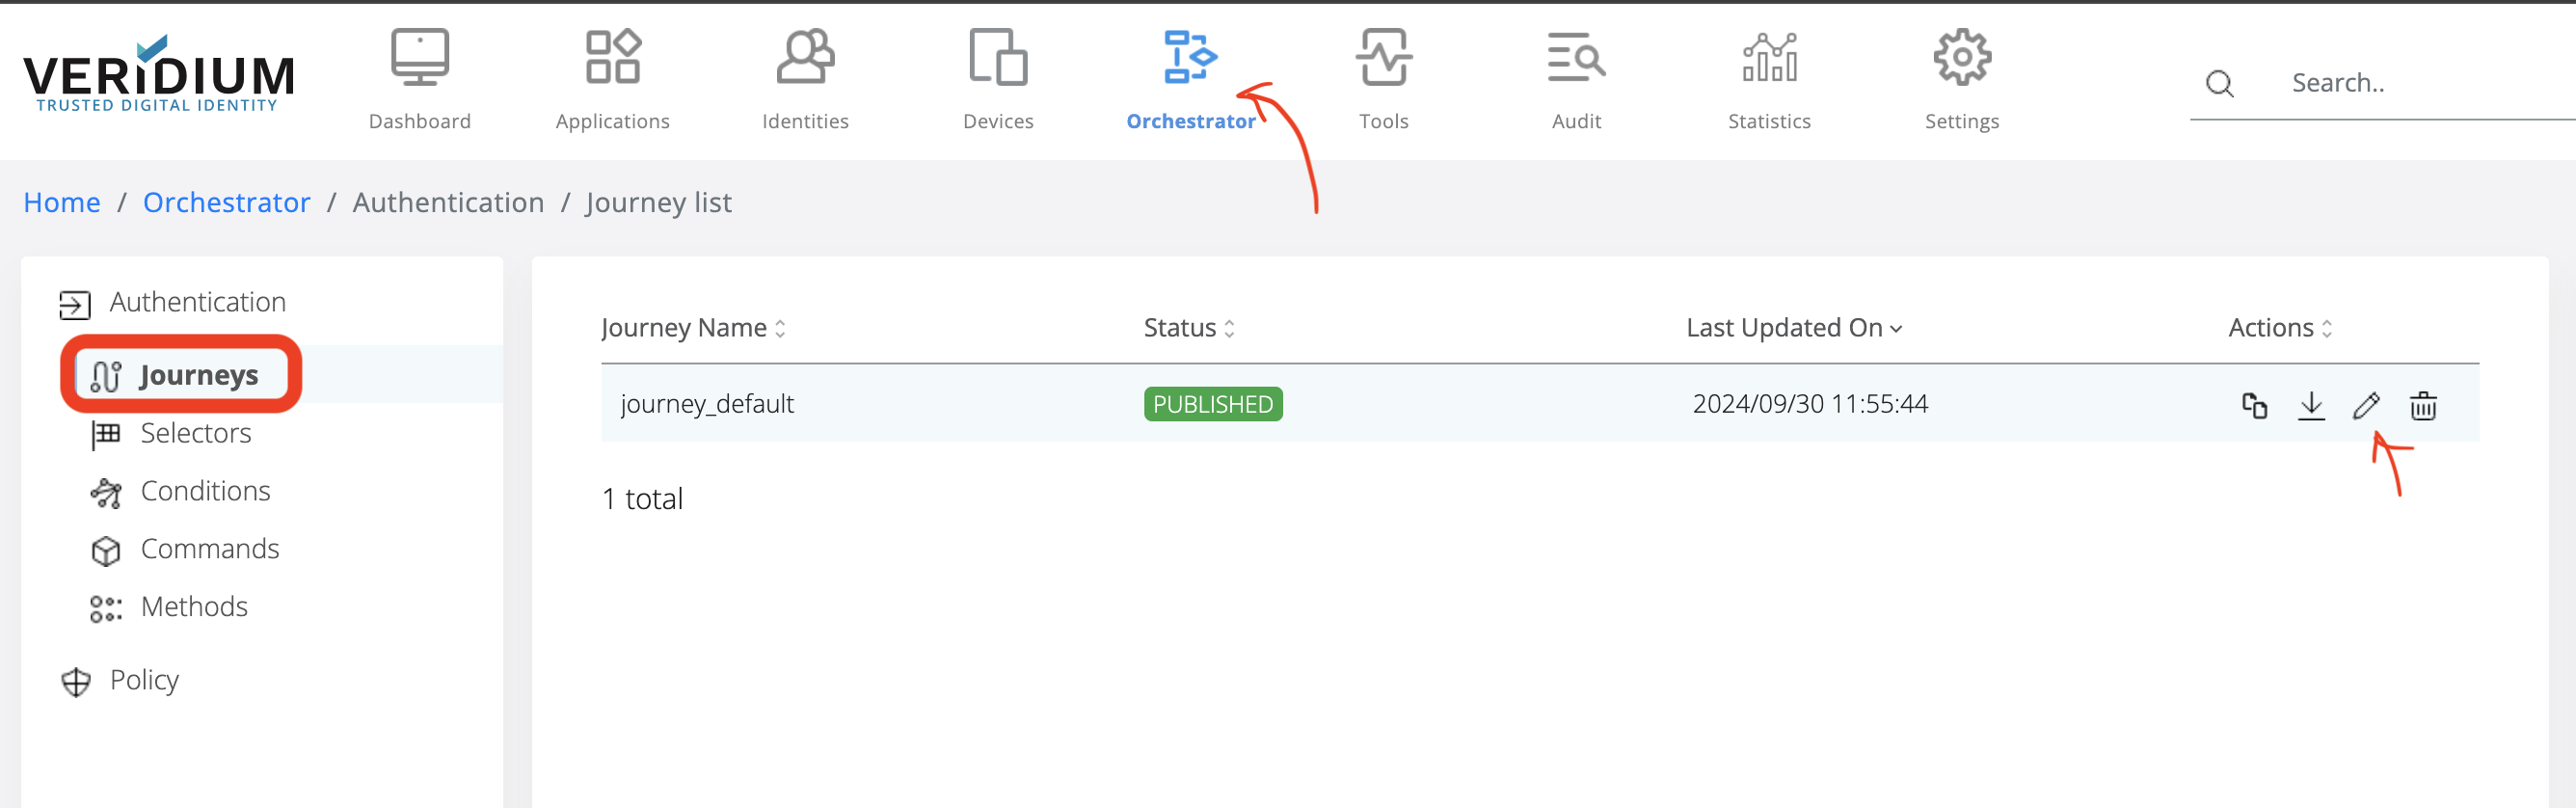
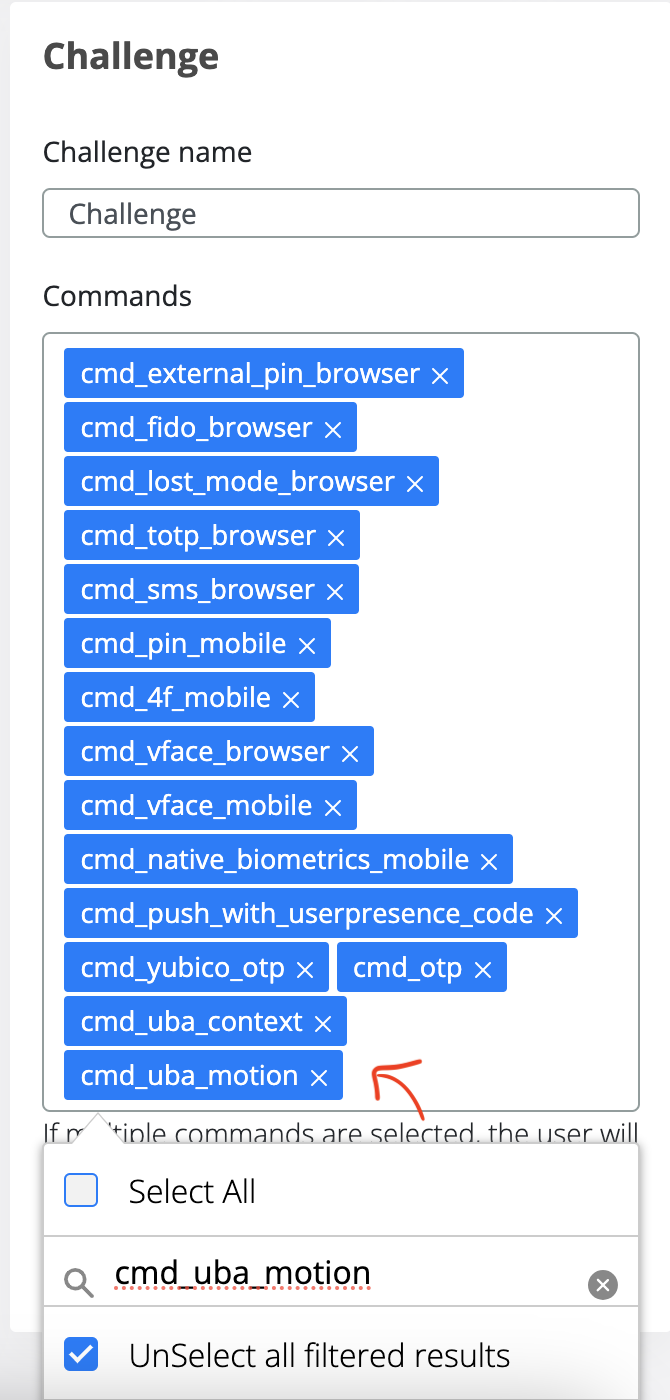
11.2 Check in the journey you are using if uba_command_motion and uba_command_context are enabled.
-
Click on Orchestator
-
Click on Journeys
-
In the Journey Name, select the active one and click on Edit button:
Check if uba_command_motion and uba_command_context are in the Challenge section:
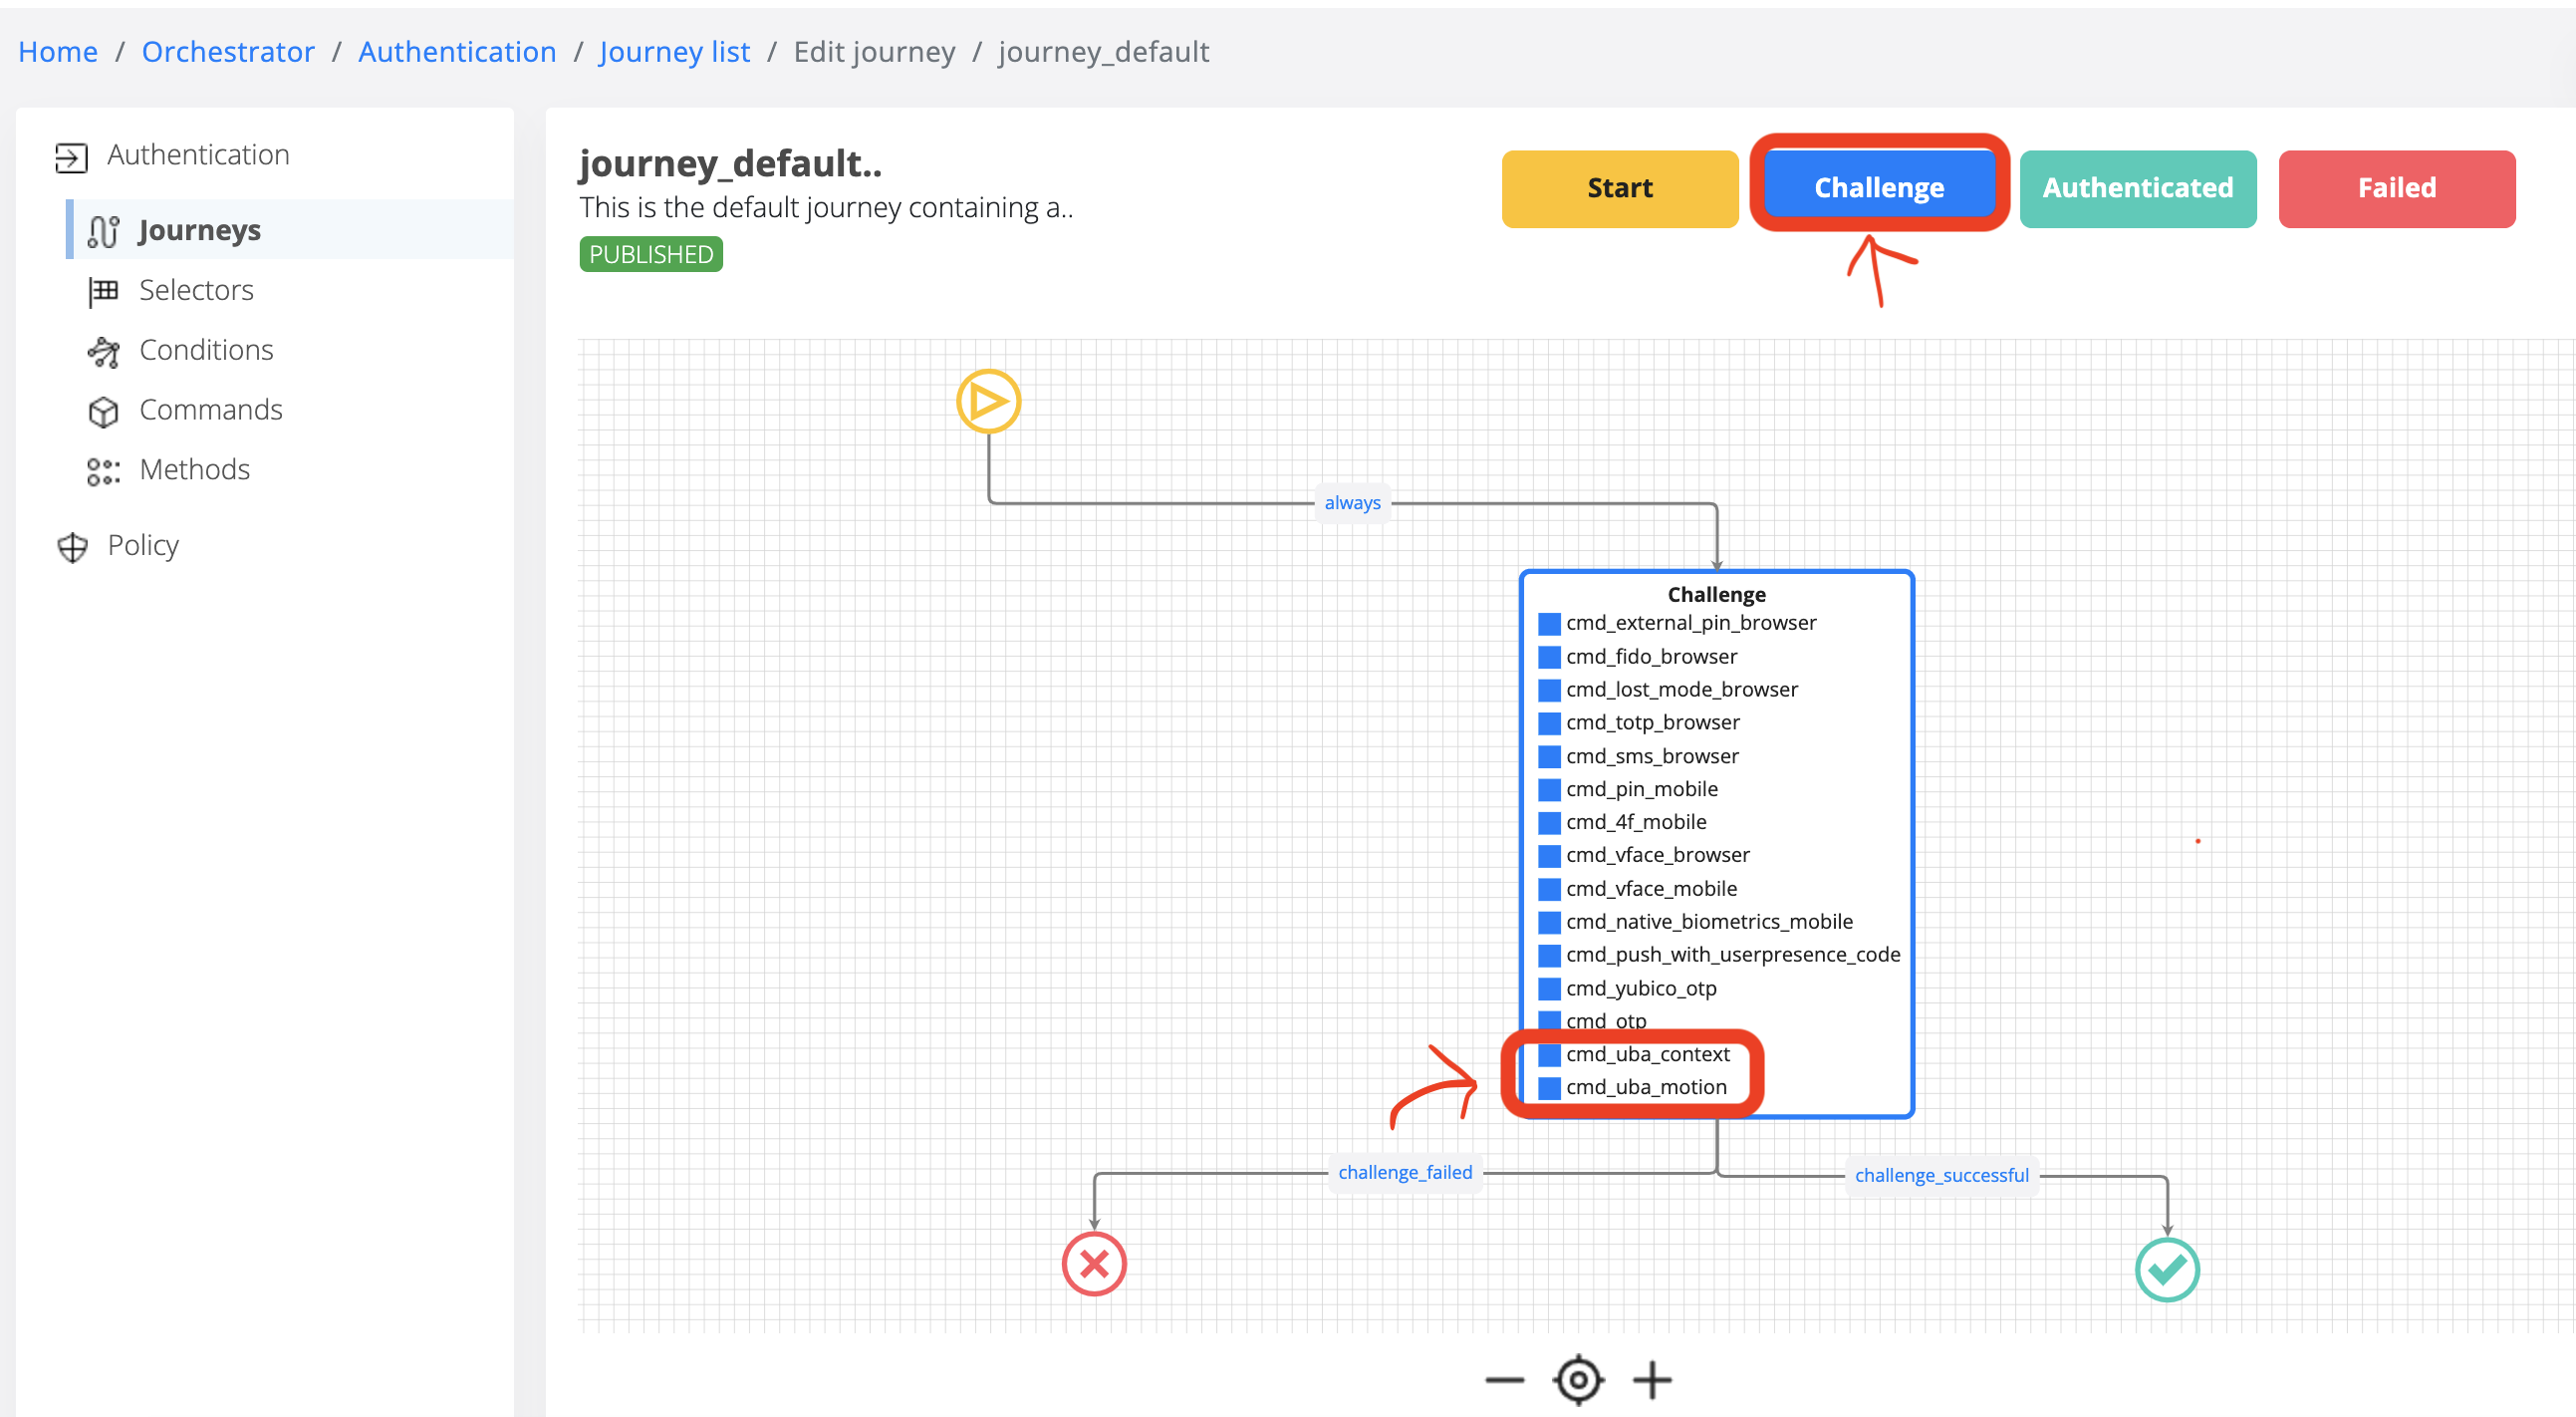
If uba_command_motion and uba_command_context are not enabled, please add in the Commands section and Save.
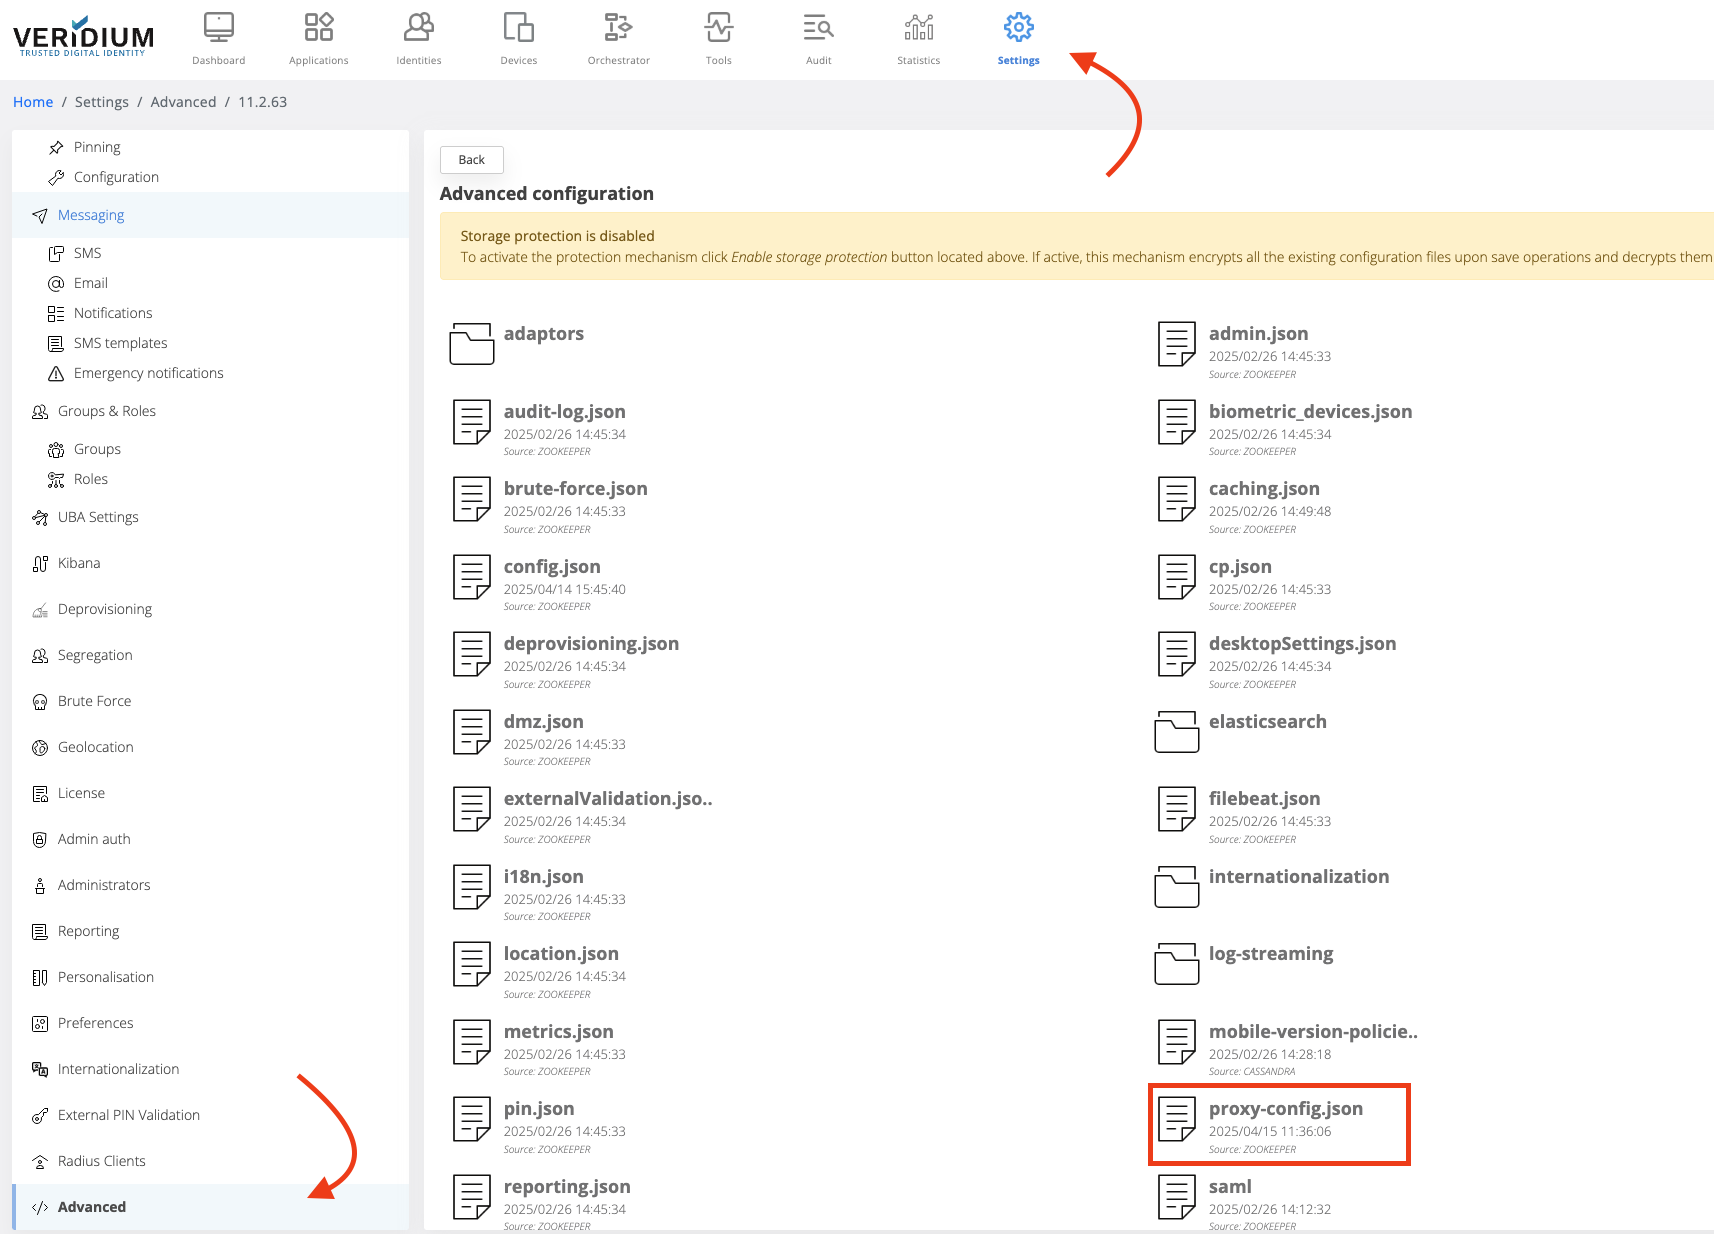
11.3 Configure proxy (if you are using one - OPTIONAL) in WebsecAdmin (Settings → Advanced → proxy-config.json) to maintain the traffic internally (where ilpdevelop.veridium-dev.com is the domain you are using for UBA)
## proxy-config.json, such an entry, to keep the traffic internally
"nonProxyHttpsHosts": "localhost|ilpdevelop.veridium-dev.com|api.twilio.com|*ilpdevelop.veridium-dev.com|*.ilpdevelop.veridium-dev.com"
11.4 Restart tomcat:
systemctl restart ver_tomcat
11.5 Go to SSP Login Page and do 11 logins and you will see score for Motion / Content in Activity. After 4 authentications you should receive a context score, and after 11 authentications you should receive a motion score as well.
Useful commands for troubleshooting
Start/stop services:
## run the following command to see if everything is running:
uba_check_services
## check if kafka is running:
uba_check_kafka
## stop/start UBA services:
uba_stop
uba_start
## stop/start a specific service (e.g.: uba-kafka)
systemctl stop uba-kafka
systemctl start uba-kafka
Log location
## veridium logs on Webapp VeridiumId servers
/var/log/veridiumid/tomcat/bops.log
## uba logs location on ILP nodes
/var/log/veridiumid/uba/<service_name>.log
##
grep DURATION /var/log/veridiumid/tomcat/bops.log
grep SESSION_ID /var/log/veridiumid/tomcat/bops.log
Troubleshooting commands:
## run this on Webapp VeridiumId servers
ping tenant.FQDN
## check connectivity
nc -zv tenant.FQDN 443
## curl
export https_proxy=""
curl https://tenant.FQDN:443
If you want to run UBA on the same machine as VeridiumID, you should edit the haproxy config using these commands:
vi /etc/veridiumid/haproxy/haproxy.cfg
frontend frontend-https
        bind *:443
        mode tcp
        ...
        ...
        use_backend backend_uba if { req_ssl_sni -i ingestion.dev58.veridium-dev.com }
        use_backend backend_uba if { req_ssl_sni -i tenant.dev58.veridium-dev.com }
        use_backend backend_uba if { req_ssl_sni -i users.dev58.veridium-dev.com }
backend backend_uba
     mode tcp
     server uba_frontend 127.0.0.1:6443
frontend ingestion
    bind 127.0.0.1:6443 ssl crt /etc/veridiumid/haproxy/server.pem alpn h2,http/1.1
    mode http
    acl uba_ingestion ssl_fc_sni -i ingestion.dev58.veridium-dev.com
    acl uba_tenant ssl_fc_sni -i tenant.dev58.veridium-dev.com
    acl uba_users ssl_fc_sni -i users.dev58.veridium-dev.com
    use_backend backend_uba_web_ingestion if uba_ingestion
    use_backend backend_uba_web_tenant if uba_tenant
    use_backend backend_uba_web_users if uba_users
backend backend_uba_web_ingestion
    balance roundrobin
    server server1 127.0.0.1:8220 check id 1 proto h2
backend backend_uba_web_tenant
    balance roundrobin
    server server1 127.0.0.1:8120 check id 1 proto h2
backend backend_uba_web_users
    balance roundrobin
    server server1 127.0.0.1:8200 check id 1 proto h2
sudo systemctl restart ver_haproxy