
We're excited to announce enhanced authentication capabilities with the integration of Windows Biometric Framework (WBF) support into our server platform! This update significantly improves the user experience by enabling seamless, secure, and passwordless or multi-factor authentication through WBF-compliant biometric devices like fingerprint readers on Windows systems.
WBF is a standardized API from Microsoft that simplifies biometric authentication across various devices. By integrating it, our server can now effortlessly process biometric authentication requests from your Windows desktop clients.
This document covers how WBF integration works, including its architecture, configuration, and usage.
What's New for Administrators
Managing WBF integration is straightforward. Here's what administrators need to know:
-
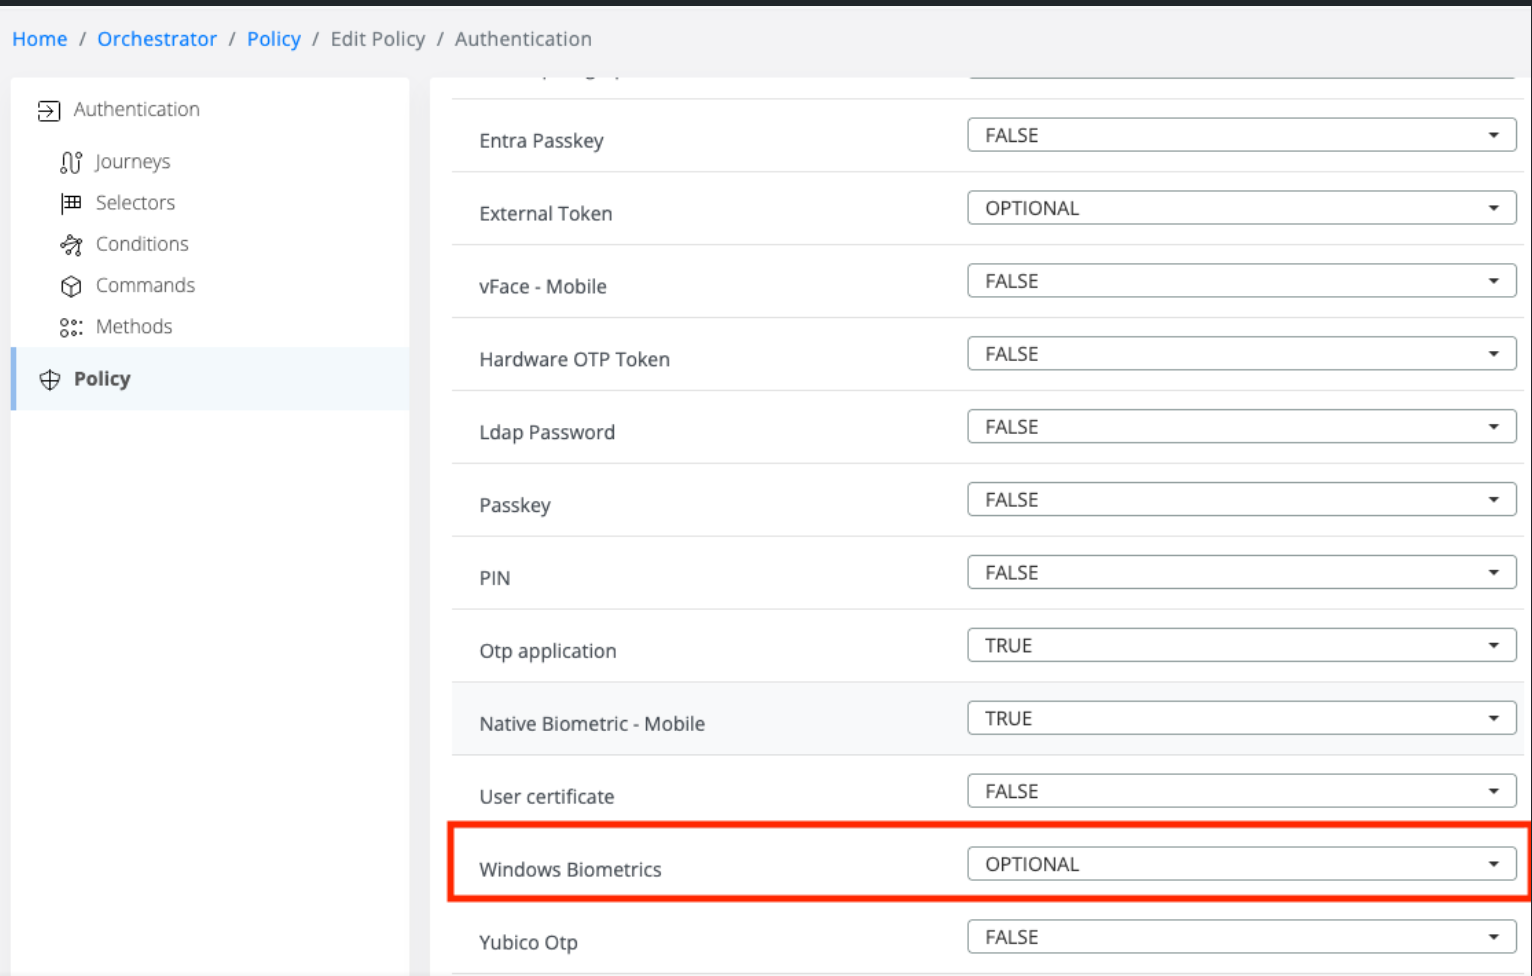
Policy Configuration: We've introduced a dedicated policy that lets administrators define whether biometric authentication is optional or required.
-
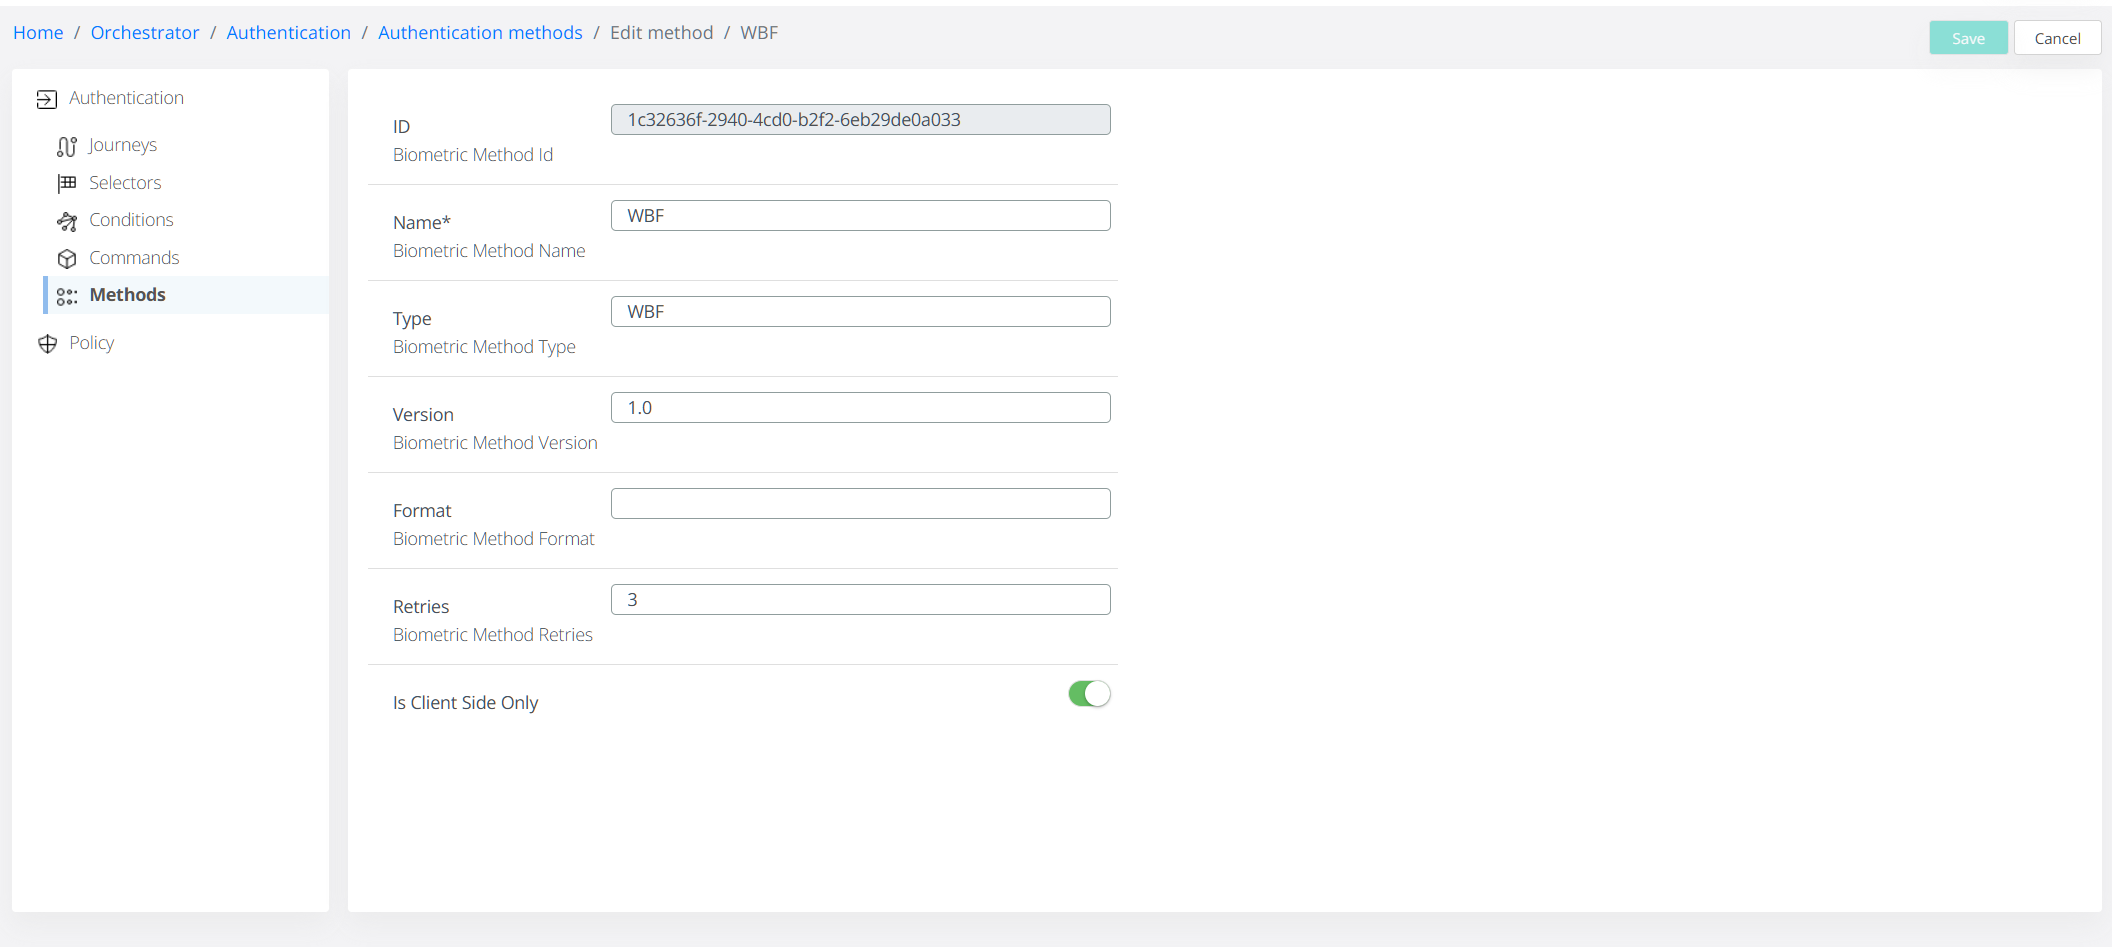
New Authentication Method: A new authentication method, simply named WBF, is now available.

-
Dedicated Authentication Command: The
cmd_wbfis a new command specifically implemented to handle WBF-based authentication requests from Windows clients. Please note this command is restricted to desktop devices only.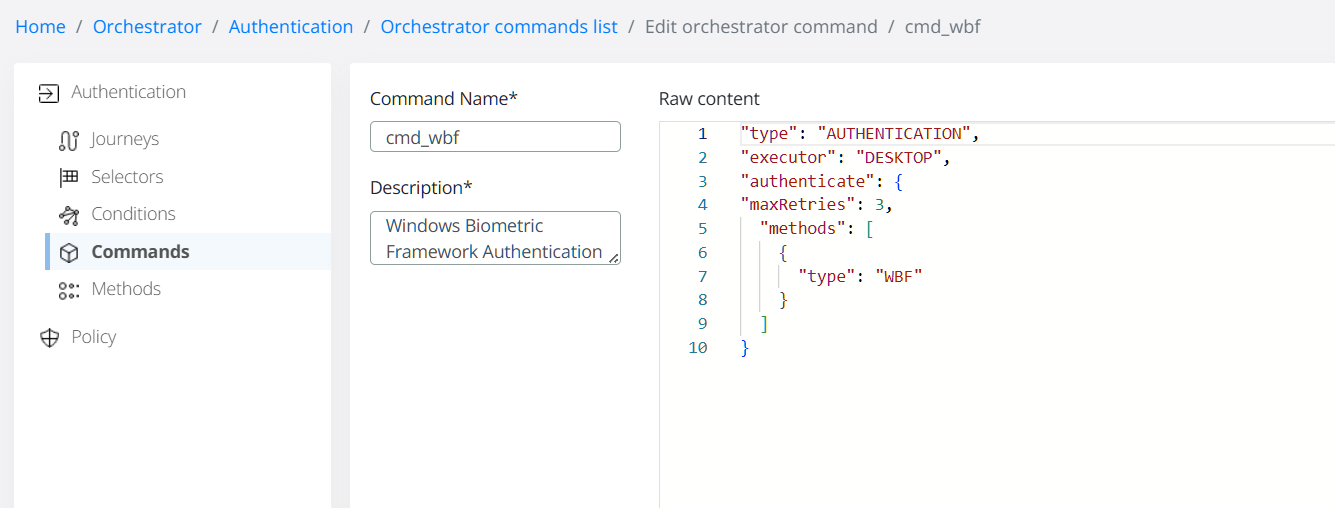
-
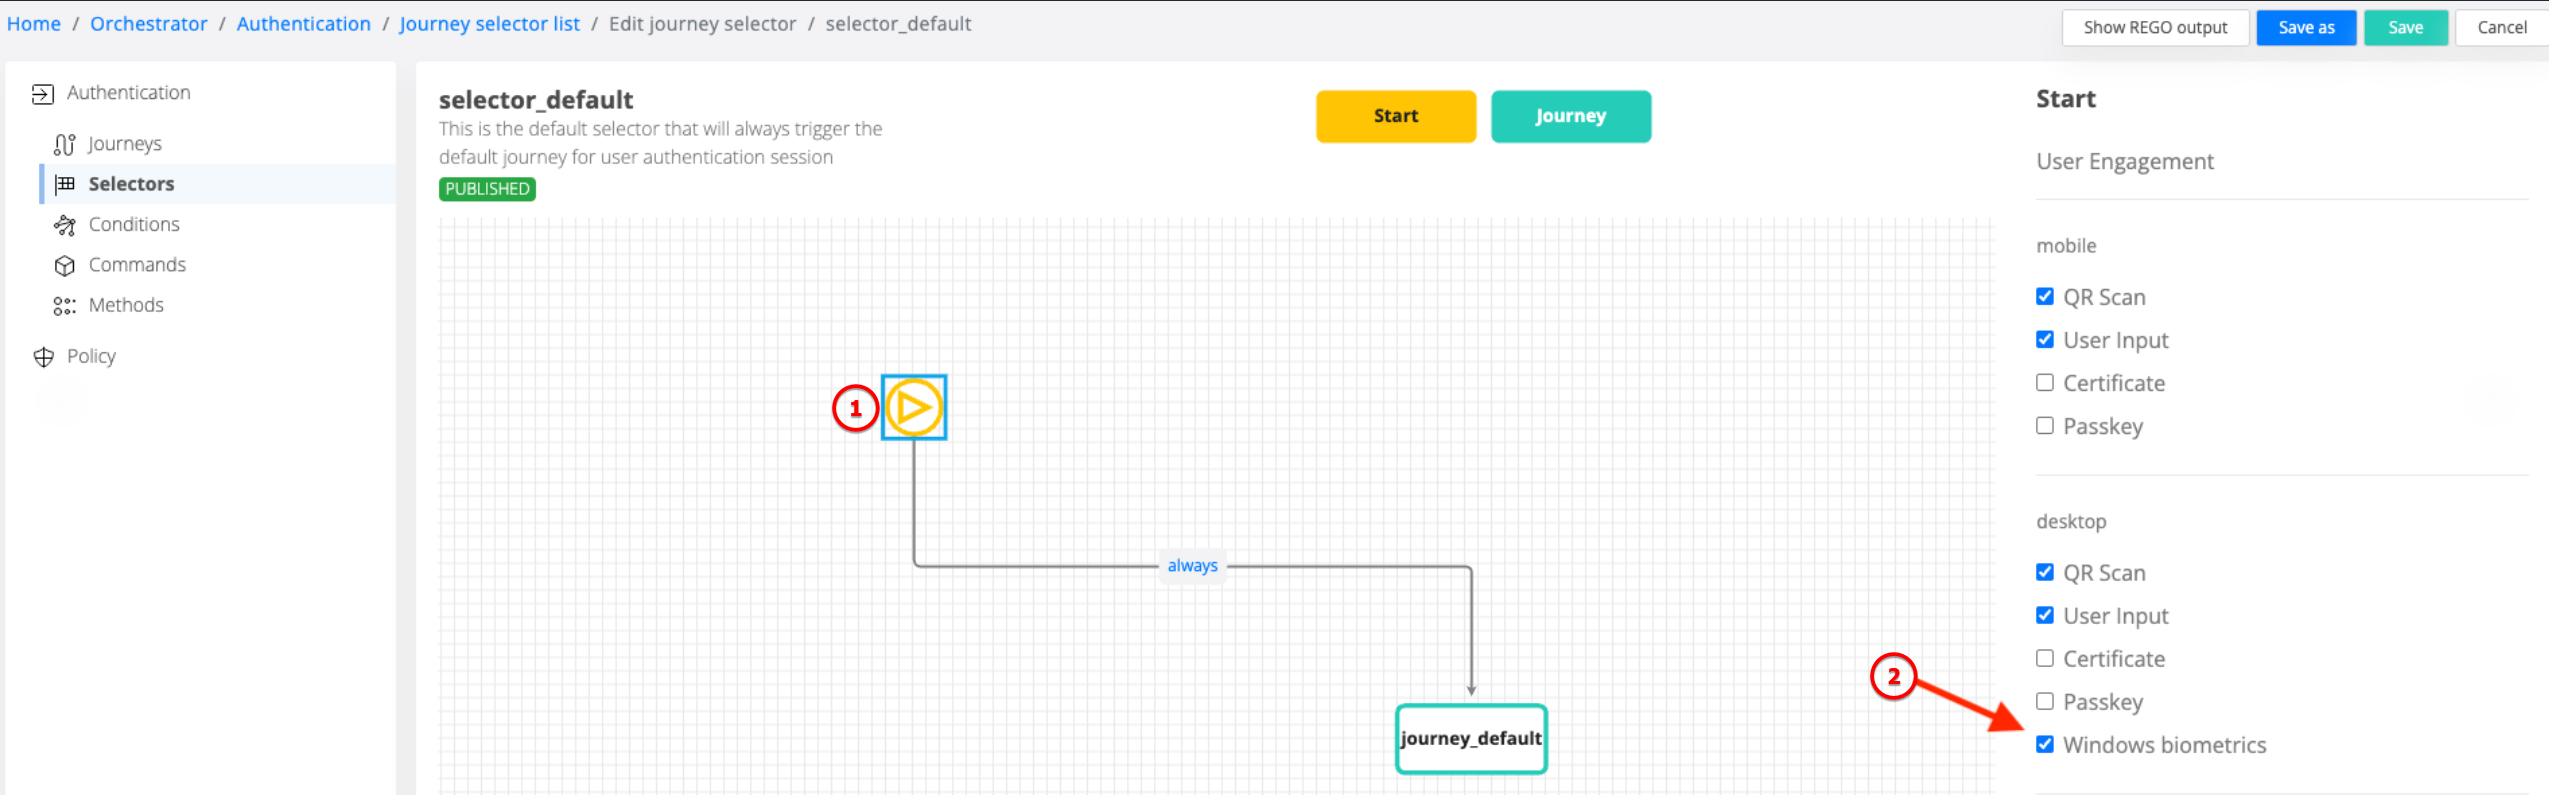
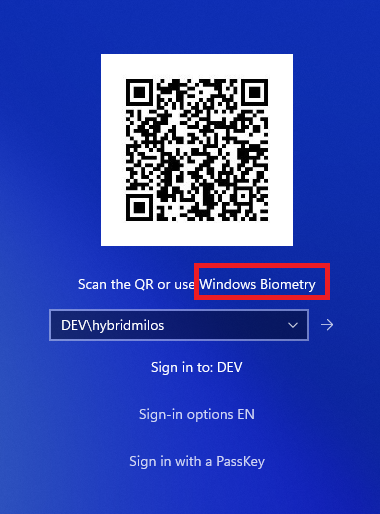
Enhanced User Experience: A new selector called Windows Biometrics has been added to improve user engagement during the authentication process.
-
Improved Identity and Device Management: The Identity and Device sections in the administration interface have been enhanced.
-
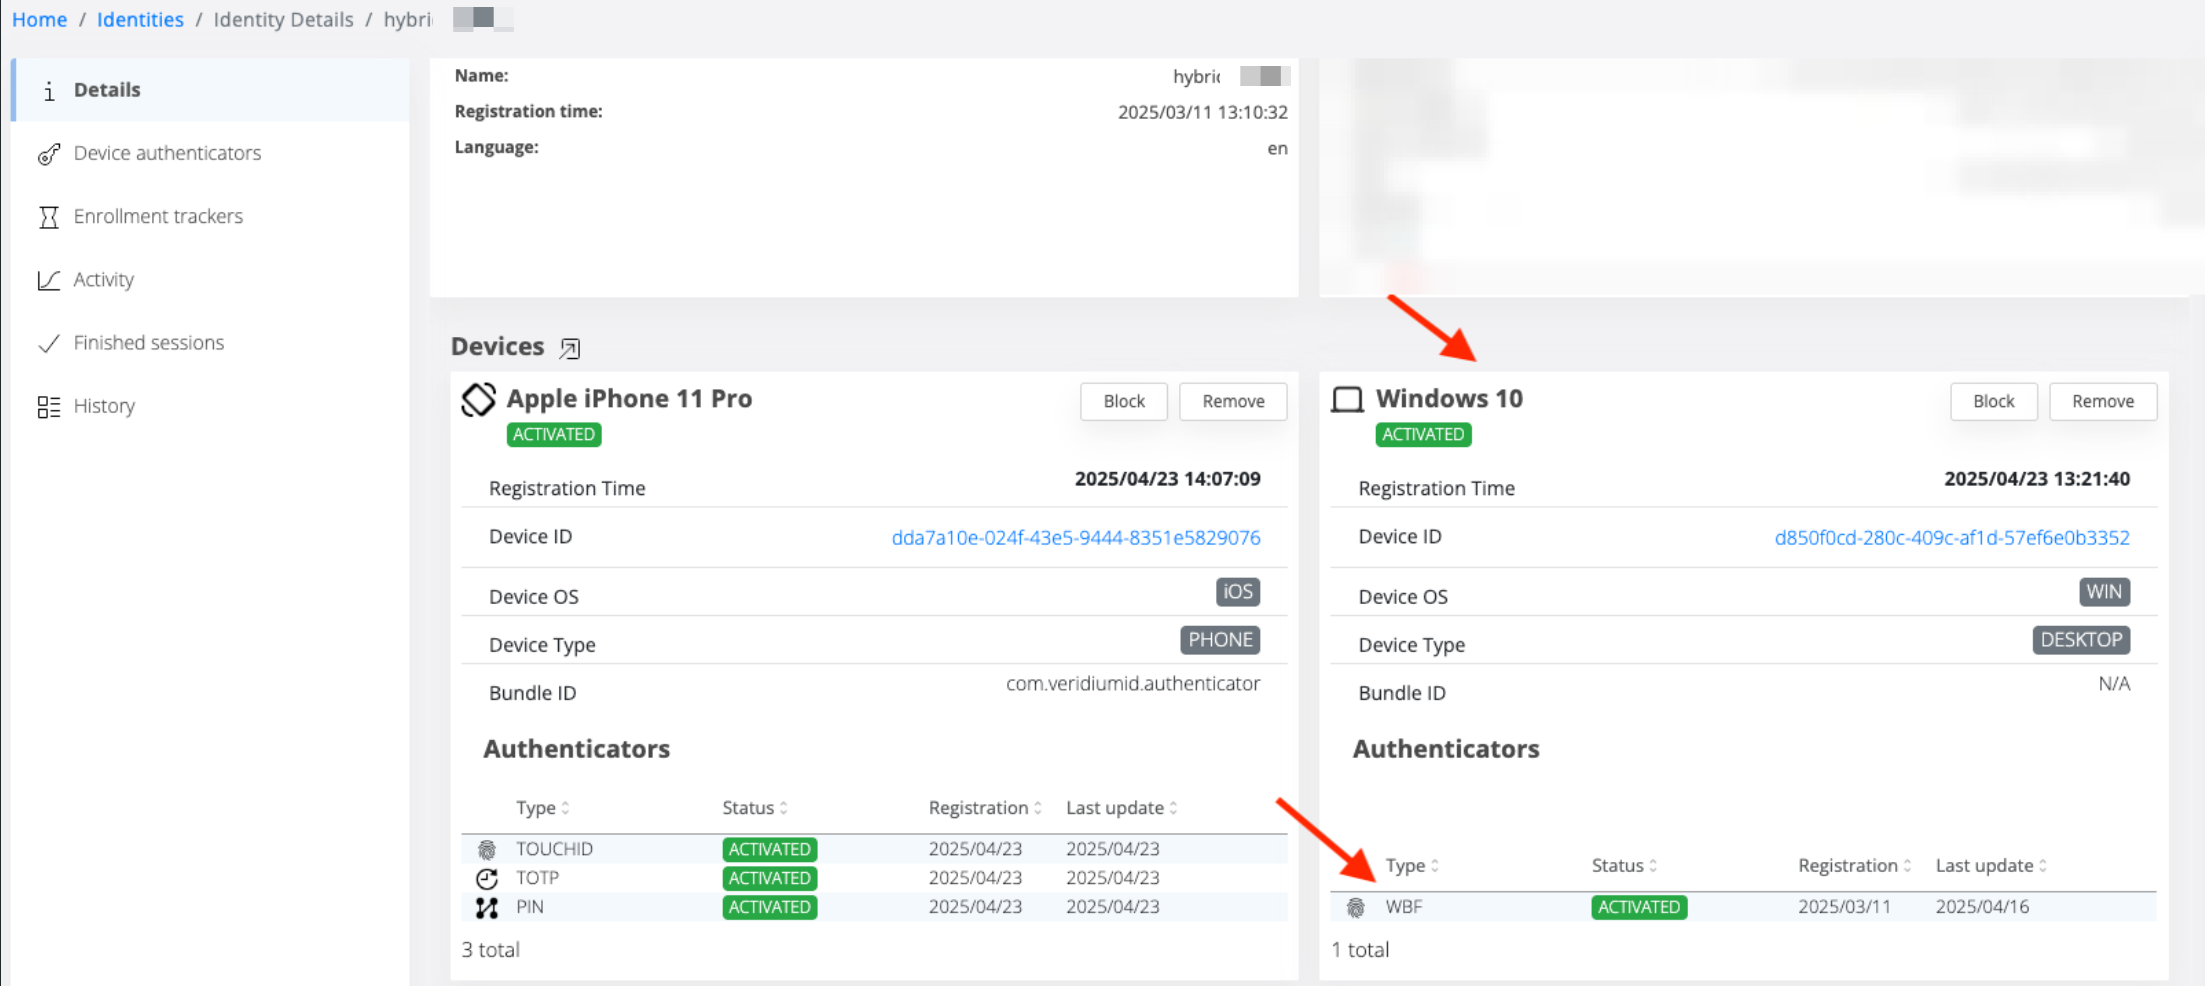
The Identity view now provides detailed information about registered desktop devices and their associated authenticators.
-
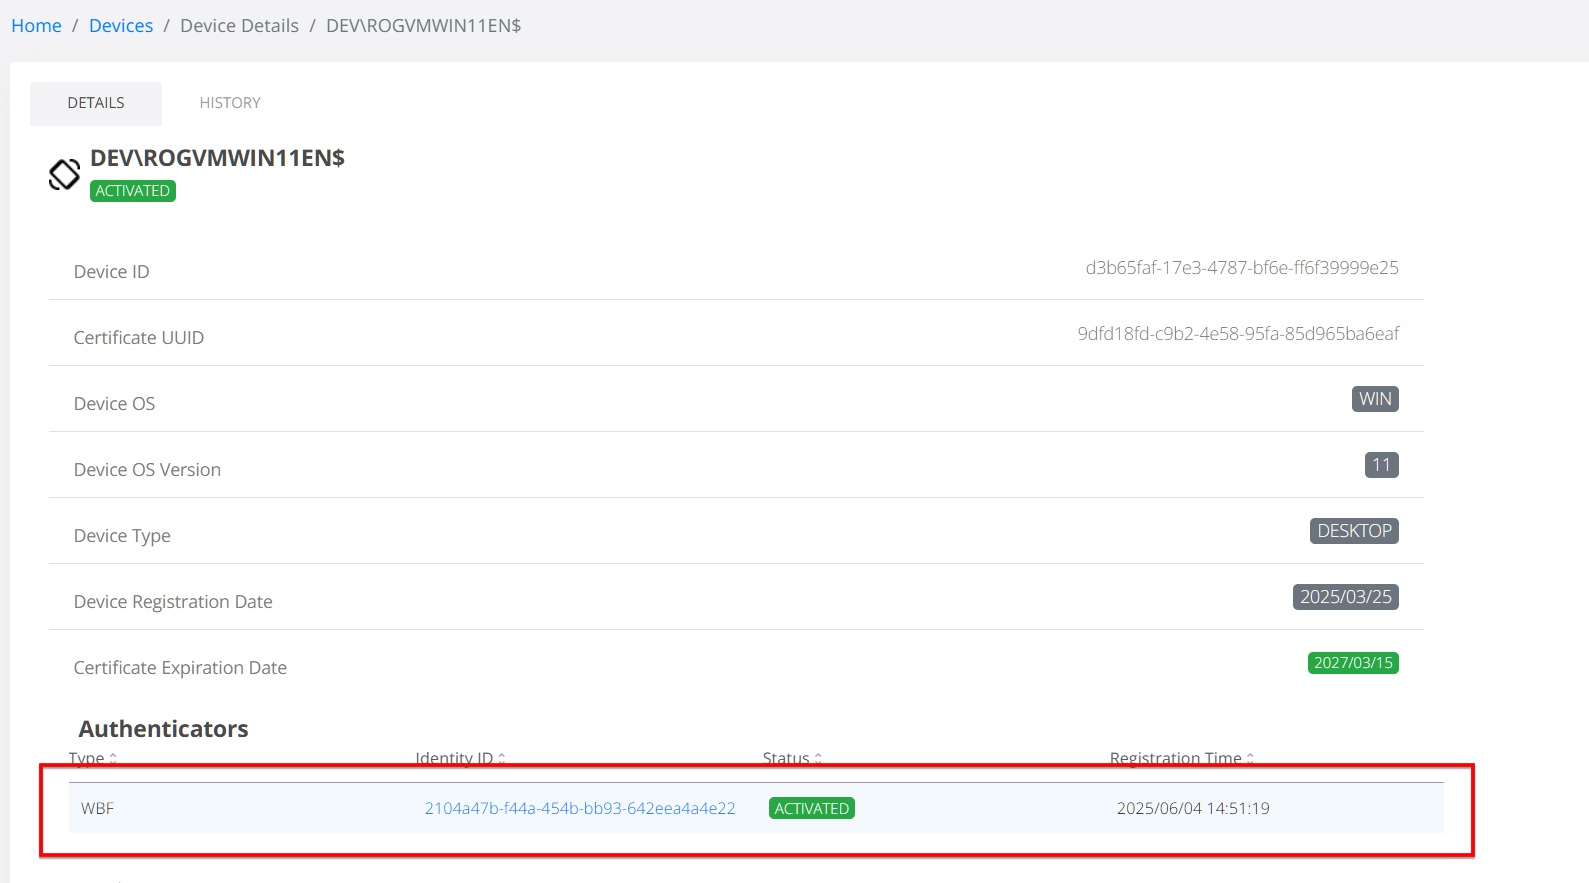
The Device view now allows administrators to see a device's associated authenticators, including the WBF method, and the identity it's linked to.
-
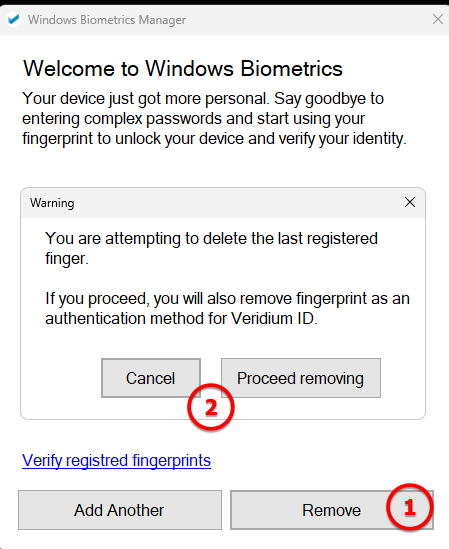
Note that the WBF authenticator will have a single entry in Veridium, no matter how many fingers are actually enrolled.
Self-Service Portal Updates
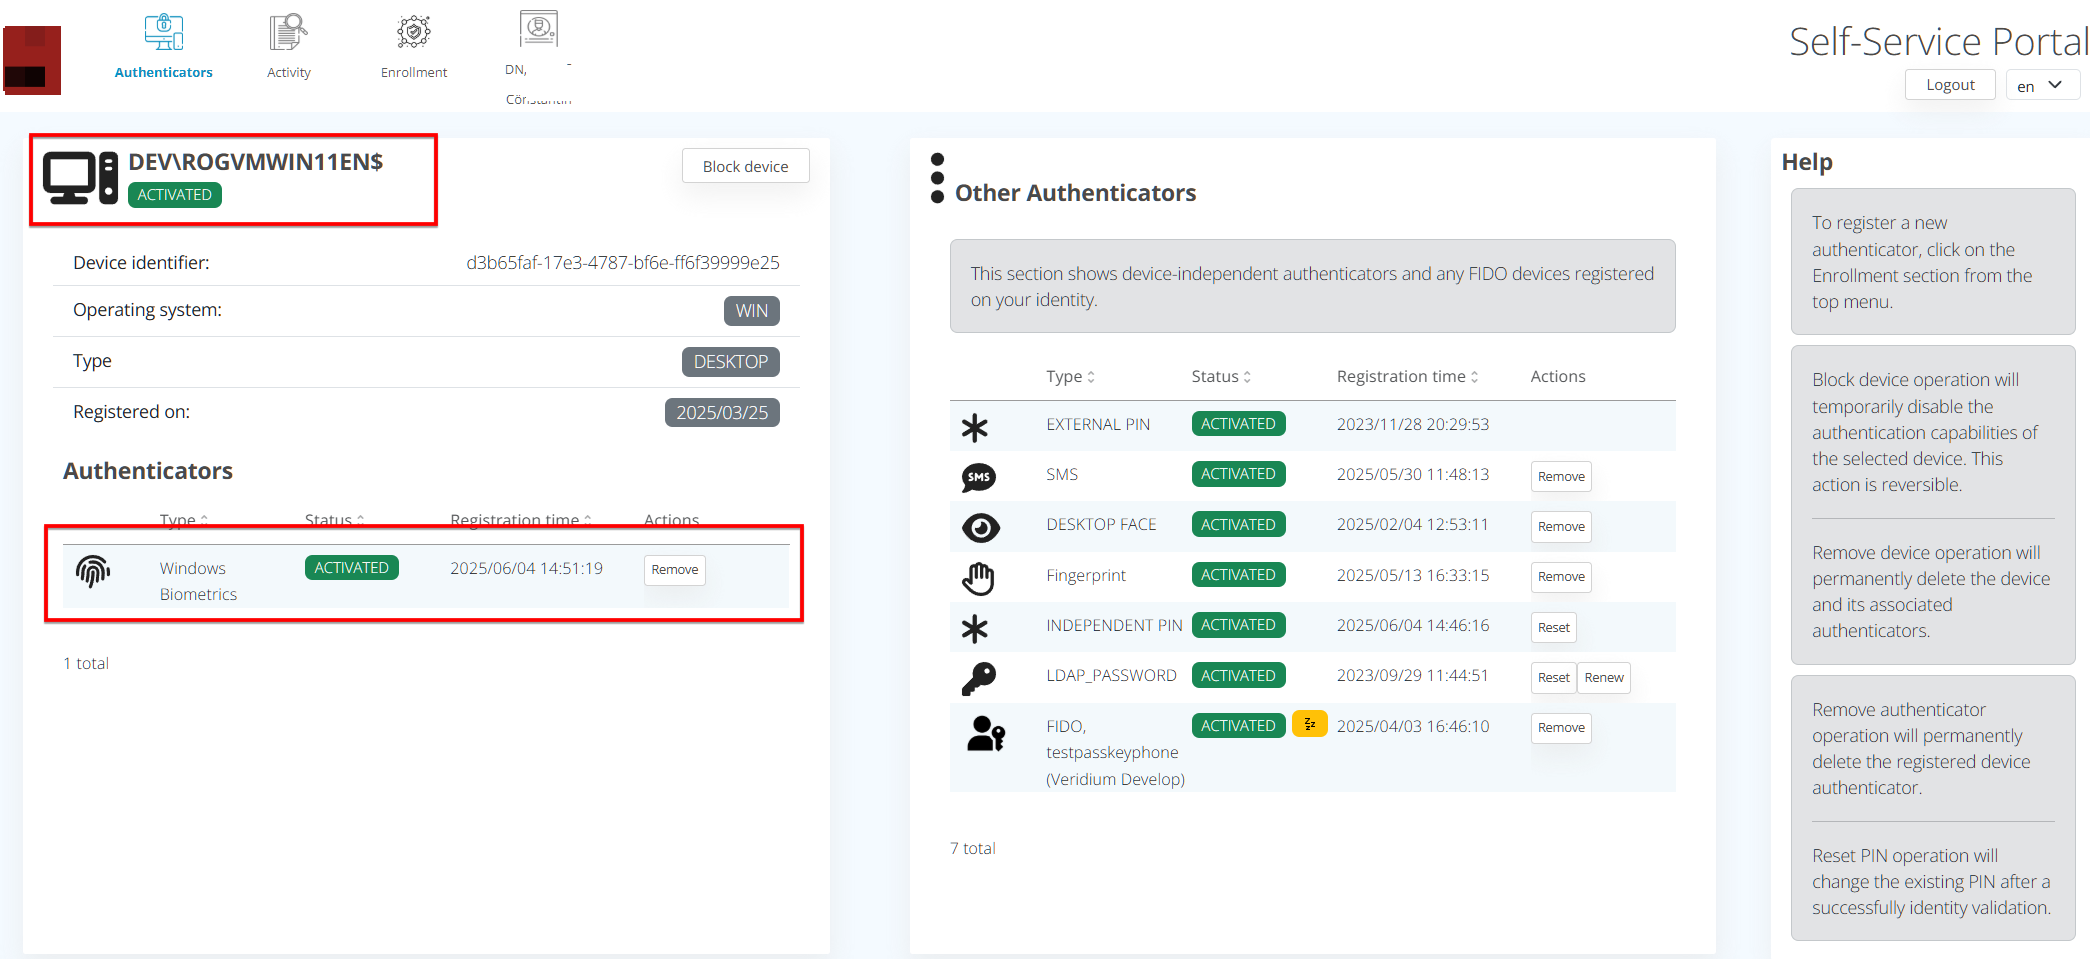
The Identity view in the Self-Service Portal (SSP) now provides detailed information about registered desktop devices and their associated authenticators, offering users greater visibility into their biometric setup.
Enrollment Process
Here's how users can enroll their biometric data:
Note that Windows Hello cannot be used at the same time with Veridium WBF integration (i.e. having a Windows Hello option (face, fingerprint, PIN) enrolled in both Windows - Settings - Sign-in options - and Veridium Windows Biometrics Manager active)
The easiest way to disable Windows Hello is to set the following key value in registry:
[HKEY_LOCAL_MACHINE\SOFTWARE\Microsoft\Windows\CurrentVersion\Authentication\Credential Providers\{BEC09223-B018-416D-A0AC-523971B639F5}]
"Disabled"=dword:00000001
-
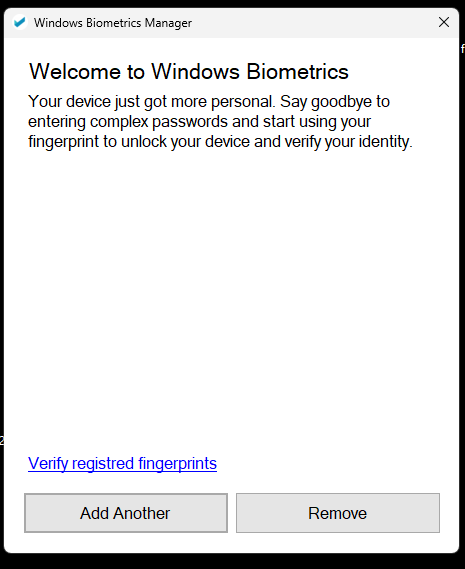
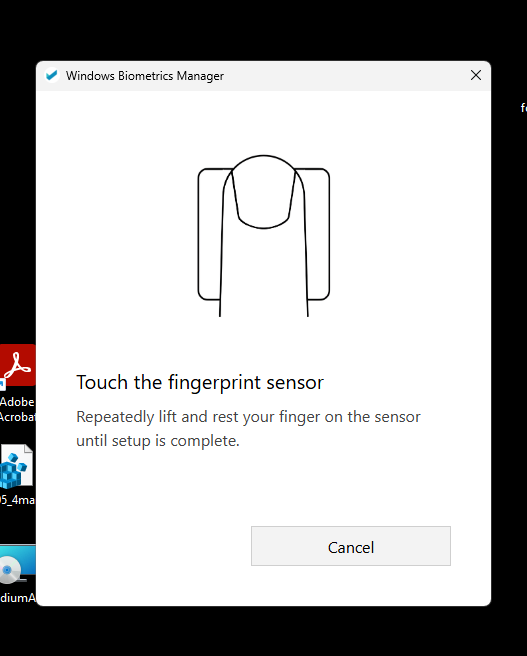
User Initiates Enrollment: The user taps the "Enroll" button within the native application named “Windows Biometrics Manager” installed automatically starting with Windows Credential Provider v3.8.1.
The application allows registered fingerprint check, add or remove.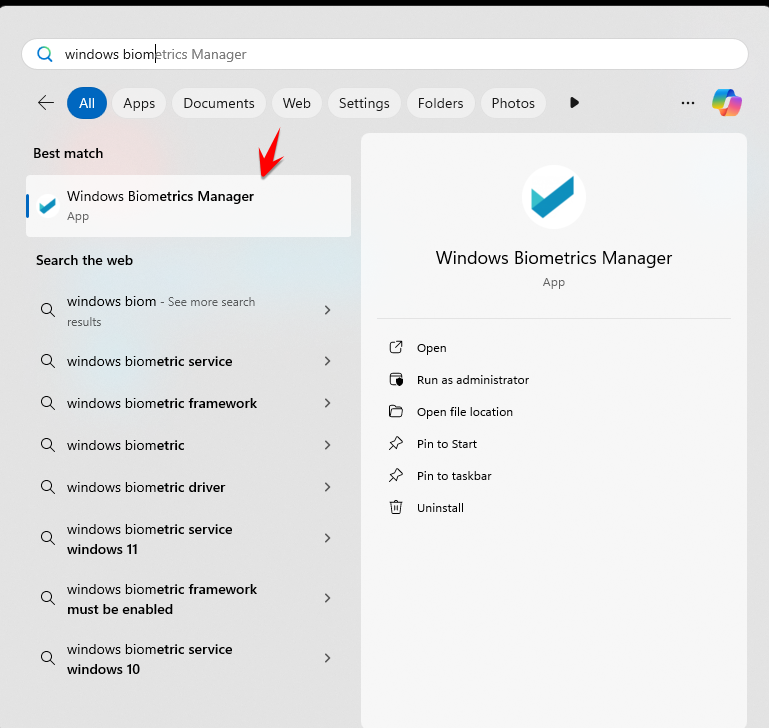
-
Launch WebView with SSP: The native application launches a WebView that displays the Self-Service Portal (SSP) regular enrollment flow.
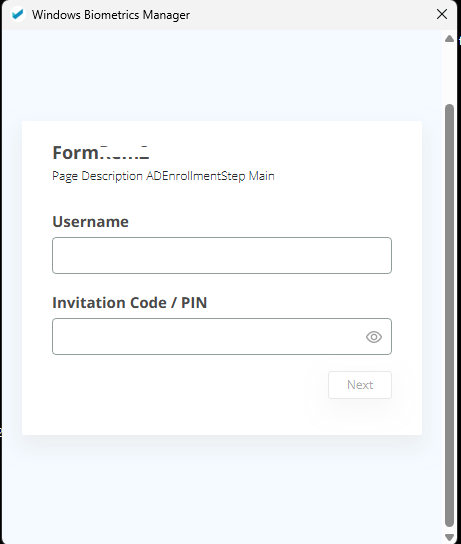
-
Enrollment via SSP: The user completes the enrollment steps within the SSP. The native application monitors the
currentStatusof the enrollment. -
Detect Enrollment Completion: Once
currentStatusreachesACTIVE, the native application closes the WebView and resumes control of the enrollment process. -
Continue Native Enrollment Workflow: The application continues with any additional native-side enrollment logic (e.g., secure credential storage, biometric linking).
-
Finalize Enrollment: The native application completes the process by invoking the
/SetAuthenticationMethodendpoint viaBopsLogonService, supplying the necessary parameters to register the chosen authentication method with the backend.
Authentication Flow
The authentication process using Windows Biometric Framework (WBF) with VeridiumID works as follows:
-
Authentication Request: The Credential Provider (CP) sends an
AuthenticationRequestto VeridiumID to begin the authentication flow. -
Command Retrieval: The CP receives the available authentication commands.
-
Choose Authentication Command: The CP sends the WBF command to VeridiumID via
/ChooseAuthentication.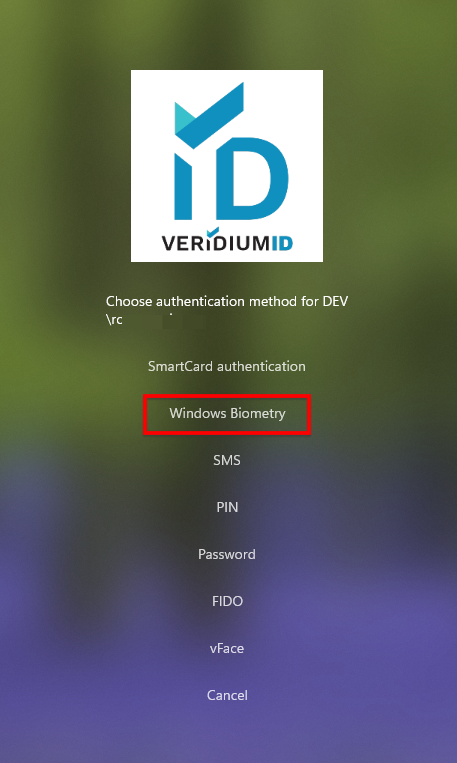
If the user engagement selector is used instead, the interface will adapt accordingly:
-
Session ID Assignment: VeridiumID responds with a
SessionID, which uniquely identifies this authentication session. -
Biometric Matching and Private Key Use: The CP performs biometric matching (e.g., a fingerprint scan). If successful, it securely unlocks the user's
PrivateKeystored on the device.

-
Message Signing: The CP constructs an encrypted message (
Message = profileId + SessionID) and signs it with the unlockedPrivateKey. -
Authentication Response: The signed message is sent to VeridiumID's
/AuthenticationResponseendpoint for verification and session completion.
WBF Authenticator Status
To check the status of a WBF authenticator, you'll need to call the /GetAuthenticationMethodStatus API with the following parameters:
{
  "deviceId": "string",
  "applicationVersion": "string",
  "ts": "string",
  "val1": "string",
  "val2": "string",
  "deviceFingerprint": "string",
  "profileId": "string",
  "name": "string"
}

MediaType = application/vnd.veridiumid.getauthenticationmethodstatus-v1+json
and the response will be:
{
  "status": "string",
  "error": {
    "errorDescription": "string",
    "errorCode": 0
  }
}
Possible status values include:
-
ACTIVATED -
DISABLED(by user) -
EXPIRED(when LostMode expiration occurs) -
LOST(when LostMode activation updates authenticator status) -
EXPIRING(when it's about to expire) -
BLOCKED(when a device is blocked, updating authenticator status) -
BLOCKED_BY_ADMIN -
NOT_FOUND
An errorCode of 0 indicates a successful operation.
Delete Authenticator
To remove a WBF authenticator, call the /DeleteAuthenticationMethod API with these parameters:
{
  "profileId": "string",
  "name": "string" //authenticator name (WBF)
}

MediaType = application/vnd.veridiumid.deleteauthmethod-v1+json
and the response will be:
{
  "error": {
    "errorDescription": "string",
    "errorCode": 0
  }
}
Again, an errorCode of 0 signifies a successful operation.