Fortigate v 7.2.1 with SAML authentication through VeridiumID
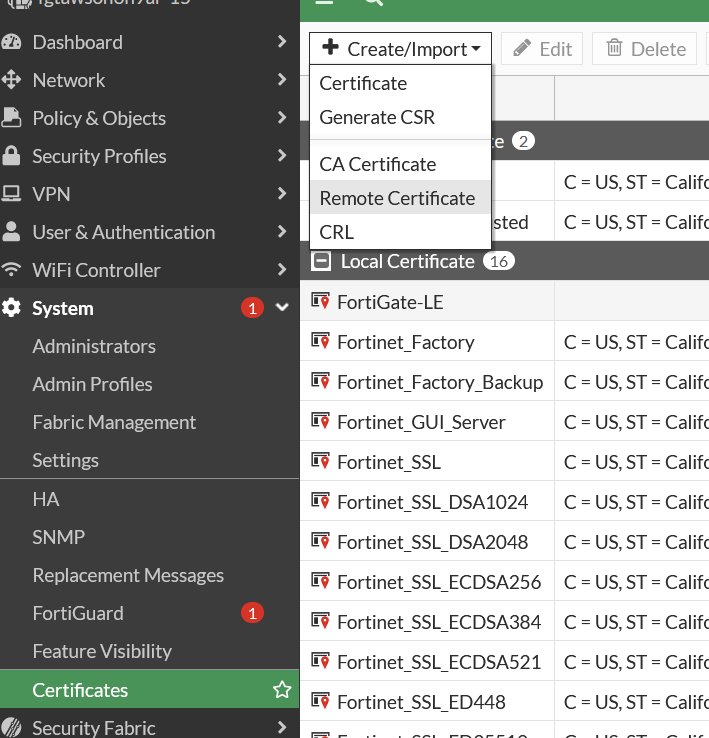
We’ve managed to configure a working SAML integration between FortiOS 7.2.1 and Veridium 3.2.0 version. SAML integration is available both for VPN connection and administrative access. In both cases you must import the idp signing certificate in the System->Certificates menu:
Guide for metadata construction:
https://www.oasis-open.org/committees/download.php/51890/SAML%20MD%20simplified%20overview.pdf
VPN - Fortigate 7.2.1 configuration
VPN configuration - configure Fortigate SP to be a SAML user:
CODEconfig user saml edit "fac-sslvpn" set entity-id "https://10.79.5.88:10443/remote/saml/metadata" set single-sign-on-url "https://10.79.5.88:10443/remote/saml/login/" set single-logout-url "https://10.79.5.88:10443/remote/saml/logout/" set idp-entity-id "https://develop.veridium-dev.com/idp/shibboleth" set idp-single-sign-on-url "https://develop.veridium-dev.com/idp/profile/SAML2/Redirect/SSO" set idp-single-logout-url "https://develop.veridium-dev.com/idp/profile/SAML2/Redirect/SSO" set idp-cert "REMOTE_Cert_3" set user-name "urn:oid:1.2.840.113556.1.4.656" set group-name "urn:mace:dir:attribute-def:memberOf" set digest-method sha256 set clock-tolerance 300 set auth-url "https://10.79.5.88:10443/remote/saml/login/" next endAfter defining the Fortinet SP as a saml user, this user must be a member of a group which will be used for firewall policy.
config user group
edit "veridium"
set member "fac-sslvpn" "ipopa@dev.local"
next
Add SAML group to a firewall policy
config firewall policy
    edit 1
        set name "SSLVPN"
        set uuid c00b9a52-1a2a-51ed-caf9-795c5fdf5140
        set srcintf "ssl.root"
        set dstintf "port1"
        set action accept
        set srcaddr "all"
        set dstaddr "SSLVPN_TUNNEL_ADDR1"
        set schedule "always"
        set service "ALL"
        set nat enable
        set groups "veridium"
    next
end
VeridiumID configuration
Metadata creation - Because metadata export isn’t available from this version of Fortigate, here is a built xml metadata to be imported into Veridium:
<?xml version="1.0" encoding="UTF-8"?>
<md:EntityDescriptor xmlns:ds="http://www.w3.org/2000/09/xmldsig#" xmlns:md="urn:oasis:names:tc:SAML:2.0:metadata" entityID="https://10.79.5.88:10443/remote/saml/metadata">
   <md:SPSSODescriptor AuthnRequestsSigned="false" WantAssertionsSigned="false" protocolSupportEnumeration="urn:oasis:names:tc:SAML:2.0:protocol">
      <md:NameIDFormat>urn:oasis:names:tc:SAML:1.1:nameid-format:unspecified</md:NameIDFormat>
      <md:NameIDFormat>urn:oasis:names:tc:SAML:2.0:nameid-format:emailAddress</md:NameIDFormat>
      <md:AssertionConsumerService Binding="urn:oasis:names:tc:SAML:2.0:bindings:HTTP-POST" Location="https://10.79.5.88:10443/remote/saml/login/" index="0" isDefault="true"/>
   <md:Extensions>
<mdui:UIInfo xmlns:mdui="urn:oasis:names:tc:SAML:metadata:ui">
</mdui:UIInfo>
</md:Extensions>
</md:SPSSODescriptor>
</md:EntityDescriptor>
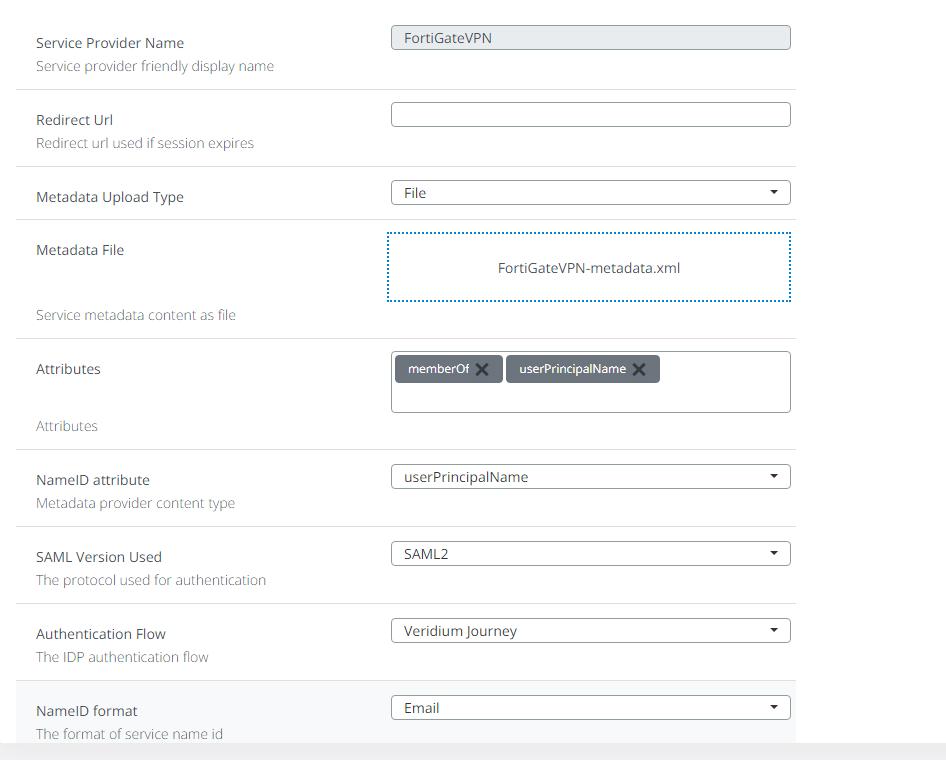
Defining Fortinet as a SP in VeridiumID dashboard:

Admin access - Fortigate 7.2.1 configuration
Security fabric connector - Fortigate 7.2.1 configuration
You can configure the Fortigate as a service provider from the admin interface by accessing the Security fabric->Fabric connectors->Security fabric setup->Single sign-on settings like in the below example:
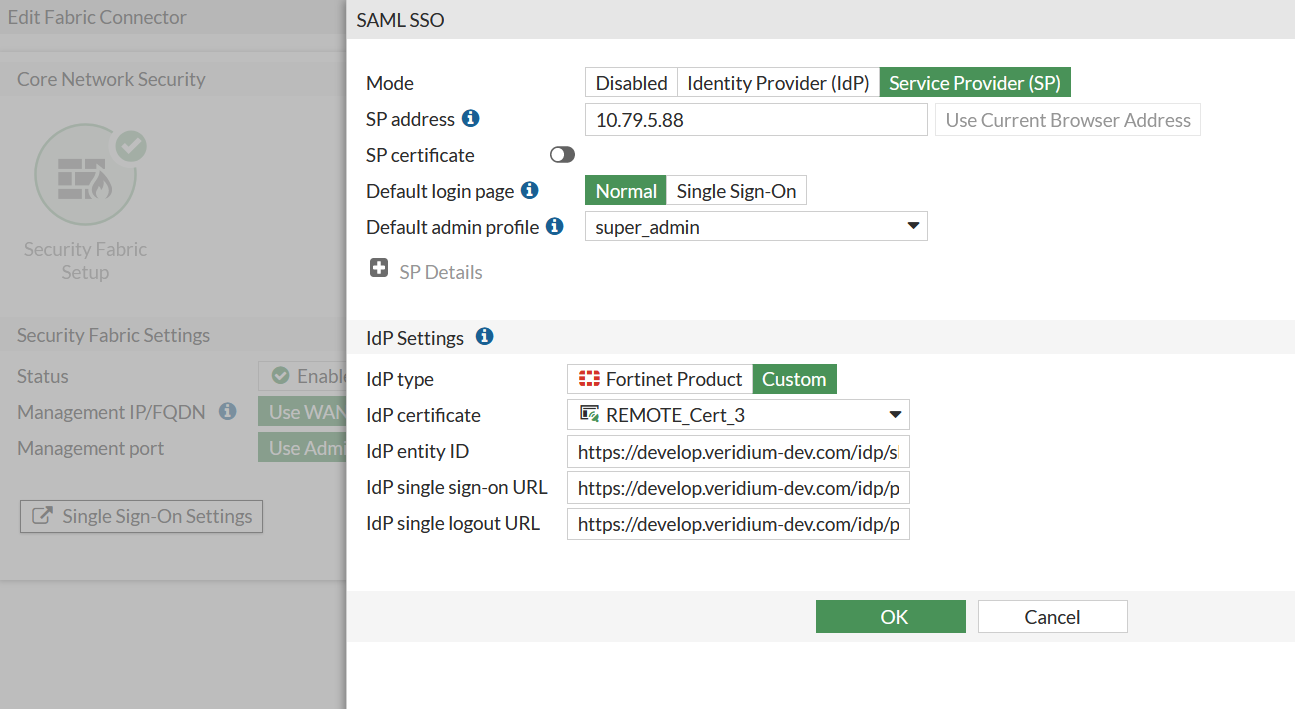
Alternatively, you can do this from the CLI by running the following sequence of commands:
config system saml
    set status enable
    set default-profile "super_admin"
    set binding-protocol post
    set idp-entity-id "https://develop.veridium-dev.com/idp/shibboleth"
    set idp-single-sign-on-url "https://develop.veridium-dev.com/idp/profile/SAML2/POST/SSO"
    set idp-single-logout-url "https://develop.veridium-dev.com/idp/profile/SAML2/Redirect/SSO"
    set idp-cert "REMOTE_Cert_3"
    set server-address "10.79.5.88"
end
SAML application - VeridiumID configuration
Just like the VPN configuration part, no metadata file is available for the Fortinet SP. Her is an example of a working metadata (imported and tested):
<?xml version="1.0" encoding="UTF-8"?>
<md:EntityDescriptor xmlns:ds="http://www.w3.org/2000/09/xmldsig#" xmlns:md="urn:oasis:names:tc:SAML:2.0:metadata" entityID="http://10.79.5.88/metadata/" validUntil="2025-12-09T09:13:31.006Z">
   <md:SPSSODescriptor AuthnRequestsSigned="false" WantAssertionsSigned="true" protocolSupportEnumeration="urn:oasis:names:tc:SAML:2.0:protocol">
      <md:NameIDFormat>urn:oasis:names:tc:SAML:1.1:nameid-format:unspecified</md:NameIDFormat>
      <md:NameIDFormat>urn:oasis:names:tc:SAML:2.0:nameid-format:userPrincipalName</md:NameIDFormat>
      <md:AssertionConsumerService Binding="urn:oasis:names:tc:SAML:2.0:bindings:HTTP-POST" Location="https://10.79.5.88/saml/?acs" index="0" isDefault="true"/>
   <md:Extensions>
<mdui:UIInfo xmlns:mdui="urn:oasis:names:tc:SAML:metadata:ui">
</mdui:UIInfo>
</md:Extensions>
</md:SPSSODescriptor>
</md:EntityDescriptor>
Fortinet is searching for an attribute called username. This attribute doesn’t exist by default in Active Directory and therefore it is not included in the SAML assertion causing the authentication to fail. The way around this is to define a subject derived attribute. For this, go to Settings->SAML->Subject derived attributes and create a new username attribute as below:
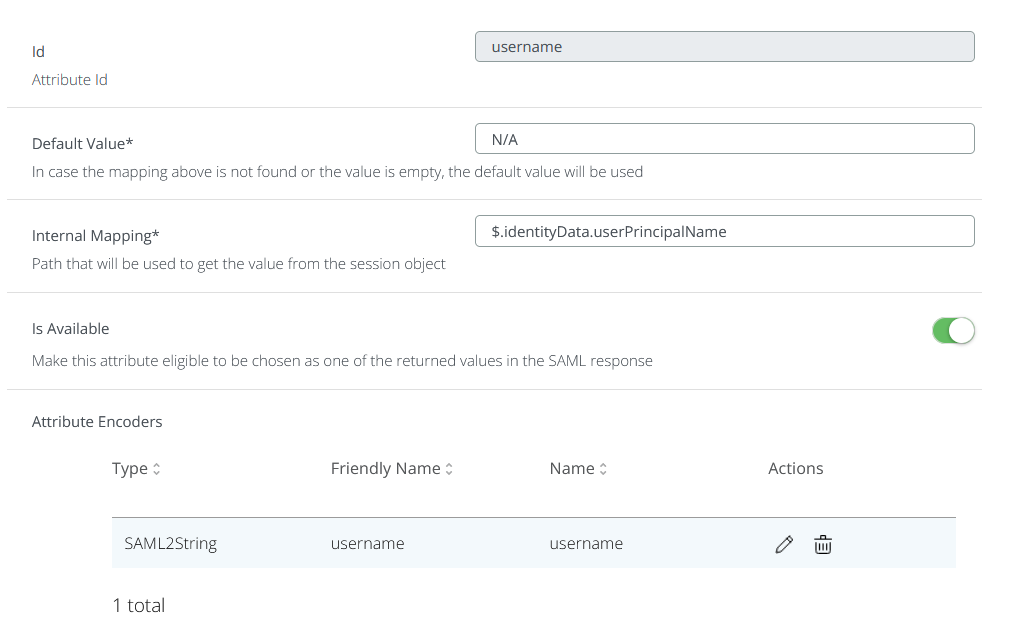
Create a SAML app for the Fortinet administrative dashboard like in the below example:
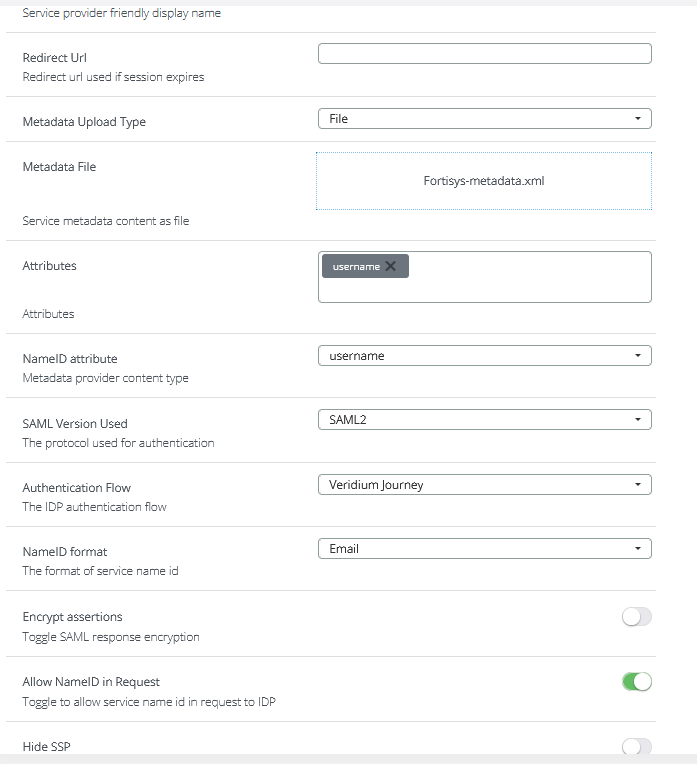
Please note that the subject derived attribute must be configured in the SAML application definition(both under Attributes and NameID sections), otherwise the authentication will fail complaining that the username is not included in the SAML assertion.
Troubleshooting
On the Fortinet side, you can enable debug for SAML by running the following commands:
diagnose debug enable
diagnose debug application samld -1
Detailed information about the SAML authentication process will be displayed.
Alternatively you can use the SAML tracer browser extension.
