
The 4Finger-ID biometric can function in an Enrol-Authentication use case, or act as an exporter whereby fingerprint data is output in a chosen format for 3rd party matching / storage outside of the Veridium SDK. In either case, integration follows the same steps.
This guide covers the use of the 4Finger ID biometric specifically and its use in the Veridium SDK. However, we demonstrate the necessary steps to use the 4FingerID biometric from the SDK, and the UI customisation that it allows.
Requirements
4Finger ID requires a minimum of iOS 12.0 and a rear LED for illumination.
Frameworks
-
veridium4FBiometrics- Contains the SDK interface implementation to the biometric. -
veridium4FLib- Contains the core logic of the biometric and is used internally. -
veridium4FUI- A UI for portrait mode and assisted/agent capture.
In addition to the 4FingerID modules you must also include the following dependencies from the Veridium SDK:
-
veridiumCore -
veridiumAnalytics -
VeridiumBiometricsOnly
Permissions
Access to the device's camera will be requested upon first use. The app's Info.plist must contain an NSCameraUsageDescription key with a string value explaining to the user how the app uses camera data.
Privacy Manifest
Your app must include a Privacy manifest file (PrivacyInfo.xcprivacy). Using the vFace SDK requires only adding the entry for access to User Defaults under NSPrivacyAccessedAPICategoryUserDefaults with reason “CA92.1" (access to read an write information accessible to the app itself), as follows:
<?xml version="1.0" encoding="UTF-8"?>
<!DOCTYPE plist PUBLIC "-//Apple//DTD PLIST 1.0//EN" "http://www.apple.com/DTDs/PropertyList-1.0.dtd">
<plist version="1.0">
<dict>
	<key>NSPrivacyTracking</key>
	<false/>
	<key>NSPrivacyTrackingDomains</key>
	<array/>
	<key>NSPrivacyCollectedDataTypes</key>
	<array/>
	<key>NSPrivacyAccessedAPITypes</key>
	<array>
		<dict>
			<key>NSPrivacyAccessedAPIType</key>
			<string>NSPrivacyAccessedAPICategoryUserDefaults</string>
			<key>NSPrivacyAccessedAPITypeReasons</key>
			<array>
				<string>CA92.1</string>
			</array>
		</dict>
	</array>
</dict>
</plist>
Initialization and Local Licensing
Initialize the biometric libraries before use. For example, inside your application's AppDelegate file (although the architecture of your app may suggest an alternative is better):
-
Import all frameworks:
Objective C
@import VeridiumCore;
@import Veridium4FBiometrics;
@import Veridium4FUI;
Swift
import VeridiumCore
import Veridium4FBiometrics
import Veridium4FUI
-
Call setup of the SDK with your SDK licence key and check the result for success via a
VeridiumLicenseStatusobject:Objective C
[VeridiumSDK setup];
VeridiumLicenseStatus* sdkStatus = [VeridiumSDK loadLicense:@"sdk_license_key_goes_here"];

// Check the result of the license system
if(!sdkStatus.initSuccess){
    // Your SDK licence is invalid
    // return fail
}

// We can also check if the licence is in the grace period
if(sdkStatus.isInGracePeriod) {
    // Warn the licence is soon to expire
}
Swift
VeridiumSDK.setup()
let sdkStatus:VeridiumLicenseStatus = VeridiumSDK.loadLicense("licence_key_goes_here")

// Check the result of the license system
if(!sdkStatus.initSuccess){
    // Your SDK licence is invalid
    // return fail
}

// We can also check if the licence is in the grace period
if(sdkStatus.isInGracePeriod) {
    // Warn the licence is soon to expire
}
-
Call setup of 4FingerID with a licence key and check the result for success via a
VeridiumLicenseStatusobject. Note, the calls for Objective C and Swift differ:Objective C
VeridiumLicenseStatus* fourfStatus = [VeridiumSDK.sharedSDK setupLib4FWithLicence:@"4f_license_key_goes_here"];

// Check the result of the license system
if(!fourfStatus.initSuccess){
    // Your 4F Export licence is invalid
    // return fail
}

// We can also check if the licence is in the grace period
if(fourfStatus.isInGracePeriod) {
    // Warn the licence is soon to expire
}
Swift
let fourfStatus:VeridiumLicenseStatus = VeridiumSDK.shared.setupLib4F(withLicense:"4f_license_key_goes_here")

// Check the result of the license system
if(!fourfStatus.initSuccess){
    // Your 4F Export licence is invalid
    // return fail
}

// We can also check if the licence is in the grace period
if(fourfStatus.isInGracePeriod) {
    // Warn the licence is soon to expire
}
-
Register the UI. Register an
Exporter,EnrollerandAuthenticatoras needed. :*Objective C* ```objectivec [VeridiumSDK.sharedSDK register4FUIEnroller]; [VeridiumSDK.sharedSDK register4FUIAuthenticator]; [VeridiumSDK.sharedSDK register4FUIExporter]; ``` *Swift* ```swift VeridiumSDK.shared.register4FUIEnroller(); VeridiumSDK.shared.register4FUIAuthenticator(); VeridiumSDK.shared.register4FUIExporter(); ```
Online Licensing
In order to initialize the Veridium SDK with online licensing capabilities, you should:
-
Get your client certificate from the Veridium License server
-
Import the frameworks stated in SDK Initialization step 1
-
Call the VeridiumSDK's setup method with your client certificate converted to Base64 string, in your app's
AppDelegate(or some other place you would like to initialize VeridiumSDK), as follows:Objective C
[VeridiumSDK setupWithOnlineLicensing:"<Your client certificate in base64 format>" onSdkLicenseCompletion: onBiolibsCompletion:];
Swift
VeridiumSDK.setup(withOnlineLicensing: "<Your client certificate in base64 format>", onSdkLicenseCompletion: , onBiolibsCompletion: );
-
The
onSDKLicenseCompletionblock provides the license validation status of Veridium SDK. In this block you can check status for success as stated in SDK Initialization step 2. In the same block you can register the default UIs as stated in SDK Initialization step 4. -
The
onBiolibsCompletionblock provides the license validation status of biometric libraries you registered at step 4. It provides statuses as a dictionary of (libraryName, VeridiumLicenseStatus) key-value pairs. You can iterate over these key-value pairs and check validation statuses as stated in SDK Initialization step 3.
Please note that, since the initialization involves communication with the Veridium Licensing Server, it is asynchronous. Therefore, the onSDKLicenseCompletion and the onBiolibsCompletion blocks are executed asynchronously.
Local Enrol and Authentication
Perfom enrol and authentication using the supplied VeridiumBiometricsOnly framework (import VeridiumBiometricsOnly), which will manage the local account for multiple biometrics.
 var account: VeridiumAccount?;

// Initilise a Veridium account for storage
func initAccount() {
    VeridiumSDK.shared.registerLocalAccountService();

    account = VeridiumAccount.init(accountId: "my_account_id", andService:VeridiumSDK.shared.localAccountService!);
        account!.kcStore["accountType"] = "my_account_name)";
}
Enrolment
Clear the Veridium account:
account!.clearAllData();
Create an enroller specifying the required biometrics, in this case 4Finger ID (engine name kVeridiumBiometricEngineName4F), and call the enroll method. Provide blocks to handle the possible outcomes.
Swift:
let enroller = VeridiumSDK.shared.enroller(forMethod: kVeridiumBiometricEngineName4F);

enroller?.enroll({ (enrollmentVector) in
    enrollmentVector.store(into: self.account!.kcStore); // store enrolment vector
    VeridiumUtils.alert("Enrolment Success", title:"Success");
}, onFail: {
    VeridiumUtils.alert("Enrolment failed", title:"Failed");
}, onCancel: {
    VeridiumUtils.alert("Enrolment Cancled", title:"Cancled");
}, onError: {
    (error) in
    VeridiumUtils.alert(error.localizedDescription, title: "Error");
});
Ensure the returned enrolment vector is stored into a VeridiumAccount, as above.
Optionally, configure the enroler before calling enrol, for example, to specify which hand to enrol and whether to use liveness.
let hand = VeridiumFourFHandChoiceForceLeftHandEnroll
let configFourFEnrol = VeridiumFourFCaptureConfig(forEnrollWithHand: hand, andLiveness: true);
commonConfigure(captureConfig: configFourFEnrol)
VeridiumSDK.shared.configureFourFEnroler(configFourFEnrol);
Authentication
Authenticate only the 4FingerID enrolment by using the shared authenticator:
let authenticator = VeridiumSDK.shared.authenticatorFourF!
Authentication requires the enrolment vector to be loaded and to be configured to update the enrol vector when needed:
let enrollVector = VeridiumBiometricFullVector.load(from: account!.kcStore,
    underKey: (authenticator.engineName));
    authenticator.configure(VeridiumBiometricsFourFCapturer.createFullLocalMatchingStrategy(with: enrollVector!, andVectorUpdate: {
    (updatedEnrollmentVector) in
    updatedEnrollmentVector.store(into: self.account!.kcStore);
})
);
Call authenticate with a block to handle the possible outcomes:
authenticator.authenticate("Auth", withCompletion: { (authStatus, error) in

    if(error != nil){
        VeridiumUtils.alert(error?.localizedDescription, title: "Error");
        return;
    }
    switch (authStatus) {
    case VeridiumAuthResult.AUTHENTICATED:
        VeridiumUtils.alert("Auth success", title:"Success");
        break;
    case VeridiumAuthResult.CANCELED:
        VeridiumUtils.alert("Auth cancelled", title:"Cancelled");
        break;
    case VeridiumAuthResult.FAILED:
        VeridiumUtils.alert("Auth failed", title:"Failed");
        break;
    case VeridiumAuthResult.TIMEOUT:
        VeridiumUtils.alert("Auth timeout", title:"Timeout");
        break;
    case VeridiumAuthResult.AUTHENTICATED_BY_ADMIN:
        VeridiumUtils.alert("Authenticated by admin", title:"Admin");
        break;
    default:
        break;
    }
});
Optionally, configure the authenticator before calling authenticate, for example, to specify which hand to authenticate (it should match the hand configured during enrolment) and whether to use liveness.
let hand = VeridiumFourFHandChoiceForceLeftHandEnroll;

let configFourFAuth = VeridiumFourFCaptureConfig(forAuthWithHand: hand, andLiveness: true);
        commonConfigure(captureConfig: configFourFAuth)
        VeridiumSDK.shared.configureFourFAuthenticator(configFourFAuth);
Export
Exporting fingerprints is achieved using the VeridiumBiometricsFourFService. Create an VeridiumFourFCaptureConfig and set do_export to true:
let exportConfig = VeridiumFourFCaptureConfig()
exportConfig.do_export = true;

VeridiumBiometricsFourFService.exportTemplate(exportConfig, onSuccess:  { (ouputVector) in
    VeridiumUtils.alert("Practice Success", title:"Success");
    // process the output vector
}, onFail: {
    VeridiumUtils.alert("Practice failed", title:"Failed");
}, onCancel: {
    VeridiumUtils.alert("Practice cancelled", title:"Cancelled");
}, onError: {
    (error) in
    VeridiumUtils.alert(error.localizedDescription, title: "Error");
});
Export can be configured to capture hands, individual fingers, or thumbs, in various image formats and containers. For example, to output images in PNG format inside a JSON container:
exportConfig.exportFormat = FORMAT_JSON
exportConfig.pack_png = true;
See formats and configuration for descriptions of all configurable items.
Liveness
This version of 4FingerID contains passive liveness. No additional action by the user is required. Liveness is supported on all iOS devices that meet the 4Finger ID requirements.
Turn liveness on/off using ExportConfig
ExportConfig.useLiveness = true
Finger Selector Module
The VeridiumFingerSelector framework provides a simple UI for user finger selection. The user is displayed a graphic of a hand, and can tap those fingers that they wish to capture.
[Note, this a feature for Export only, and not Enrol / Authenticate use cases.]
The finger selector is not a required component, so is provided in the iOS Quick Start project. It can be used directly, or as an example for building a custom UI for finger selection. Usage is demonstrated in the VeridiumExportDemo app.
Objective-C
Apply delegate ViewControllerFingerSelectorDelegate to a UIViewController:
#import <VeridiumFingerSelector/ViewControllerFingerSelector.h>

@interface ViewController : UIViewController<ViewControllerFingerSelectorDelegate>

@end
Initiate ViewControllerFingerSelector, assigning an exportConfig object and delegate:
VeridiumFourFCaptureConfig* exportConfig;

ViewControllerFingerSelector* fingerSelectorVC = [ViewControllerFingerSelector initiate];
fingerSelectorVC.modalPresentationStyle = UIModalPresentationOverCurrentContext;
fingerSelectorVC.exportConfig = exportConfig;
fingerSelectorVC.delegate = self;
[fingerSelectorVC presentInTopmost];
Provide viewControllerFingerSelectorDidFinish implementation to update the export config with those fingers selected. complete can he used to check if the user canceled the selection process:
-(void) viewControllerFingerSelectorDidFinish:(ViewControllerFingerSelector *)controller
withSelection:(NSMutableSet *)fingers andWasComplete:(bool)complete; {
    [exportConfig setFingers:fingers];
}
Swift
Initiate ViewControllerFingerSelector, assigning an exportConfig object and delegate:
import VeridiumFingerSelector

if let fingerSelectorVC = ViewControllerFingerSelector.initiate() {
    fingerSelectorVC.modalPresentationStyle = .overCurrentContext
    fingerSelectorVC.exportConfig = exportConfig
    fingerSelectorVC.delegate = self
    fingerSelectorVC.presentInTopmost()
}
Extend a ViewController class with ViewControllerFingerSelectorDelegate to update the export config with fingers selected on completion. complete can he used to check if the user canceled the selection process:
extension ViewController: ViewControllerFingerSelectorDelegate {

    func viewControllerFingerSelectorDidFinish(_ controller: ViewControllerFingerSelector!, withSelection fingers: NSMutableSet!, andWasComplete complete: Bool) {
        if let selectedFingers = fingers as? Set<NSNumber> {
            exportConfig.setFingers(selectedFingers)
        }
    }

}
User Interface
4FingerID is provided with a pre-compiled UI as a framework
-
Veridium4FUI- UI for portrait mode, self capture.
However, this framework is provided as source code for customisation (See the iOS Quickstart package at quickstart-ios/CustomUI/Veridium4FUI).
UI implementations follow the IOSPlatformFourFGui protocol. IOSPlatformFourFGui.h is included with this documentation for reference.
Some UI elements can be controlled through the capture configuration object.
Instruction Screen
By default, the instruction screen will show before fingerprint capture for Enrol and Export operations. Control it manually by setting show_instruction_screen
let config= VeridiumFourFCaptureConfig(forEnrollWithHand: hand, andLiveness: true);
config.show_instruction_screen = false
UI Customisation
UI Customisation: UI Source Project
Any aspect of the UI can be altered by importing the source project for Veridium4FUI and editing its source and storyboards. The following example demonstrates this using the VeridiumExportDemo provided in the iOS Quickstart package.
-
Open the app workspace in Xcode;
quickstart-io/VeridiumExportDemo/VeridiumExportDemo.xcworkspace.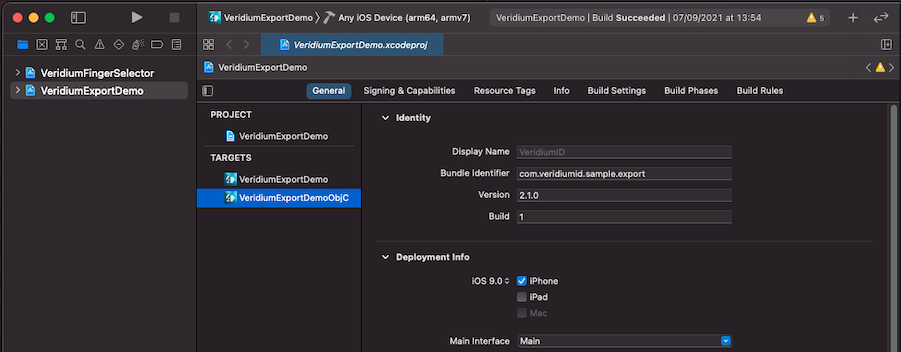
-
Build and run
VeridiumExportDemo. This should be successful and run on a device. -
Delete the reference to the pre-compiled
Veridium4FUIframework in theVeridiumExportDemo.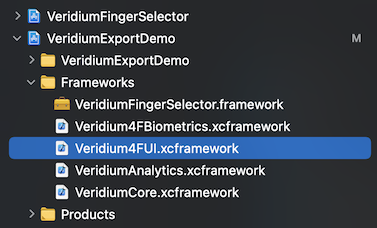
-
Drag and drop
quickstart-ios/CustomUI/Veridium4FUI/Veridium4FUI.xcodeprojinto the workspace.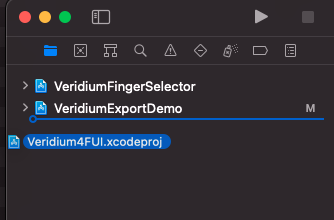
-
Select the
Veridium4FUIscheme and build it. -
Once successful, add the
Veridium4FUIproject framework toVeridiumExportDemoandVeridiumExportDemoObjCtargets. To do this, select theVeridiumExportDemoproject, general tab -> Frameworks, Libraries, and Embedded Content and click the plus icon.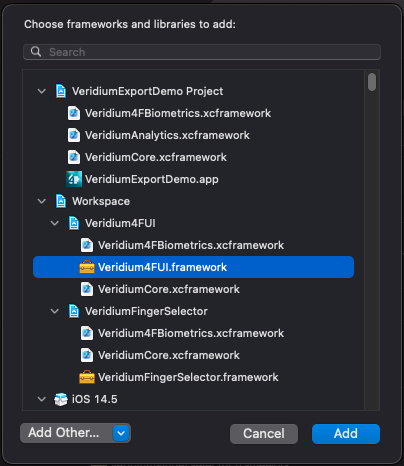
-
Build and run
VeridiumExportDemo. -
You can now edit the contents of
Veridium4FUIstoryboard, or any aspect of the UI, and observed the changes in the VeridiumExportDemo app.

NOTE: Building Veridium4FUI requires the contents of quickstart-io/_buildScripts and quickstart-io/Utilities.
UI Customisation: Extending the Default UI
Parts of the UI can be altered by creating your own UI framework which extends upon the Veridium4FUIViewController interface.
Create a new Objective-C project, eg. Custom4FUI, and add Veridium4FBiometrics, Veridium4FUI and VeridiumCore frameworks. Import Veridium4FUI into your Custom4FUI.h header file:
#import <Foundation/Foundation.h>

@import Veridium4FUI;
Create a view controller which implements Veridium4FUIViewController. For example, Custom4FUIViewController.h:
#ifndef Custom4FViewController_h
#define Custom4FViewController_h

@import Veridium4FUI;

@interface Custom4FViewController : Veridium4FUIViewController


@end

#endif /* Custom4FViewController_h */
and interface file Custom4FViewController.m:
#import "Custom4FViewController.h"

@interface Custom4FViewController (){

}

@end
Import the Custom4FUI framework into the integrating App and use as in the same way as Veridium4FUI. Adapt the interface to alter UI behaviour.