
Integrating Cisco VPN with a VeridiumID environment means creating a tunnel group which uses SAML authentication provided by Shibboleth. In order to achieve this you must perform the following steps:
-
Access VeridiumID dashboard and download the idp signing certificate.
-
Log in to Cisco ASA using a ssh client.
-
Enter the configuration terminal by issuing the following command:
configure terminal
4. Create a trustpoint associated with the VeridiumID environment. In this example, we’ll be using the develop environment:
crypto ca trustpoint develop
enrollment terminal
no ca-check
crl configure
5. Next you’ll need to import the idp signing certificate. You need to run:
crypto ca authenticate develop
At this point you need to enter the content of the idp-signing.crt file. Open it with a text editor and copy the content in clipboard, then paste it in the ssh window. After pasting, you need to press Enter, then type quit on a sepparate line, similar to the example below:
Enter the base 64 encoded CA certificate.
End with the word "quit" on a line by itself

-----BEGIN CERTIFICATE-----
MIIDYDCCAkigAwIBAgIUDMS9PGEEurJt1pGgmZCujAJQP/kwDQYJKoZIhvcNAQEL
BQAwKDEmMCQGA1UEAwwdc2hpYi5kZXZlbG9wLnZlcmlkaXVtLWRldi5jb20wHhcN
MjAwNTI4MTUyOTU5WhcNNDAwNTI4MTUyOTU5WjAoMSYwJAYDVQQDDB1zaGliLmRl
dmVsb3AudmVyaWRpdW0tZGV2LmNvbTCCASIwDQYJKoZIhvcNAQEBBQADggEPADCC
AQoCggEBAIukqxTIHhi3vmGKNMe2wzK4ubOAEFE7pxsRGUPR4UsjoPHGcuHlv6p2
vwn7EeTi+VvUr/cINzYOxTh//6U6P9S6CbpNsmOKvhFrWfNRbPikPl9pDM1E5xYE
JhPTQA1E0zvWYzkXb8jL7ohDELkmbNrKW4Hddzv83hSYcUy46NqNDChxMCZffhJx
qhFbRyFlK/HvXkuwBjiMIarP3H3vvv8PGrwnxpqaD+IL7HBL6omC14Hev70m113/
Y7PEyXG7U2q8Nvk9eR58EfQVUxnS7Iqc7kRHzDaEIsqhIYlm+354ubl44VDUMvnQ
R+PIqZw05RUP7F/rDPJPAA3B7ZSIj68CAwEAAaOBgTB/MB0GA1UdDgQWBBSyEP4m
jTCuu0e1iRBwivZzAbtWWTBeBgNVHREEVzBVgh1zaGliLmRldmVsb3AudmVyaWRp
dW0tZGV2LmNvbYY0aHR0cHM6Ly9zaGliLmRldmVsb3AudmVyaWRpdW0tZGV2LmNv
bS9pZHAvc2hpYmJvbGV0aDANBgkqhkiG9w0BAQsFAAOCAQEAHmaMM+UJaP1V89gZ
SiZFkhIID24h8KOTnduaWxXJtBlyx03lEsLofN8X2cErigs9lNR03VIwMf1SwM68
EYTH8qJQEn8QJPxK7gxIn4/4kxwChLSEq9RFSI5dG2A/h6JG9mHFlrWw/QWfNurl
glWYDNRG75rwIgu1RNaX5+eZbd8p2jrD3zkHFJvfeMRC8vZO5bqGo8PCjnQ7qGGI
IB9lfuXuy9oxieKN4OPtJETcRjwaH2tTOfeiQawHYGGGzVqTJG6ZdqxR9+0TbOMF
dwUU6FRTx3w7IqbpRVqA1rM+k0JMz1gT8RaAUN1Dsk5TxffRKAOtJrUj5NSDkh9h
wmBvCQ==
-----END CERTIFICATE-----
quit
You’ll see an information message about the certificate details and you’ll need to accept the import by typing Yes. If everything is correct, you’ll be prompted with a success message:
INFO: Certificate has the following attributes:
Fingerprint:     9be9fa6e 86d64bcc 96d0b218 d9166236
Do you accept this certificate? [yes/no]: yes

Trustpoint CA certificate accepted.

% Certificate successfully imported
Note: In the Cisco documentation and the CLI it is stated that you need to enter the base64 value of the certificate. However, the idp signing certificate is in pem format, therefore already in base64. Because of this, you have to add the content of the certificate “as is”, without the need of performing a base64 of it.
6. Next you have to define the VeridiumID SAML idp in the Cisco CLI. For this you must run the following commands:
conf t
webvpn
saml idp https://shib.develop/idp/shibboleth
url sign-in https://shib.develop/idp/profile/SAML2/Redirect/SSO
base-url https://asavpn.veridium-dev.com:8443
trustpoint idp develop
trustpoint sp VERIDIUM2020 <name_of_the_sp_trustpoint> (both trustpoints must be previously configured with the crypto ca truspoint command; the idp trustpoint must contain the idp signing cert and the sp trustpoint must contain the ASA certificate, preferably not a self signed one)
signature rsa-sha384
force re-authentication
timeout assertion 7200
7. At this point you have to create the tunnel group associated to the VeridiumID environment. Run the following commands from the Cisco CLI:
conf t
tunnel-group develop type remote-access
tunnel-group develop webvpn-attributes
authentication saml
group-url https://asavpn.veridium-dev.com:8443/develop enable
saml identity-provider https://shib.develop.veridium-dev.com/idp/shibboleth
8. The tunnel group metadata can be extracted from the following address:
https://asavpn.veridium-dev.com:8443/saml/sp/metadata/develop
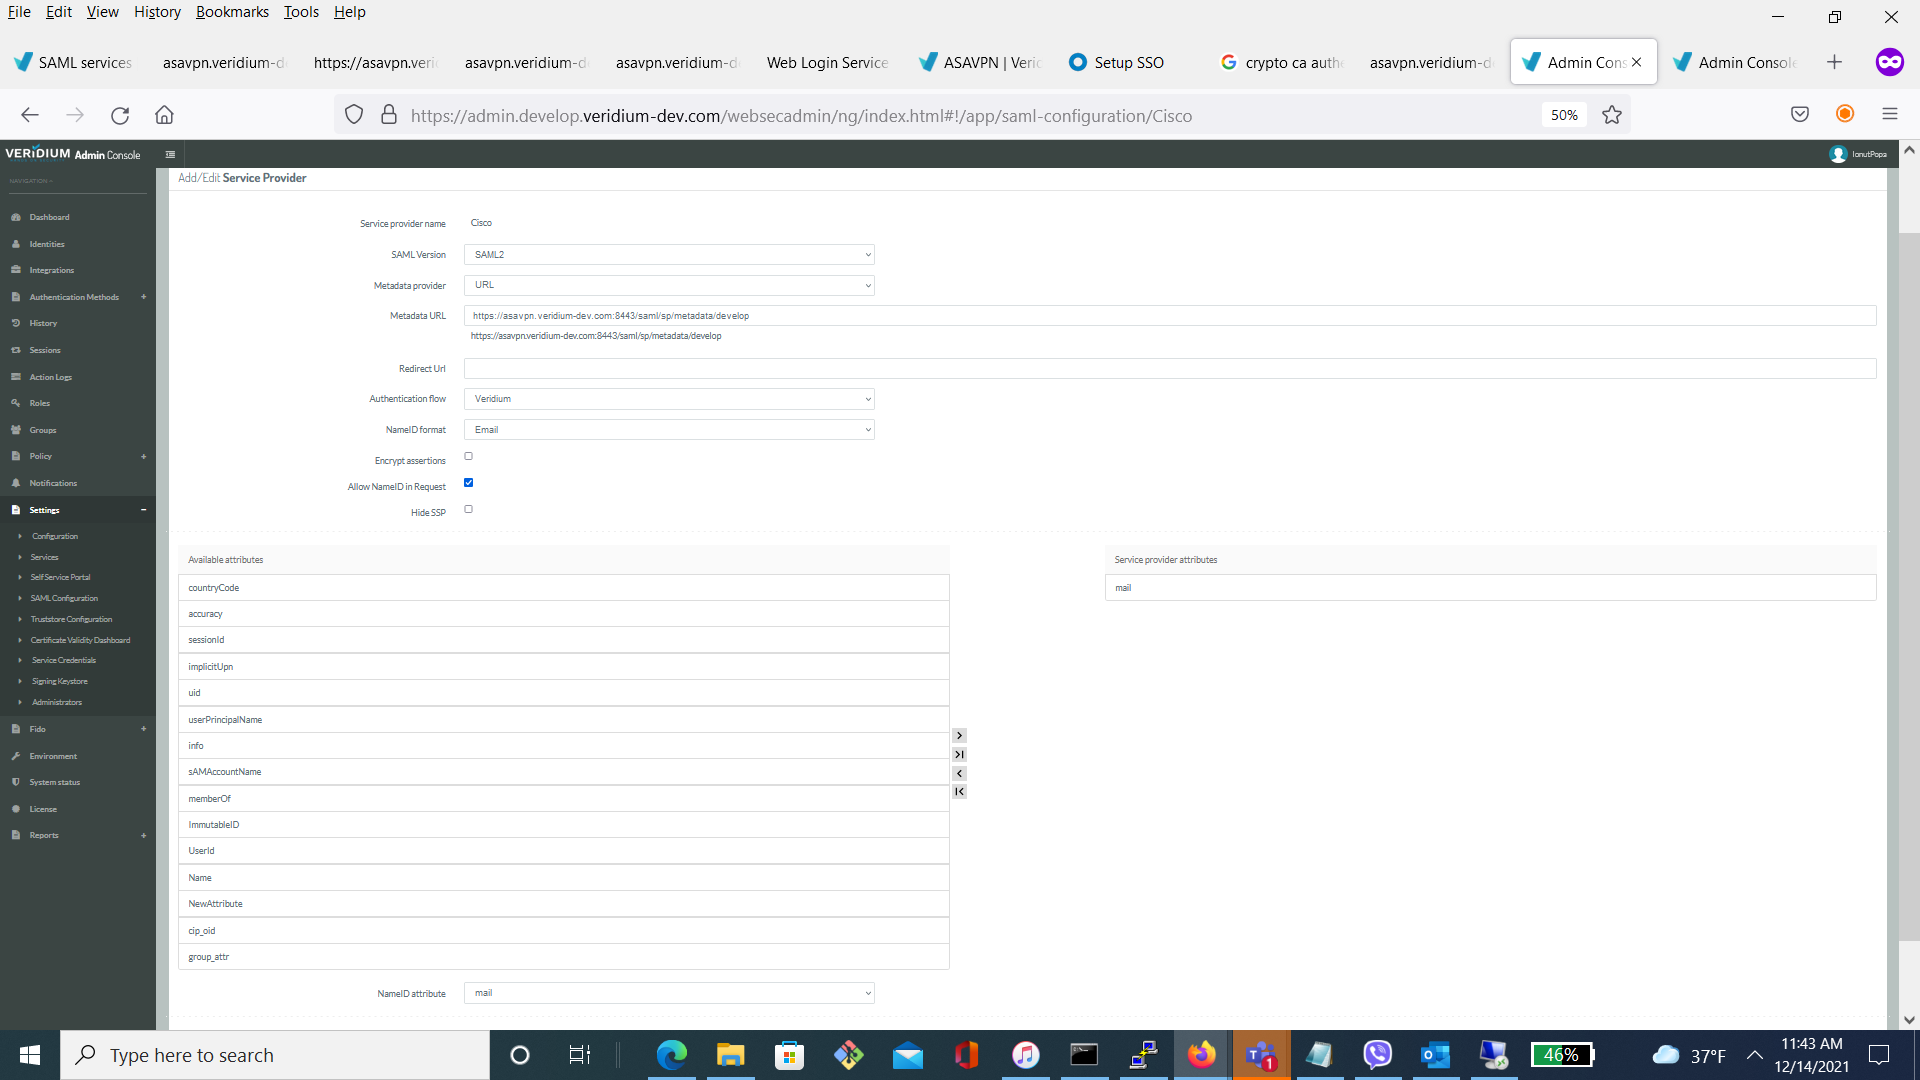
9. The final step is creating the Service Provider for Cisco in VeridiumID dashboard. Access Settings->SAML Configuration and create a SP like in the following example:
10. Test the configuration by logging in to the VPN using https://asavpn.veridium-dev.com:8443/develop or, instead of develop, the chosen VeridiumID environment name.