
Upgrade/Downgrade Diagram
Cassandra and Elasticsearch will ensure always backwards compatibility.
Downgrade process will never downgrade Cassandra and Elasticsearch.
Kubernetes automatic rollout update process (for application layer):
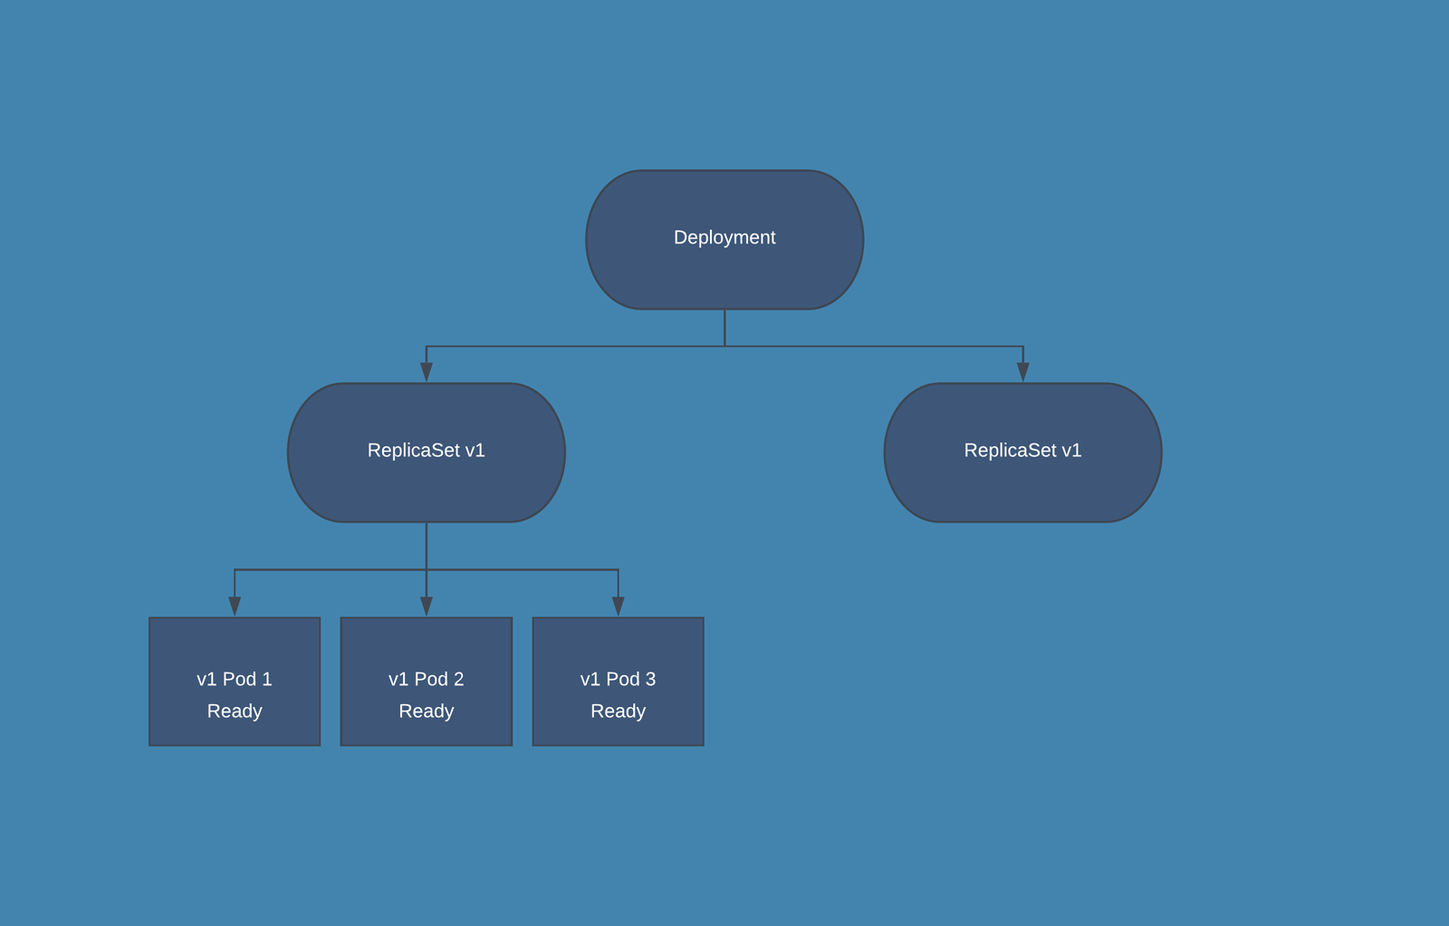
Upgrade from 3.5 to 3.6/Rollback Procedure
1. Prerequisites
Please install the following software on the machine that will be used to deploy VeridiumID:
-
Helm 3. Please check your installed version by running
helm version -
yq 3.2.3. Please check your installed version by running
yq --versionATTENTION:
2. Change directory to the folder where veridium-containers folder is located
3. Download required files
wget --user <NEXUS_USER> --password <NEXUS_PASSWORD> https://veridium-repo.veridium-dev.com/repository/helm-releases/veridiumid-containers/3.6.0/veridiumid-containers-3.6.0.zip
unzip -o veridiumid-laas-3.6.0.zip -d 3.6.0
4. Begin upgrade
bash 3.6.0/scripts/upgrade.sh
Prior to performing the upgrade, all required ConfigMaps and Secrets will be backed up automatically.
5. Rolling back to the previous version of VeridiumID (webapps)
In case the upgrade failed to complete successfully or you simply want to revert to the previous version, please execute the following command:
helm rollback -n <NAMESPACE> veridiumid
In addition to restoring to a previous version of VeridiumID services, this will also restore the ConfigMaps and Secrets from a backup that was done prior to upgrading.
ConfigMaps and Secrets Update Procedure
1. Prerequisites
1.1. Client machine
2. Change the content of a ConfigMap or Secret
2.1. Using the command-line
# for a configmap:
oc -n <NAMESPACE> edit configmap <CONFIGMAP_NAME>

# for a secret:
oc -n <NAMESPACE> edit secret <SECRET_NAME>
This command will open the default editor set for the environment. Please edit the content as needed then save and exit the editor.
2.2. Using the Web Dashboard
Navigate to the Workloads - ConfigMaps/Secrets section in the sidebar menu. Find the specific configmap/secret you want to modify, and select the three dots icon positioned at the right end of the line. From the resulting menu, choose the option "Edit Configmap"/"Edit Secret".
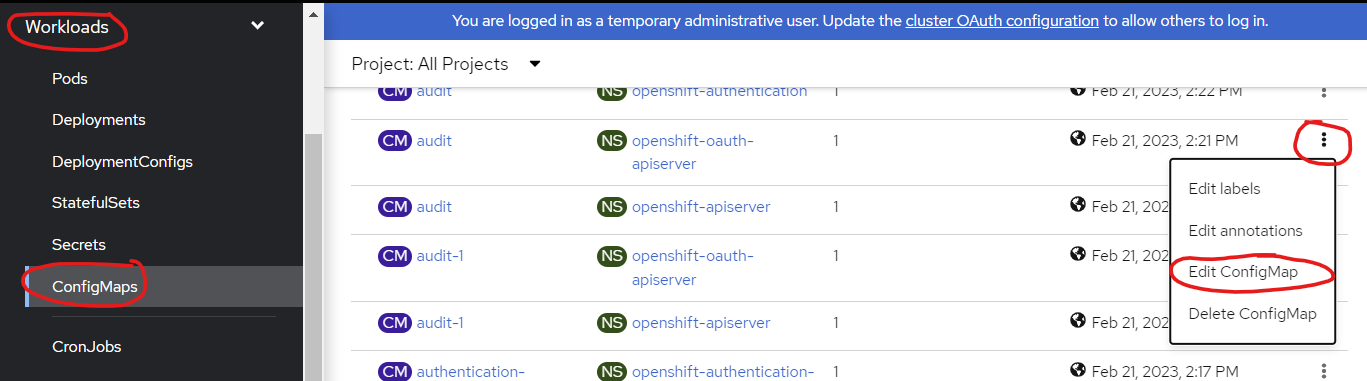
Afterwards, modify the contents according to your preferences, and then proceed to click the "Save" button.
Rolling and Hard Restart Procedure
1. Prerequisites
Please install the following software on the machine that will be used to deploy VeridiumID:
-
Helm 3. Please check your installed version by running
helm version
2. Rolling restart
To graacefully restart each pod of an application with no downtime, please execute the follwing:
oc -n <NAMESPACE> rollout restart deployment <NAME_OF_APPLICATION>
Since vid-haproxy runs as a daemonset rather than a deployment, the command to restart vid-haproxy is as follows:
oc -n <NAMESPACE> rollout restart daaemonset vid-haproxy
3. Hard restart
In case grecefully restarting pods does not work, uninstall the veridiumid chart then re-install it.
Data and configuration will be preserved in spite of the unistallation.
Please make sure to use the same veridiumid-values.yaml file that was used during the most recent upgrade or installation.
If unavailable, the file can be generated using the following command:
helm get values -n <NAMESPACE> veridiumid > veridiumid-containers/veridiumid-values.yaml
# uninstall
helm -n <NAMESPACE> delete veridiumid
# ... then reinstall
helm upgrade --install -n <NAMESPACE> --username <NEXUS_USER> --password <NEXUS_PWD> -f veridiumid-containers/veridiumid-values.yaml veridiumid <https://veridium-repo.veridium-dev.com/repository/helm-releases/veridiumid-containers/veridiumid-0.1.x.tgz>
Cassandra Backup/Restore
in k8ssandra-medusa-backup.yaml (see the veridiumid-containters.zip) we have “MedusaBackupSchedule" configured to perform backups every “cronSchedule“ time.
We can see the schedule configured in our namespace using the following command:
$ kubectl get MedusaBackupSchedule -n veridiumenv
NAME                      DATACENTER   SCHEDULEDEXECUTION   LASTEXECUTION   BACKUPTYPE
veridiumenv-medusa-backups   dc1          <invalid>            5s              full
$
list of backups:
$ kubectl get MedusaBackupJob -n veridiumenv
NAME                                         AGE
medusa-backup-veridiumenv-1686272400   7h26m
Purge old backups from medusa:
in k8ssandra-medusa-backup.yaml (see the veridiumid-containters.zip) we have a CronJob configured to perform purge/clean up every schedule time.
To modify the backup count keep we need to modify the “k8ssandra-deployment.yaml” file (see the veridiumid-containters.zip):
... truncate ...
  medusa:
  ... truncate ...
      storageProperties:
      maxBackupCount: 2
      maxBackupAge: 0
... truncate ...
maxBackupCount: 2 how many backups to keep.
1. Restore All Cassandra Data by replace the new PV with the old PV
This scenario we will do it when all Cassandra Cluster needs to be recovered.
We run the above command and we lost our cluster but we have the old PV because we us Retain for PV.
kubectl delete -f veridiumid-containers-veridiumenv/k8ssandra-deployment.yaml -n veridiumenv
#after that we deployed again the cassandra cluster
kubectl apply -f veridiumid-containers-veridiumenv/k8ssandra-deployment.yaml -n veridiumenv
Medusa PV/PVC
$ kubectl get pvc -n veridiumenv | grep medusa
medusa-backups-cluster-dc1-default-sts-0          Bound    pvc-a5f101c3-08d6-410d-ae2b-e9405cfd4923   60Gi       RWO            storage-sc       8m18s
medusa-backups-cluster-dc1-default-sts-1          Bound    pvc-9b7e8c29-b091-4660-8216-e3bb7fd79e7d   60Gi       RWO            storage-sc       42m
medusa-backups-cluster-dc1-default-sts-2          Bound    pvc-e9896681-9dad-44a5-b380-f29bd3c8b43b   60Gi       RWO            storage-sc       42m
$
We need to mount the old PV for each medusa.
kubectl get pvc medusa-backups-cluster-dc1-default-sts-0 -o yaml -n veridiumenv > pvc0.yaml
kubectl get pvc medusa-backups-cluster-dc1-default-sts-1 -o yaml -n veridiumenv > pvc1.yaml
kubectl get pvc medusa-backups-cluster-dc1-default-sts-2 -o yaml -n veridiumenv > pvc2.yaml
Edit each .yaml file and replace “volumeName:“ with the old PV (get available id from PV list)
Delete the old PVC’s for medusa:
kubectl delete pvc medusa-backups-cluster-dc1-default-sts-0 -n veridiumenv
kubectl delete pvc medusa-backups-cluster-dc1-default-sts-1 -n veridiumenv
kubectl delete pvc medusa-backups-cluster-dc1-default-sts-2 -n veridiumenv
In case this command is stuck, you need to edit each medusa PVC and add “finalizers: []“
$ kubectl edit pvc medusa-backups-cluster-dc1-default-sts-0 -n veridiumenv
persistentvolumeclaim/medusa-backups-cluster-dc1-default-sts-0 edited

$ kubectl edit pvc medusa-backups-cluster-dc1-default-sts-1 -n veridiumenv
persistentvolumeclaim/medusa-backups-cluster-dc1-default-sts-1 edited

$ kubectl edit pvc medusa-backups-cluster-dc1-default-sts-2 -n veridiumenv
persistentvolumeclaim/medusa-backups-cluster-dc1-default-sts-2 edited
At this moment if we run “kubectl get pvc -n veridiumenv” we don’t see anymore the PVC.
Edit each medusa PV and remove the entire claimRef for the old/new PV
$ kubectl get pv | grep veridiumenv/medusa-

pvc-0d0b9cc1-7dbd-4c8e-b79c-1d82b68b7cfe   60Gi       RWO            Retain           Bound            veridiumenv/medusa-backups-cluster-dc1-default-sts-2             storage-sc                21h
pvc-5ee8e000-c9dd-416c-92d1-4367c3c083aa   60Gi       RWO            Retain           Bound            veridiumenv/medusa-backups-cluster-dc1-default-sts-1             storage-sc                21h
pvc-a5f101c3-08d6-410d-ae2b-e9405cfd4923   60Gi       RWO            Retain           Bound            veridiumenv/medusa-backups-cluster-dc1-default-sts-0             storage-sc                21h
pvc-4df4d343-7dbd-4c8e-b79c-1d82b68j8j7f   60Gi       RWO            Retain           Released         veridiumenv/medusa-backups-cluster-dc1-default-sts-2             storage-sc                21h
pvc-56f2s2d3-c9dd-416c-92d1-4369867b6657   60Gi       RWO            Retain           Released         veridiumenv/medusa-backups-cluster-dc1-default-sts-1             storage-sc                21h
pvc-7hg23d59-08d6-410d-ae2b-8jh7677n7868   60Gi       RWO            Retain           Released         veridiumenv/medusa-backups-cluster-dc1-default-sts-0             storage-sc                21h

$ kubectl edit pv pvc-0d0b9cc1-7dbd-4c8e-b79c-1d82b68b7cfe
$ kubectl edit pv pvc-5ee8e000-c9dd-416c-92d1-4367c3c083aa
$ kubectl edit pv pvc-a5f101c3-08d6-410d-ae2b-e9405cfd4923
$ kubectl edit pv pvc-4df4d343-7dbd-4c8e-b79c-1d82b68j8j7f
$ kubectl edit pv pvc-56f2s2d3-c9dd-416c-92d1-4369867b6657
$ kubectl edit pv pvc-7hg23d59-08d6-410d-ae2b-8jh7677n7868


part to be deleted:
  claimRef:
    apiVersion: v1
    kind: PersistentVolumeClaim
    name: medusa-backups-cluster-dc1-default-sts-2
    namespace: veridiumenv
    resourceVersion: "77906577"
    uid: baa4efa4-392a-4310-a000-cfe7a75c43c6
Create the new PVC using yaml files
$ kubectl apply -f pvc0.yaml -n veridiumenv
$ kubectl apply -f pvc1.yaml -n veridiumenv
$ kubectl apply -f pvc2.yaml -n veridiumenv
Check the PVC
$ kubectl get pvc -n veridiumenv | grep medusa
We need to do the same above steps for cassandra data:
server-data-cluster-dc1-default-sts-0             Bound    pvc-4123670d-e26f-4d73-be01-f49b041b9240   40Gi       RWO            storage-sc       19h
server-data-cluster-dc1-default-sts-1             Bound    pvc-504fb35d-fa7a-43ee-993e-a9451f97fd5f   40Gi       RWO            storage-sc       19h
server-data-cluster-dc1-default-sts-2             Bound    pvc-71522b78-fa01-4939-baf3-96c3be06f945   40Gi       RWO            storage-sc       19h
after we replace the pv for cassandra data / medusa, we need to restart cassandra pods
$ kubectl get pods -n veridiumenv | grep cluster
cluster-dc1-default-sts-0                            3/3     Running            0                19h
cluster-dc1-default-sts-1                            3/3     Running            0                19h
cluster-dc1-default-sts-2                            3/3     Running            0                19h
cluster-dc1-reaper-85c74fdf7c-5p45n                  1/1     Running            2 (19h ago)      21h
2. Create a manually backup Cassandra using medusa
Create a yaml file:
apiVersion: medusa.k8ssandra.io/v1alpha1
kind: MedusaBackupJob
metadata:
  name: medusa-backup-1
  namespace: veridiumenv
spec:
  cassandraDatacenter: dc1
Remember the “name: medusa-backup-1" needs to be unique.
cassandraDatacenter: dc1 - datacenter name
veridiumenv - our namespace
Check the old backup names:
$ kubectl get MedusaBackupJob -n veridiumenv
Create the backup
$ kubectl apply -f veridiumid-containers-veridiumenv/k8ssandra-backup.yaml
3. Restore a backup Cassandra using medusa
Create a yaml file:
apiVersion: medusa.k8ssandra.io/v1alpha1
kind: MedusaRestoreJob
metadata:
  name: veridiumenv-medusa-backups-1
  namespace: veridiumenv
spec:
  cassandraDatacenter: dc1
  backup: medusa-backup-1
where we have:
name: veridiumenv-medusa-backups-1 - name of the restore job - needs to be unique
namespace: veridiumenv - namespace
cassandraDatacenter: dc1 - cassandra datacenter name
backup: medusa-backup-1 - our backup name (we can use “kubectl get MedusaBackupJob -n veridiumenv“ to get the backup name)
$ kubectl apply -f k8ssandra-medusa-restore.yaml

# check the restore job
$ kubectl get MedusaRestoreJob
wait ~5min
after all pods running we need to restart the services
kubectl rollout restart -n veridiumenv deployment/vid-shibboleth
kubectl rollout restart -n veridiumenv deployment/vid-ssp
kubectl rollout restart -n veridiumenv deployment/vid-websec
kubectl rollout restart -n veridiumenv deployment/vid-websecadmin
kubectl rollout restart -n veridiumenv deployment/vid-adservice
kubectl rollout restart -n veridiumenv deployment/vid-dmz
kubectl rollout restart -n veridiumenv deployment/vid-fido
kubectl rollout restart -n veridiumenv deployment/vid-freeradius
kubectl rollout restart -n veridiumenv deployment/vid-maintenance
kubectl rollout restart -n veridiumenv deployment/vid-opa
kubectl rollout restart -n veridiumenv daemonset/vid-haproxy
check the pod status using:
$ kubectl get pods -n veridiumenv
when all pods are running correctly (Check the Ready section):
Go to cluster-dc1-default-sts-0 (Cassandra pod) bash:
$ kubectl exec --stdin --tty cluster-dc1-default-sts-0 -n veridiumenv -- /bin/bash
$ cd /opt/scripts
$ /bin/bash cassandra_maintenance.sh -c maintenance.conf

$ cat /var/log/cassandra/maintenance.log
09-Jun-2023 09:24:53 AM INFO Checking the status of the cluster
09-Jun-2023 09:24:55 AM INFO Checking state of Cassandra cluster based on nodetool status output
09-Jun-2023 09:24:55 AM INFO All Cassandra nodes are up
09-Jun-2023 09:24:55 AM INFO Starting repair procedure
09-Jun-2023 09:24:59 AM INFO Nodetool repair finishes successfully
$


$ /bin/bash cassandra_maintenance.sh -c maintenance.conf -k


$ cat /var/log/cassandra/maintenance.log
... truncate...
09-Jun-2023 10:21:25 AM INFO Nodetool repair finishes successfully for veridium session_finished session_finished_index
09-Jun-2023 10:21:25 AM INFO Nodetool repair finishes successfully for veridium enrollment_invitation enrollment_invitation_idx
09-Jun-2023 10:21:26 AM INFO Nodetool repair finishes successfully for veridium enrollment_code enrollment_code_idx
09-Jun-2023 10:21:28 AM INFO Nodetool repair finishes successfully for veridium account account_index
09-Jun-2023 10:21:29 AM INFO Nodetool repair finishes successfully for veridium history history_index
09-Jun-2023 10:21:30 AM INFO Nodetool repair finishes successfully for veridium role roles_index
09-Jun-2023 10:21:31 AM INFO Nodetool repair finishes successfully for veridium profile profile_index
09-Jun-2023 10:21:31 AM INFO Nodetool repair finishes successfully for veridium alert alert_lucene_index
09-Jun-2023 10:21:32 AM INFO Nodetool repair finishes successfully for veridium device device_index
09-Jun-2023 10:21:33 AM INFO Nodetool repair finishes successfully for veridium identity identity_index
c$
repeat the above steps for cluster-dc1-default-sts-1 / cluster-dc1-default-sts-2
ElasticSearch/Zookeeper Backup
Please create a StorageClass with "reclaimPolicy: Retain" + Encrypted and ReadWriteMany(RWX) access mode, this will be used for Zookeeper, ElasticSearch Backup.
Note: Replace “<NAMESPACE>” with the namespace name where we will perform the deployment of application. You need to create the namespace first.
For Zookeeper Backup/Elasticsearch Backup, please create a PV with name "efs-pv-veridium-backups-<NAMESPACE>" with StorageClass created above + ReadWriteMany(RWX), after that please create a PVC with name "efs-pvc-veridium-backups-<NAMESPACE>" with StorageClass created above + ReadWriteMany(RWX) in the namespace where we will perform the deployment.
In this volume please create two folders named "elasticsearch-backup" and "zookeeper-backup" with full permission (chmod 777).
1. Zookeeper
1.1. Backup Zookeeper
Configure the Zookeeper Backup from “veridiumid-containers/veridiumid-values.yaml”
vid-maintenance:
... truncate ...
  backup:
    zookeeper:
      enable: true
      keep: 10
      schedule: "* 23 * * *"
... truncate ...
enable → Enable the backup? (true for yes , false for no)
keep: 10 → how many backup to keep
schedule → when the cronjob will run
A cronjob veridiumid-zookeeper-backup-cronjob will run every “schedule“ time and keep 10 backups.
1.2. Manual Zookeeper Backup
From “vid-maintenance” pod, run the following command:
$ /tmp/zookeeper_backup.sh <number of backups to keep>

# example: /bin/bash /tmp/zookeeper_backup.sh 10
1.3. Restore Zookeeper Backup
From “vid-maintenance” pod, run the following command:
$ cd /mnt/backups/zookeeper-backup
$ ls
1686727473  1686727531  1686727651  1686728667

# restore backup 1686728667
$ /bin/bash /opt/veridiumid/migration/bin/migration.sh -u /mnt/backups/zookeeper-backup1686728667
2. Elasticsearch
2.1. Backup Elasticsearch
Backup for Elasticsearch:
a) using SLM Policy from Elasticsearch
b) using Veridiumid script
2.1.1. a) Backup Elasticsearch using SLM Policy
This operation will restart the entire Elasticsearch cluster (one time per implementation).
Replace the “<ENV_NO>” with VeridiumID deploy number used in “install procedure documentation“.
Replace the “<NAMESPACE>” with namepace where Elasticsearch is deployed.
Before deploying Elasticsearch modify the file veridiumid-containers/elasticsearch-values.yaml and uncomment “# elasticsearch_backup_with_policy: true".
Deploy the Elasticsearch
helm upgrade --install -n <NAMESPACE> --username <NEXUS_USER> --password <NEXUS_PWD> -f veridiumid-containers/elasticsearch-values.yaml elasticsearch-<ENV_NO> https://veridium-repo.veridium-dev.com/repository/helm-releases/veridiumid-containers/elasticsearch-X.X.X.tgz
Patch the backup volume using the following command:
kubectl patch statefulset elasticsearch-<ENV_NO>-es-default -p '{"spec": {"template": {"spec": {"containers": [{"name": "elasticsearch","volumeMounts": [{"name": "elasticsearch-backup","mountPath": "/mnt/backup-elasticsearch"}]}]}}}}' -n <NAMESPACE>
Edit “veridiumid-containers/veridiumid-values.yaml” and modify:
.. truncate ..
vid-maintenance:
.. truncate ..
  backup:
.. truncate ..
    elasticsearch:
      enable: false <<< this needs to be on false
    elasticsearch_backup_with_policy:
      enable: true << <<< this needs to be on true
      # https://www.elastic.co/guide/en/elasticsearch/reference/current/trigger-schedule.html#schedule-cron
      # every day at noon
      schedule: "0 0 12 * * ?"
      expire_after: "30d"
      min_count: 5
      max_count: 50
.. truncate ..
enable → enable the backup? (true for yes , false for no)
schedule → when to be executed? More details on https://www.elastic.co/guide/en/elasticsearch/reference/8.1/trigger-schedule.html#schedule-cron
expire_after: Xd → backup expire period in days.
min_count: how minimum copies to keep
max_count: how maximum copies to keep
Useful commands (running these commands from vid-maintenance pod )
Get Repository:
curl -k -u elastic:<password> -X GET "https://elasticsearch-<ENV_NO>-es-http:9200/_cat/repositories?pretty"
Get all snapshots:
curl -k -u elastic:<password> -X GET "https://elasticsearch-<ENV_NO>-es-http:9200/_snapshot/elasticsearch-backup/*?pretty"
Create a manual snapshot using SLM policy:
$ curl -k -u elastic:<password> -X POST "https://elasticsearch-<ENV_NO>-es-http:9200/_slm/policy/elasticsearch-backup/_execute?pretty"
2.1.2. b) Backup Elasticsearch using VeridiumID script
This operation will not required to restart the Elasticsearch cluster.
Edit “veridiumid-containers/veridiumid-values.yaml” and modify:
vid-maintenance:
... truncate ..
  backup:
... truncate ..
    elasticsearch:
      enable: false # << this needs to be on true
      keep: 10
      schedule: "* 22 * * *"
    elasticsearch_backup_with_policy:
      enable: false # << this needs to be on false
... truncate ..
enable → enable the backup? (true for yes , false for no)
keep: 10 → how many backup to keep
schedule → when the cronjob will run
Run upgrade deployment to update with the new values:
helm upgrade --install -n <NAMESPACE> --username <NEXUS_USER> --password <NEXUS_PWD> -f veridiumid-containers/veridiumid-values.yaml veridiumid https://veridium-repo.veridium-dev.com/repository/helm-releases/veridiumid-containers/veridiumid-X.X.X.tgz
All backups will be in “vid-maintenance“ pod → /mnt/backups/elasticsearch-backup/
Useful commands (running these commands from vid-maintenance pod )
Create a manual backup using veridiumid script:
$ mkdir /mnt/backups/elasticsearch-backup/manual-backup-1
$ /opt/veridiumid/migration/bin/elk_ops.sh --backup --dir=/mnt/backups/elasticsearch-backup/manual-backup-1
2.2. Restore Elasticsearch
Restore for Elasticsearch:
a) using SLM Policy from Elasticsearch
b) using Veridiumid script
2.2.1. a) Restore Elasticsearch using SLM Policy
Restore a full snapshot
Official documentation: https://www.elastic.co/guide/en/elasticsearch/reference/8.1/snapshots-restore-snapshot.html
Go to “vid-maintenance“ pod (ssh)
Temporarily stop indexing and turn off the following features:
# GeoIP database downloader and ILM history store

$ curl -k -u elastic:<password> -X PUT "https://elasticsearch-<ENV_NO>-es-http:9200/_cluster/settings?pretty" -H 'Content-Type: application/json' -d'
{
  "persistent": {
    "ingest.geoip.downloader.enabled": false,
    "indices.lifecycle.history_index_enabled": false
  }
}
'
# ILM
$ curl -k -u elastic:<password> -X POST "https://elasticsearch-<ENV_NO>-es-http:9200/_ilm/stop?pretty"

# Machine Learning
$ curl -k -u elastic:<password> -X POST "https://elasticsearch-<ENV_NO>-es-http:9200/_ml/set_upgrade_mode?enabled=true&pretty"

# Monitoring
$ curl -k -u elastic:<password> -X PUT "https://elasticsearch-<ENV_NO>-es-http:9200/_cluster/settings?pretty" -H 'Content-Type: application/json' -d'
{
  "persistent": {
    "xpack.monitoring.collection.enabled": false
  }
}
'

# Watcher

$ curl -k -u elastic:<password> -X POST "https://elasticsearch-<ENV_NO>-es-http:9200/_watcher/_stop?pretty"
after the restore is completed:
# When the restore operation is complete, resume indexing and restart any features you stopped:

# GeoIP database downloader and ILM history store
$ curl -k -u elastic:<password> -X PUT "https://elasticsearch-<ENV_NO>-es-http:9200/_cluster/settings?pretty" -H 'Content-Type: application/json' -d'
{
  "persistent": {
    "ingest.geoip.downloader.enabled": true,
    "indices.lifecycle.history_index_enabled": true
  }
}
'
# ILM
$ curl -k -u elastic:<password> -X POST "https://elasticsearch-<ENV_NO>-es-http:9200/_ilm/start?pretty"

# Machine Learning
$ curl -k -u elastic:<password> -X POST "https://elasticsearch-<ENV_NO>-es-http:9200/_ml/set_upgrade_mode?enabled=false&pretty"

# Monitoring
$ curl -k -u elastic:<password> -X PUT "https://elasticsearch-<ENV_NO>-es-http:9200/_cluster/settings?pretty" -H 'Content-Type: application/json' -d'
{
  "persistent": {
    "xpack.monitoring.collection.enabled": true
  }
}
'
# Watcher
$ curl -k -u elastic:<password> -X POST "https://elasticsearch-<ENV_NO>-es-http:9200/_watcher/_start?pretty"
Monitor the restore
$ curl -k -u elastic:<password> -X GET "https://elasticsearch-<ENV_NO>-es-http:9200/_cluster/health?pretty"
Restore a index (all veridium) from a snapshot
Go to “vid-maintenance“ pod (ssh)
Get the snapshots list:
$ curl -k -u elastic:<password> -X GET "https://elasticsearch-<ENV_NO>-es-http:9200/_snapshot/elasticsearch-backup/*?pretty"
Restore (replace “veridiumid-snap-cqsz5evwtcecqh1l9hd8pw“ with desired snapshot)
$ curl -k -u elastic:<password> -X POST "https://elasticsearch-<ENV_NO>-es-http:9200/_snapshot/elasticsearch-backup/veridiumid-snap-cqsz5evwtcecqh1l9hd8pw/_restore?pretty" -H 'Content-Type: application/json' -d'
{
  "indices": "veridium*",
  "include_global_state": false
}
'
2.2.2. b) Restore Elasticsearch using VeridiumID script
Go to “vid-maintenance“ pod (ssh)
$ cd /mnt/backups/elasticsearch-backup/
Check the available backups:
$ ls /mnt/backups/elasticsearch-backup/
1688079001  1688079121  1688079241  1688079361  1688079481
1688079061  1688079181  1688079301  1688079421  1688079541
Restore:
/opt/veridiumid/migration/bin/elk_ops.sh --restore --dir=/mnt/backups/elasticsearch-backup/1688079541
In case Elasticsearch was reinstalled and certificate/user have been rotated:
Update the new Elasticsearch certificate in Truststores (From WebsecAdmin → Settings → Certificates → Truststores)
Certificate is in Namespace → Secrets → elasticsearch-<ENV_NO>-es-http-certs-public
Save local the “ca.crt” + “tls.crt“ go to Truststores (WebsecAdmin) and remove the old elasticsearch certificate and upload the new one.
Get the new elastic password from Namespace → Secrets → elasticsearch-<ENV_NO>-es-elastic-user
Generate a new APIKEY:
$ curl -k -u elastic:<password> -X POST "https://elasticsearch-<ENV_NO>-es-http:9200/_security/api_key" -H 'Content-Type: application/json' -d'
{
    "name": "veridium-api-key-10000"
}
'
The output will be something like:
{"id":"ABUIDIkBHzbsPdcpPRum","name":"veridium-api-key-10000","api_key":"MbZenHibSh6Lxc143YJf1Q","encoded":"QUJVSURJa0JIemJzUGRjcFBSdW06TWJaZW5IaWJTaDZMeGMxNDNZSmYxUQ=="}
Get the encoded apikey: QUJVSURJa0JIemJzUGRjcFBSdW06TWJaZW5IaWJTaDZMeGMxNDNZSmYxUQ==
Go in WebsecAdmin → Settings → Advanced
Edit elasticsearch.json with the new values apiKey + elastic password:
... truncate ...
        "apiKey": "QUJVSURJa0JIemJzUGRjcFBSdW06TWJaZW5IaWJTaDZMeGMxNDNZSmYxUQ==",
        ... truncate ...
        "credentials": {
            "pass": "2m499KEMyN83g1bO7CQc0c5y",
            ... truncate ...
        },
... truncate ...
Restart the entire app:
kubectl rollout restart -n <NAMESPACE> deployment/vid-websec
kubectl rollout restart -n <NAMESPACE> deployment/vid-websecadmin
kubectl rollout restart -n <NAMESPACE> deployment/vid-shibboleth
kubectl rollout restart -n <NAMESPACE> deployment/vid-ssp
kubectl rollout restart -n <NAMESPACE> deployment/vid-adservice
kubectl rollout restart -n <NAMESPACE> deployment/vid-fido
kubectl rollout restart -n <NAMESPACE> deployment/vid-freeradius
kubectl rollout restart -n <NAMESPACE> deployment/vid-maintenance
kubectl rollout restart -n <NAMESPACE> deployment/vid-opa