
This article provides a step by step documentation of the procedure to modify the internal self-signed CA certificate with another certificate.
1) Pre-reqs
For this procedure we will need a PKCS12 certificate that will be used as a new CA certificate along with its password and the alias under which the root certificate is present within the keystore.
Steps to obtain a Microsoft CA certificate are available here: Export Microsoft CA / SubCA certificate from Certification Authority for renewing Veridium CA
How to check that a certificate can be used as a CA:
#man x509v3_config
openssl x509 -in ca.pem -text

X509v3 Basic Constraints: critical
 CA:TRUE
X509v3 Key Usage: critical
 Certificate Sign
X509v3 Extended Key Usage:
 TLS Web Server Authentication, TLS Web Client Authentication
Also please insure that the alias is written with lower case (keytool is always presenting the alias in lowercase, but it might be generated with upper case). So please run this command on the PKCS12 file.
## check the current alias:
keytool -list -keystore PATH_TO_CA_CERT.PKCS12

keytool -changealias -alias "aliasoriginal" -destalias "subca" -keystore PATH_TO_CA_CERT.PKCS12
Also please extract all the necessary information (privatekey, CA) prom PKCS12 file, by running below command. It will be generated a folder, conversion_result, containing necessary information.
/etc/veridiumid/scripts/convert_haproxy_cert.sh PATH_TO_CA_CERT.PKCS12
2) Backup current configuration
Before starting the procedure we recommend creating a backup of the old configuration.
To create the backup run the following command on any node of the deployment:
bash /opt/veridiumid/migration/bin/migration.sh -d PATH

# Where PATH will be the full path where the download will be made, including the directory which will be created, for example: /home/veridiumid/bkp_before_changing_ca
3) Change the CA certificate in the Admin Dashboard
Connect to the Admin Dashboard and navigate to Settings → Advanced → config.json.
Format the JSON file and search for certStore.
Inside the certStore configuration the following must be modified:
    "ca": {
      "alias": "NEW_CA_ALIAS",
      "cert": "BASE_64_OF_NEW_CA",
      "pwd": "NEW_CA_PASS"
    }
# To obtain the BASE64 of the new CA certificate run the following command:

base64 -w0 PATH_TO_CA_CERT.PKCS12 (USE .PFX FILE ONLY-don't use .pem file)

# Where PATH_TO_CA_CERT.PKCS12 is the full path to the new certificate
After saving the JSON modified JSON file the following commands must be run on ALL WEBAPP nodes to restart the Admin Dashboard and Tomcat services:
service ver_websecadmin restart
service ver_tomcat restart
4) Change truststore at HaProxy level
On all WEBAPP nodes the HaProxy truststore file must be change with the new CA. If it is subCA, please add the subCA and it’s chain. With below command, you will get the information needed.
The new truststore certificate from the PKCS12 certificate you can run the following command:
openssl pkcs12 -in PATH_TO_NEW_CA -nokeys -out new_ca.pem

# Where PATH_TO_NEW_CA is the full path to the new PKCS12 certificate
To change the current truststore run below commands as root user on all WEBAPP nodes.
Also can be preserved the old CA (in this case please append the content of new_ca.pem to existing client_ca.pem file).
# Make backup of current certificate
cp /etc/veridiumid/haproxy/client_ca.pem /etc/veridiumid/haproxy/client_ca.pem_old_ca

# Modify with new certificate
cp PATH_TO_NEW_PEM /etc/veridiumid/haproxy/client_ca.pem

# Where PATH_TO_NEW_PATH is the full path to the 'new_ca.pem' certificate previously created.

# Restart HaProxy service
service ver_haproxy restart
5) Modify Cassandra to be able to regenerate default Admin certificate
Connect to a Persistence node and run the following commands:
# Access cqlsh
/opt/veridiumid/cassandra/bin/cqlsh --cqlshrc=/opt/veridiumid/cassandra/conf/veridiumid_cqlshrc --ssl
# Use veridium keyspace
use veridium;
select * from system_status;

# Example result would be:
# id                                   | is_admin_initialized | is_initialized | system_password | use_password
#--------------------------------------+----------------------+----------------+-----------------+--------------
# fb76c642-e90d-4ec1-a265-3127865b0f29 |                 True |           True |            null |        False

# Modify the is_admin_initialized value
update system_status set is_admin_initialized=false where id='ID_VALUE';

# Where ID_VALUE is the value of the id field, for example the command for the above example would be:
# update system_status set is_admin_initialized=false where id='fb76c642-e90d-4ec1-a265-3127865b0f29';

# Exit CQLSH
exit
6) Create new Admin Certificate
Connect to the Admin Dashboard without providing any certificate and click on Create Default Administrator, fill in the form and click on save to generate a new Default Admin certificate.
Import this certificate into the local user keystore or into the browser’s keystore in order to access the Admin Dashboard.
7) Recreate all existing certificates
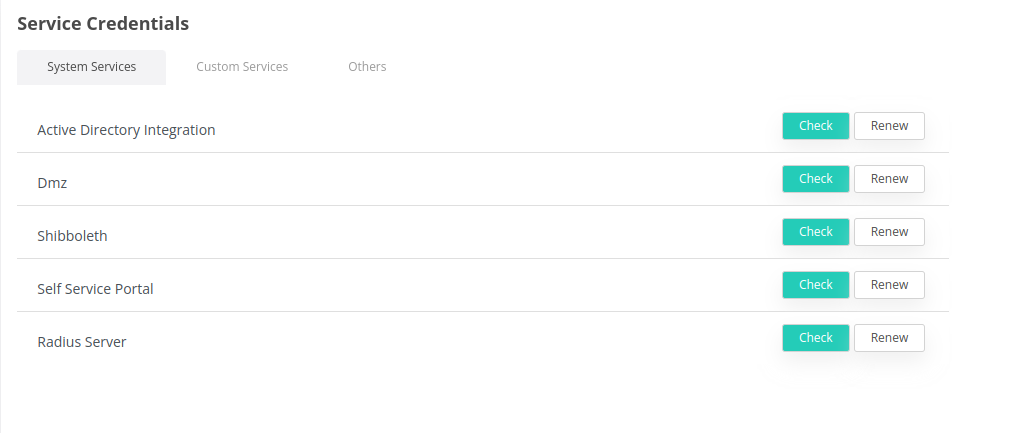
Connect to the Admin Dashboard and navigate to Settings → Service Credentials.
Click on Renew next to all System services, as seen in the image below:
Go to others and renew All certificates:
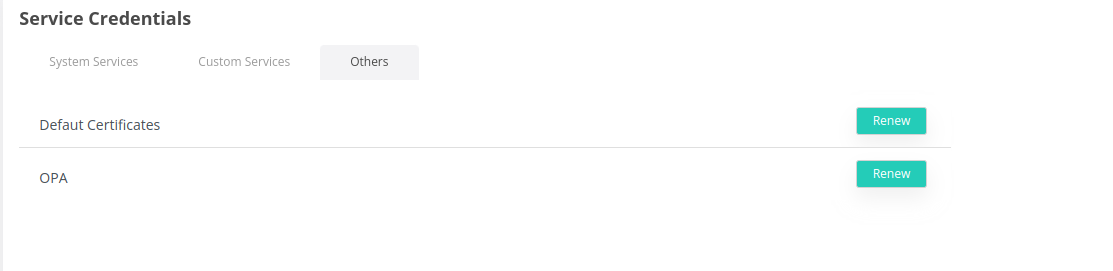
When renewing the OPA certificate an archive will be downloaded to the local computer. This archive must be copied to all Webapp nodes.
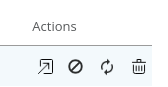
In case of having Custom Service certificate they will need to be renewed as well.
To renew them click on the third action icon next to all certificates in the list:
8) Add new CA to the application truststore
Firstly connect to a Webapp node and copy the content on the new_ca.pem certificate (created during step 4).
Connect to the Admin Dashboard and navigate to Settings → Truststores.
Click on Add Truststore select Certificate Content as Method, copy the certificate’s content in the Certificate Content section and click on Get Certificate Info:
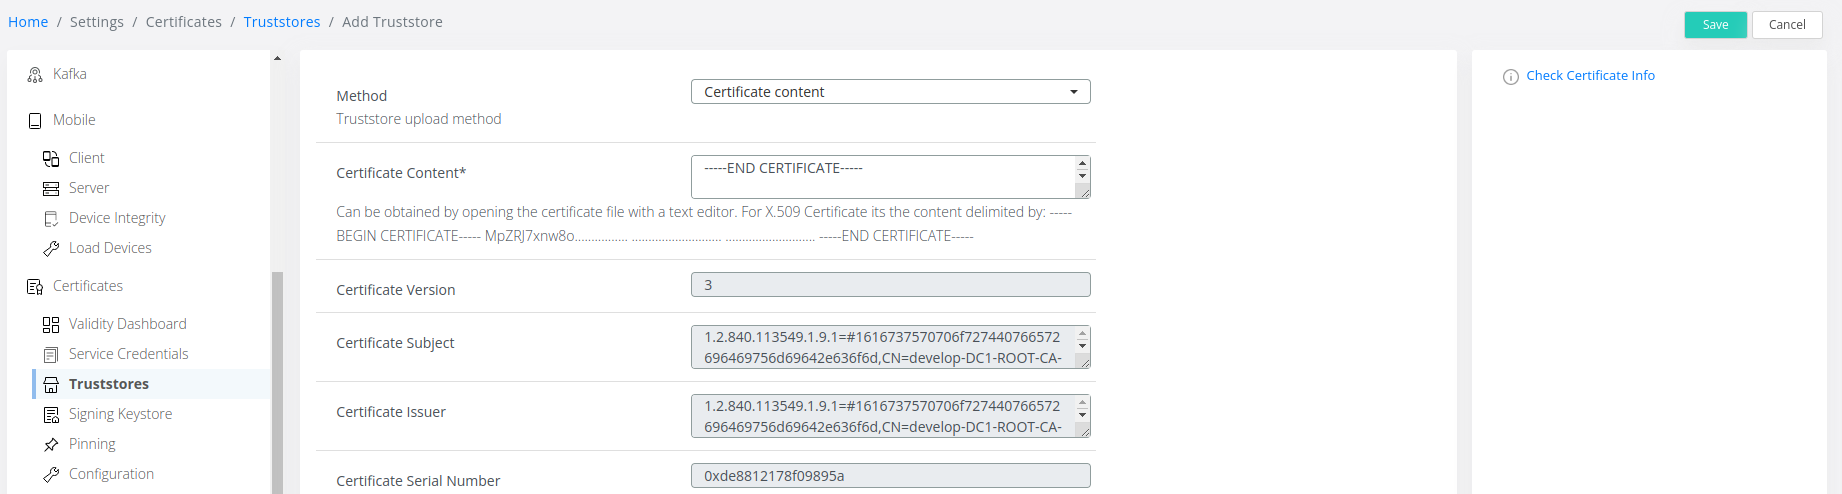
After this click on Save.
9) Renew OPA certificate
After copying the opa-cert.zip archive to all Webapp nodes, connect to all Webapp nodes and run the following commands as root:
# Get current ADMIN URL configuration
ADMIN_URL=`cat /opt/veridiumid/opa/conf/opa.yaml |grep url | cut -d"/" -f3 | tr -d [:space:]`

# Configure the new certificate and restart OPA service
bash /opt/veridiumid/opa/bin/config-opa.sh -a ${ADMIN_URL} -c PATH_TO_CERT_ZIP

# Where PATH_TO_CERT_ZIP is the full path to the location of the opa-cert.zip file uploaded earlier.
10) Renew SelfService Portal keystore
Connect to the Admin Dashboard and navigate to Settings → Services → SSP → Key Management and click on Create Keystore:
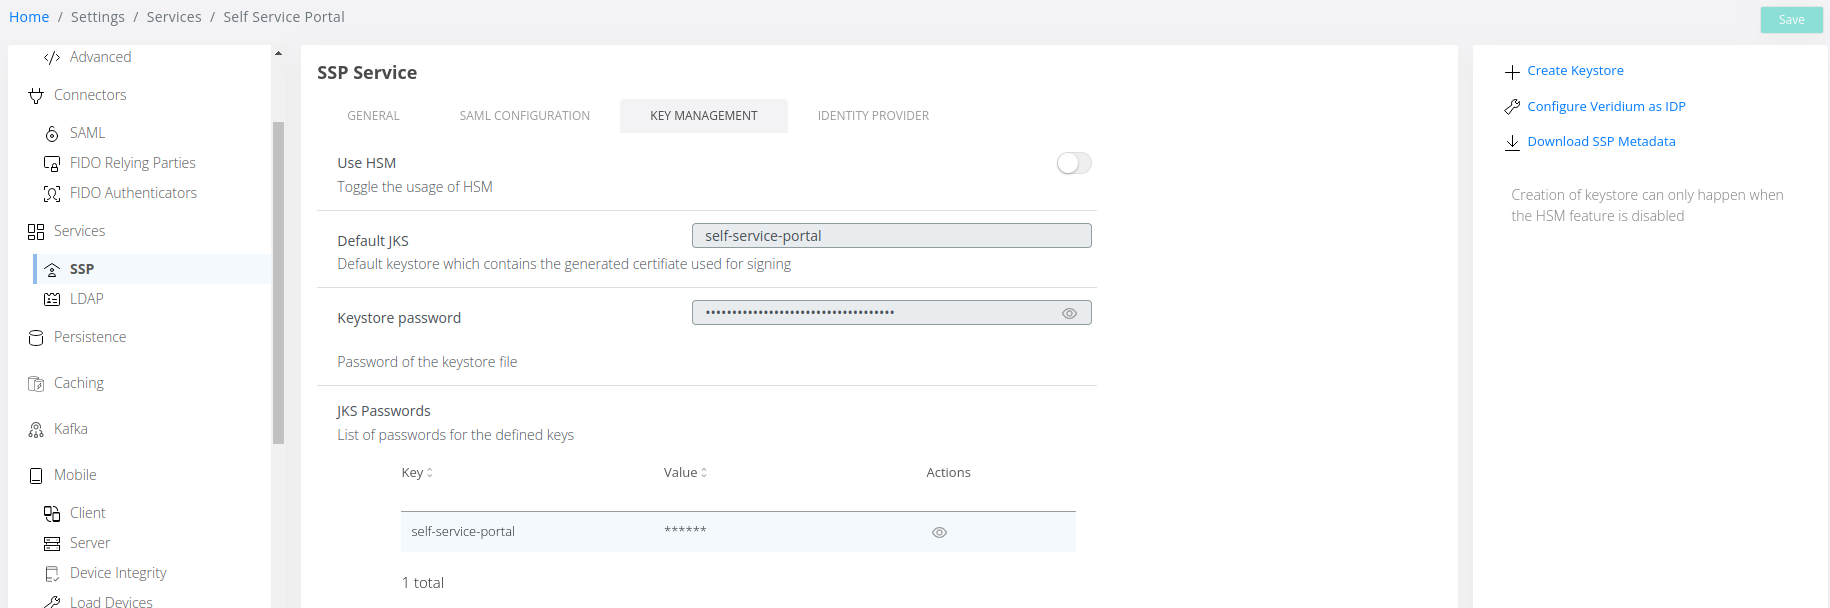
After the Keystore has been generated click on Save.
Connect to all Webapp nodes and run the following command as root to restart SelfService Portal:
service ver_selfservice restart
After the SelfService Portal has started connect to the Admin Dashboard and navigate to Settings → Services → SSP and click on Configure Veridium as IDP in order to recreate the Default SAML Application used by SelfService Portal.
11) Modify FreeRadius CA certificate
Connect to all Webapp nodes and run the following commands as root user:
# Go to FreeRadius certificate directory
cd /opt/veridiumid/freeradius/etc/raddb/certs

# Modify the ca.pem certificate with the truststore used by HaProxy
cp /etc/veridiumid/haproxy/client_ca.pem /opt/veridiumid/freeradius/etc/raddb/certs/ca.pem

# Restart FreeRadius service
service ver_freeradius restart
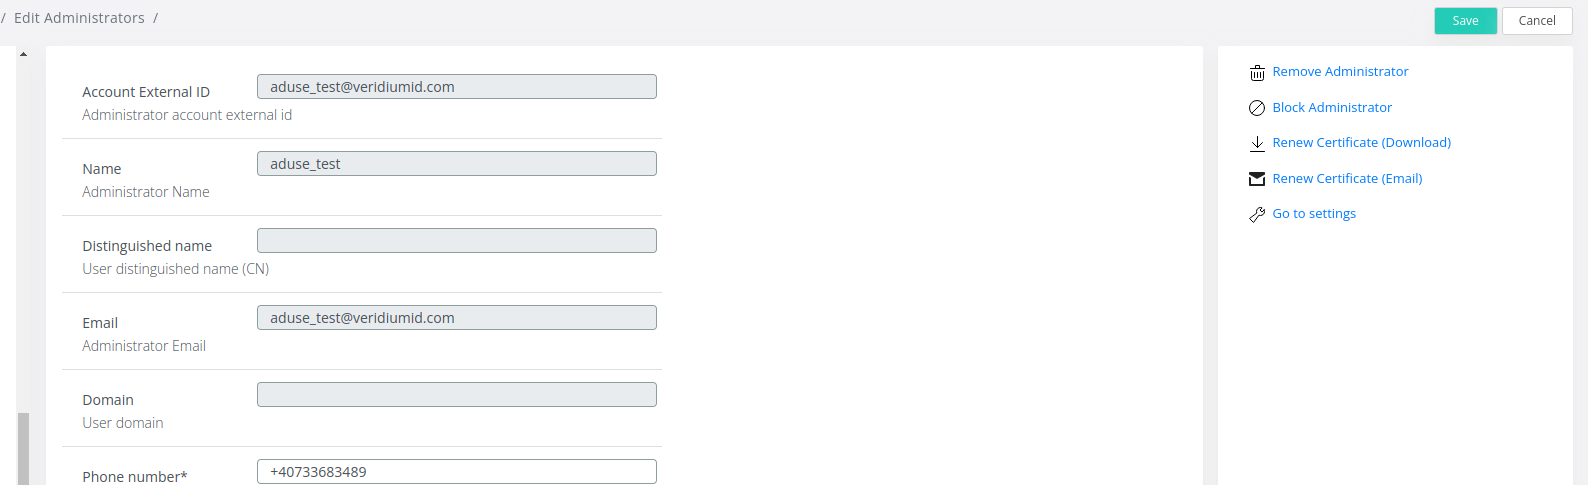
12) Optional: Renew Administrator certificate
This step will be made only in case of having multiple Administrators already created in VeridiumID.
Connect to the Admin Dashboard and navigate to Settings → Administrators.
Double click on every Administrator in the list (except for the Default Administrator created earlier) and click on Renew Certificate Download/Email depending on the existing configurations.
After applying this procedure all enrolled devices will need to be re-enrolled since they will no longer be trusted.