Deployment using OVA file - Rocky8/9
As part of deployment resources, Veridium provides an out of the box OVA image which can be obtained from Veridium Sales Engineering team or Professional services.
This OVA image can be used for PoC's or Production.
The operating system is Rocky 8 or Rocky 9, based on the OVA you have downloaded.
See chapter How to import an OVA file on how to import an OVA file.
After the OVA is imported, start the setup and installation of VeridiumID product. Make sure you have a FQDN for your VeridiumID server in DNS (bonus if you also have the PTR)
1. Connect ssh/scp and transfer HTTPS security certificate.
The certificate should be signed by a publicly trusted authority in p12 format with full chain included. Installation can be done also using a self signed certificate however that will make enrolling user devices difficult, vanilla iOS and Android devices need to trust the certificate in order to enroll.
1.1. Connect to the virtual console, authenticate, change default password, hostname and IP Address.
The default credentials are :
Login : veridiumid
Password: Ch4ng3Me!
Use the ‘passwd’ command to change the password:

Note: In production it’s strongly recommended you vault this password, ideally installing a PAM agent and other host security controls at this point.
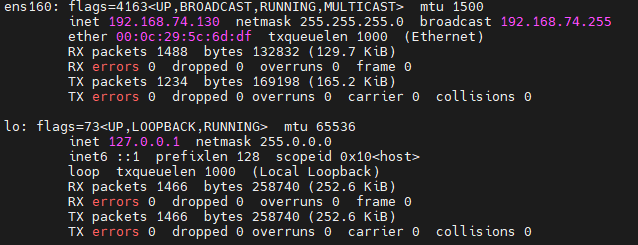
Use ‘sudo ifconfig’ to display network configuration information:
Use sudo nmtui command to configure the network. Here is an example, so the server will have always the same IP:

Also, from this interface the hostname can be changed.
Reboot the VM (I like using the command line ‘sudo reboot’, but you may also reboot using VMware as tools are installed)
Set the proper Chrony server:
sudo systemctl status chronyd
sudo systemctl enable chronyd; sudo systemctl start chronyd
sudo date
sudo chronyc -a sources

## check also if localzone is defined fine
sudo timedatectl

## also set timedate zone
sudo timedatectl list-timezones | grep Bucharest

## timedatectl set-timezone Europe/Berlin
## if no ntp server is available, the date can be modified manually
## sudo date -s "14 FEB 2024 18:08:00"
1.2 Upload the certificate using WinSCP or use a self signed certificate. - it is recommended to do the installation with the same FQDN name as the service will be published.
If you cannot obtain a certificate signed by a public authority, a self signed certificate may be generated, by running the following command:
##Args:
##       -d DOMAIN      -> mandatory argument, the domain name for the certificate (for example: poc.example.com
##       -p PASSWORD    -> mandatory argument, the password that will be used for the generated certificate

/home/veridiumid/create_domain_cert.sh -d DOMAIN -p PASSWORD

## the certificate created, used for instalation is /home/veridiumid/certs/domain.p12
If there is already a PCKS12 certificate file signed by a public authority, please copy it to /home/veridiumid/. Make sure the file contains ALL certificates in the chain and in the proper order, if you have separate certificate, chain and keyfiles skip to step 2 of this section
Use scp to transfer the PKCS12 certificate file to your VeridiumID server and skip the rest of this section.

Note: Use whatever SCP client makes you comfortable, the example above is from the Darwin (MacOS) terminal
Use scp to transfer all the separate certificate files to /home/veridiumid on the server:

Note: In this example a wildcard certificate was created using the Shield Signed service with Let’s Encrypt as the Certificate Authority
Open an SSH terminal to the VeridiumID server and Generate a PKCS12 certificate file using the following ‘openssl’ command:
openssl pkcs12 -export -out <output filename>.p12 -inkey <private key filename> -in <certificate file containing full chain of authority>

Note: The private key should be handled appropriately as should the password you set protecting it within the p12. This could also have been done from the Darwin terminal or any system that has a recent release of openssl.
2) Starting the installation
Check the IP of the server, by running. Take the IPs configured already for the server (in case of single node, only one IP is used). This will be used during installation.
ip a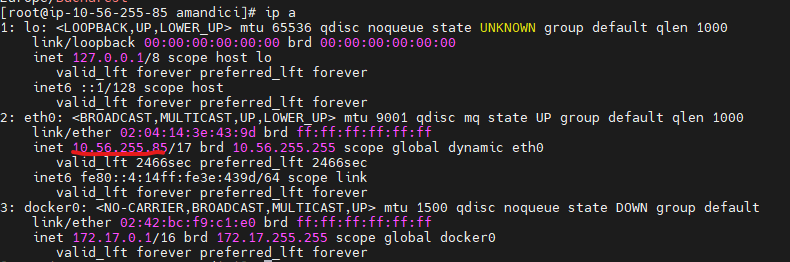
From here, start the installation by running the following script:
##for RHEL8 run:
./veridium-installer-rhel8.sh
##for RHEL9 run:
./veridium-installer-rhel9.sh
2.1) Provide deployment details using the Installation Wizard
When the installation wizard will start the following screen will be seen in the terminal:
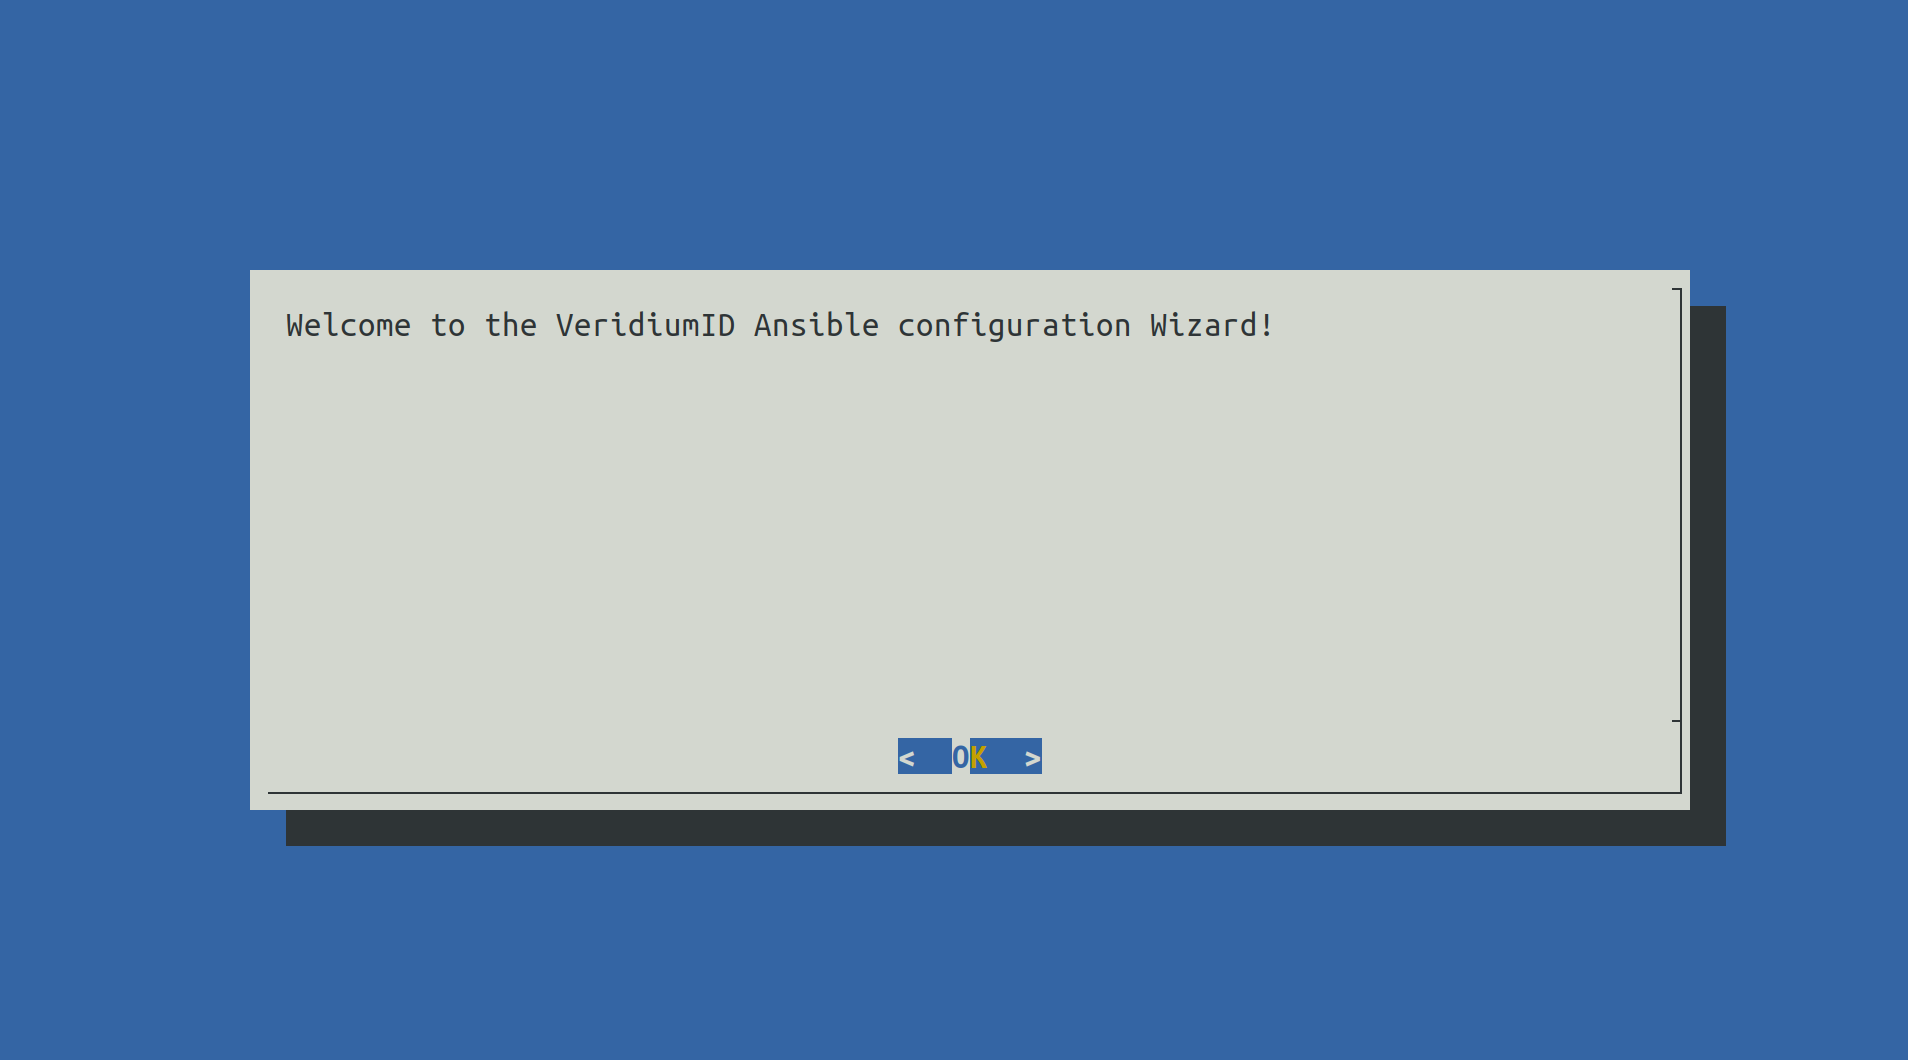
Press Enter to proceed.
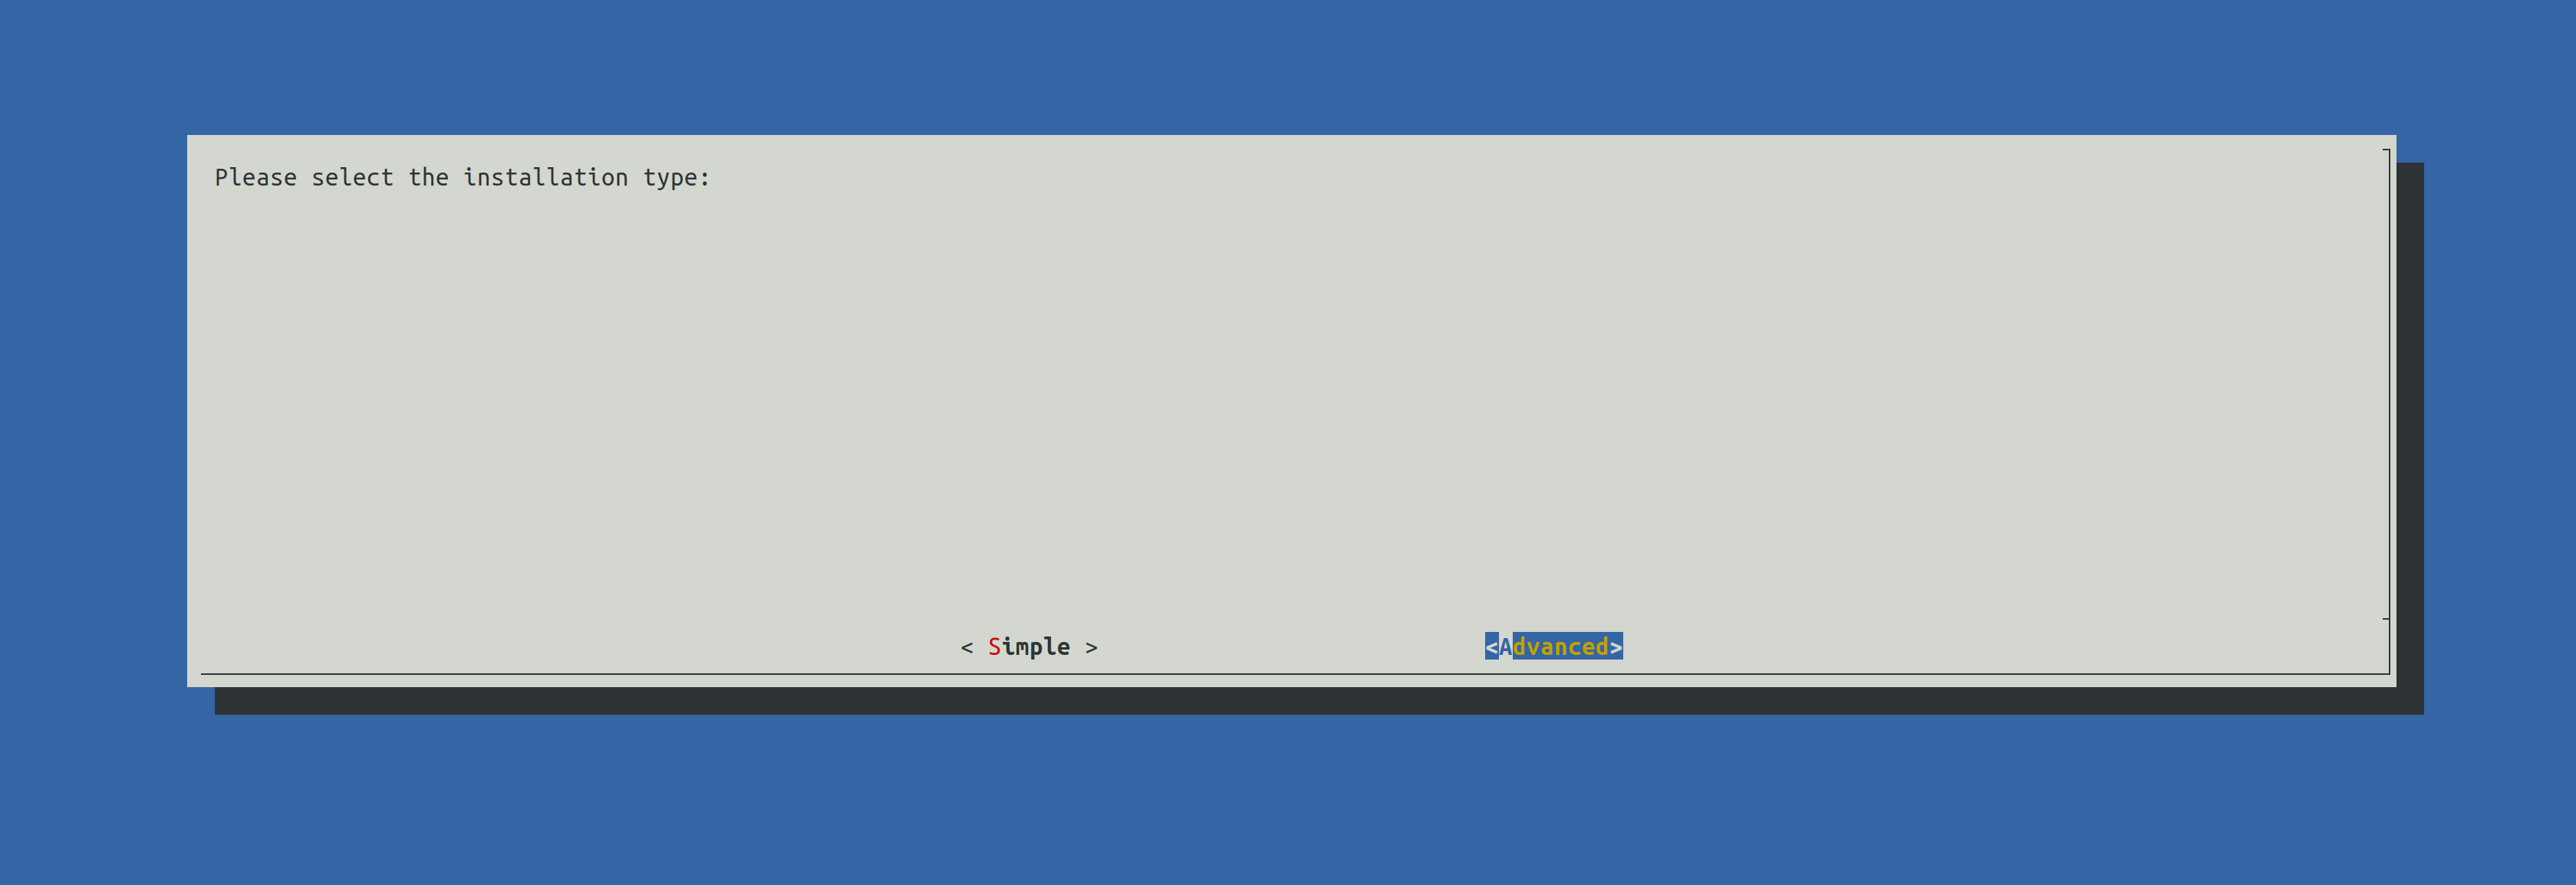
Select Advanced using the right arrow key and press Enter to continue.

All steps from the Menu will be detailed in the following steps.
2.2) Set VeridiumID FQDN
When selecting Set VeridiumID FQDN the following screen will be shown:
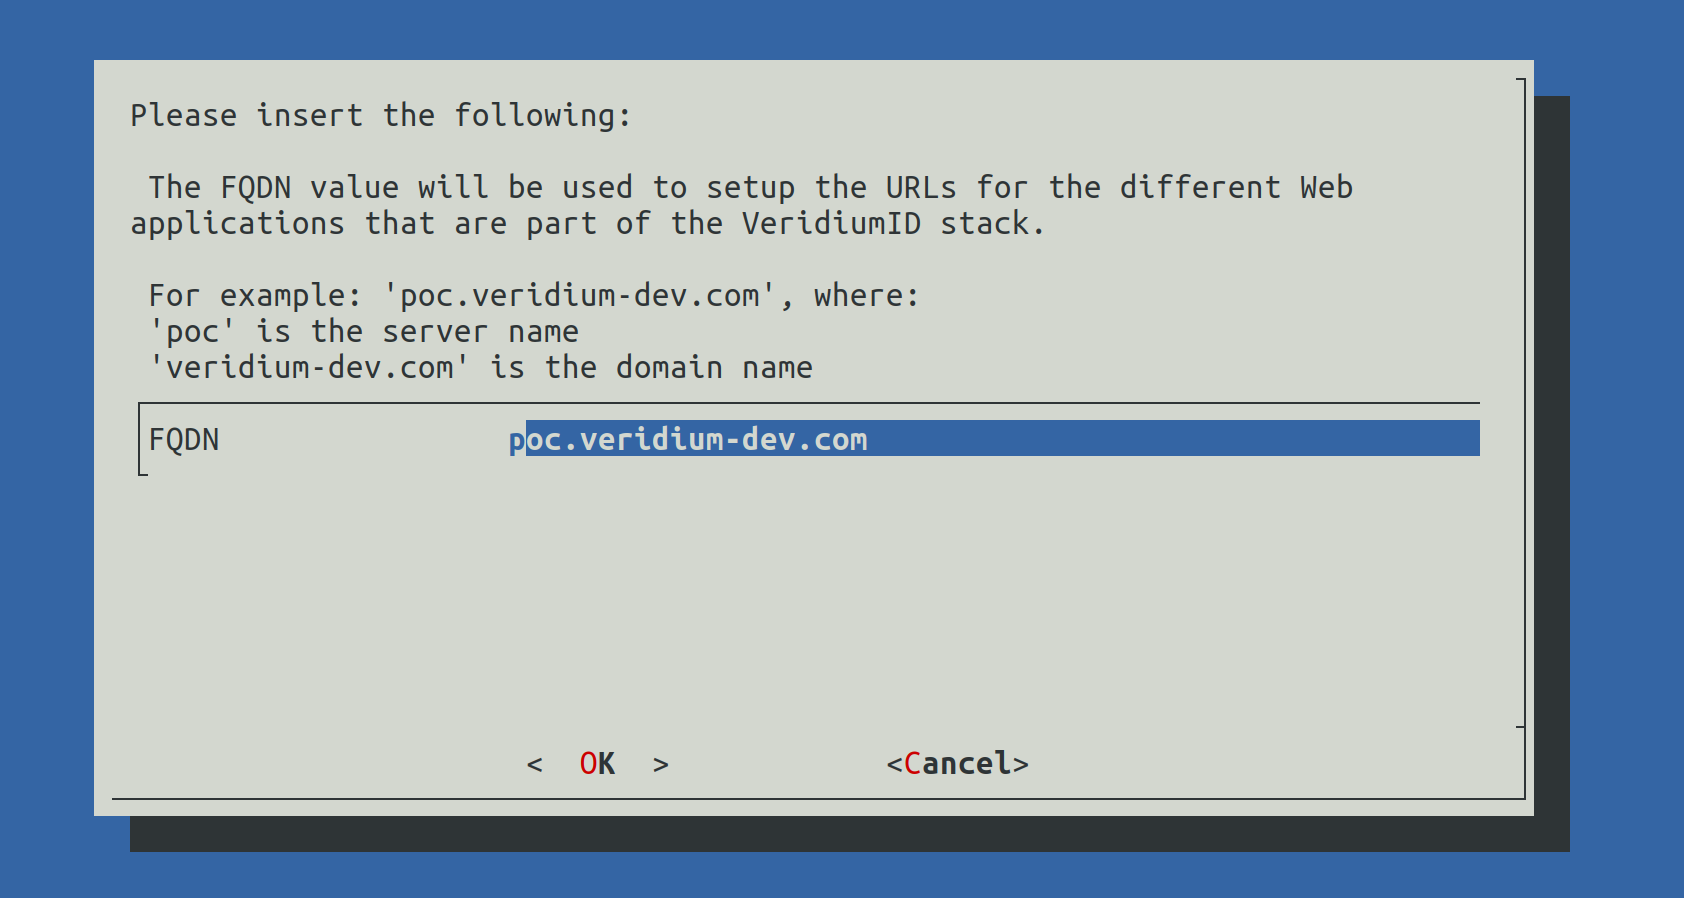
Write the correct FQDN in place of poc.veridium-dev.com and press the TAB key to go to OK and press Enter to continue.
A validation of the FQDN will be prompted. Press Enter to continue.
2.3) Configure Certificates
When selection Configure Certificates the following screen will be shown:
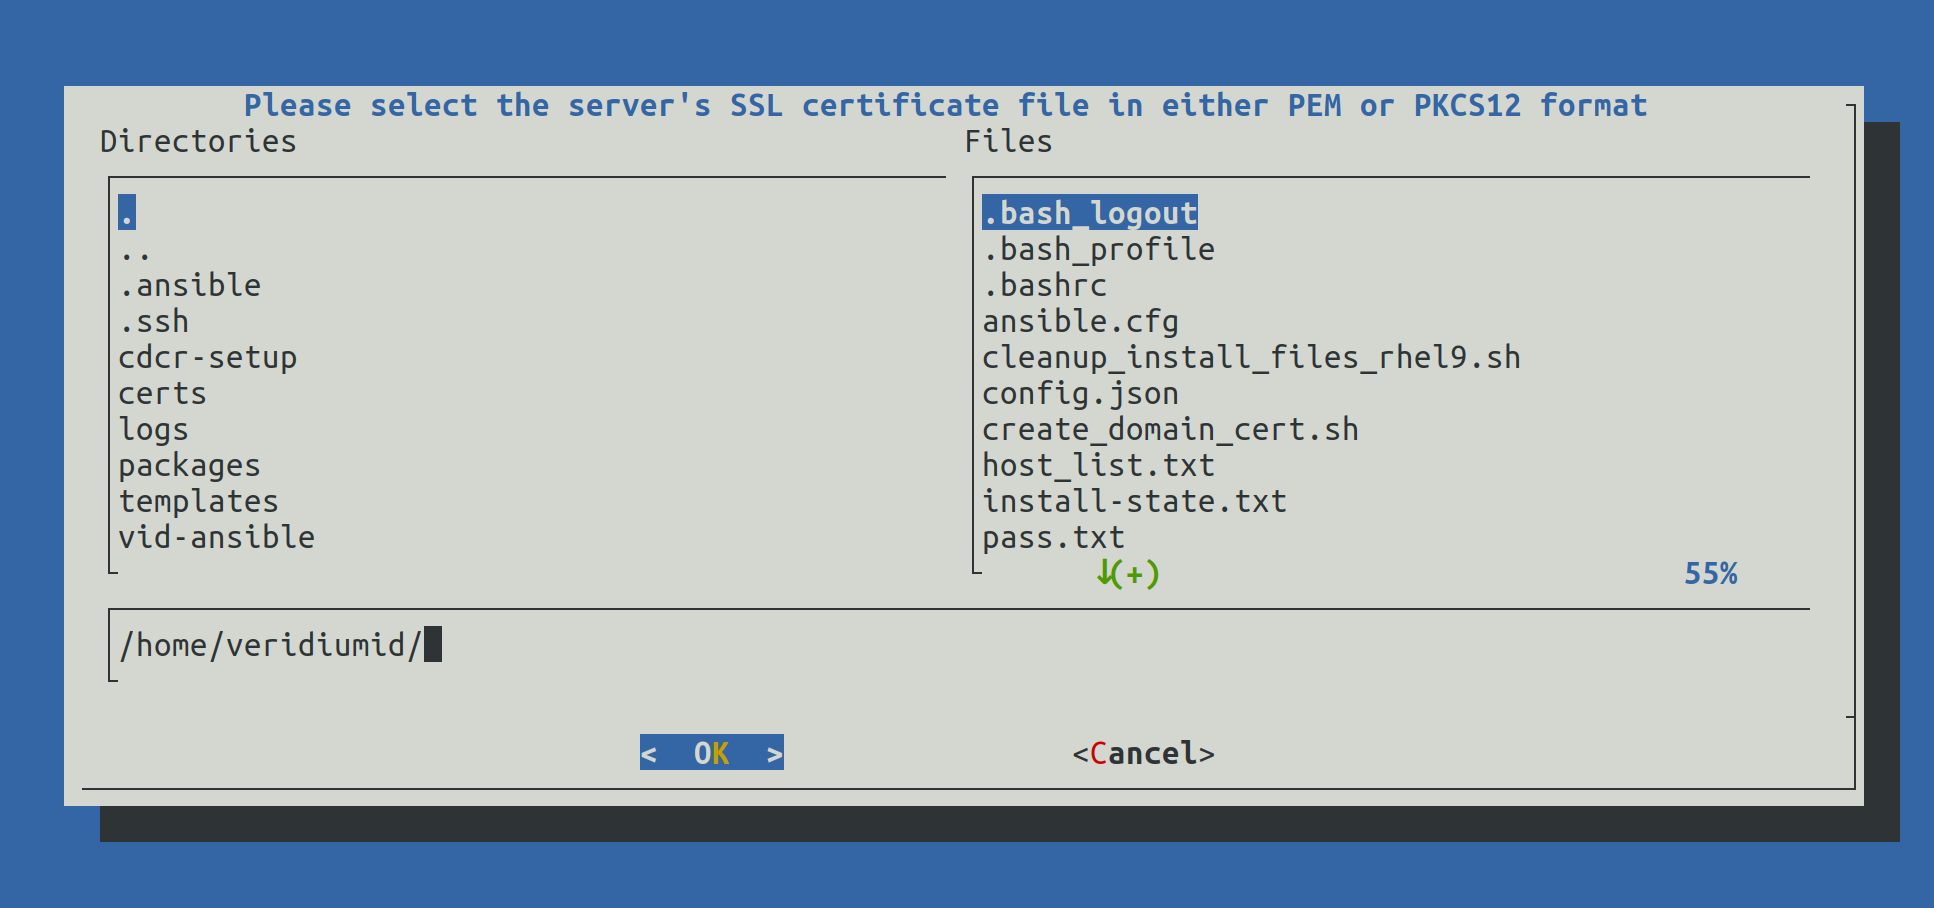
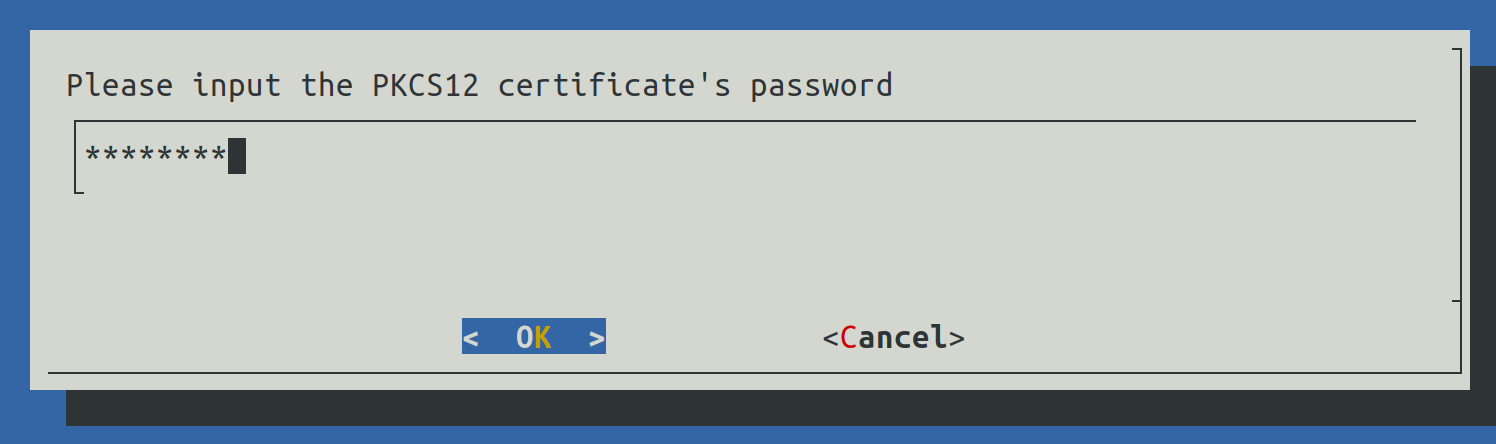
Write the full path of the certificate (for example: /home/veridiumid/certs/domain.p12) and press Enter to continue.
Another prompt for the password will be shown.
2.4) HaProxy configuration
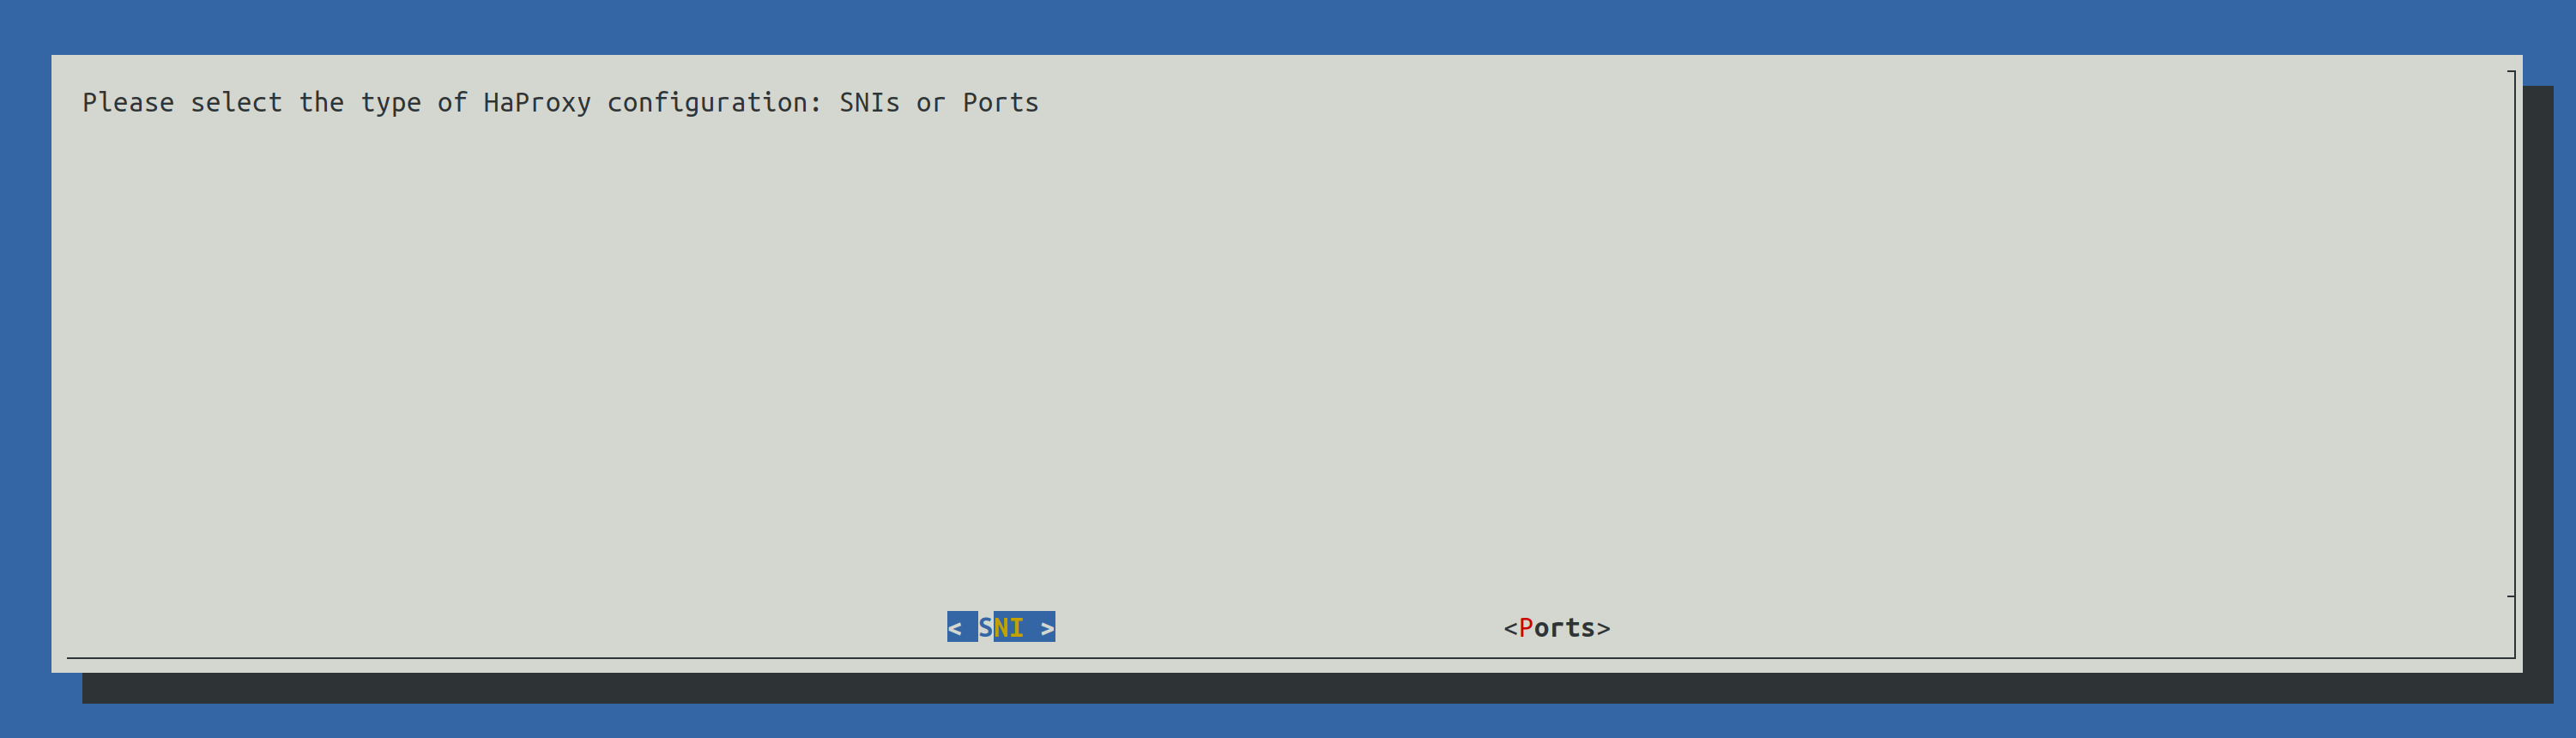
There are two configuration for HaProxy:
SNI: all component URLs will be composed from the base FQDN (the one provided during step 2.3.3.1) along side the components name, for example:
for the Admin Dashboad : admin-baseFQDN
for the Self Service Portal: ssp-baseFQDN
for the Websec API: baseFQDN
for Shibboleth (Identity Provider): shib-baseFQDN
Ports: all component URLs will be composed from the base FQDN and a different port for each component, for example:
for the Admin Dashboard: baseFQDN:9444
for the Self Service Portal: baseFQDN:9987
for the Websec API: baseFQDN:443
for Shibboleth (Identity Provider): baseFQDN:8944
2.5) Set Ansible Hosts
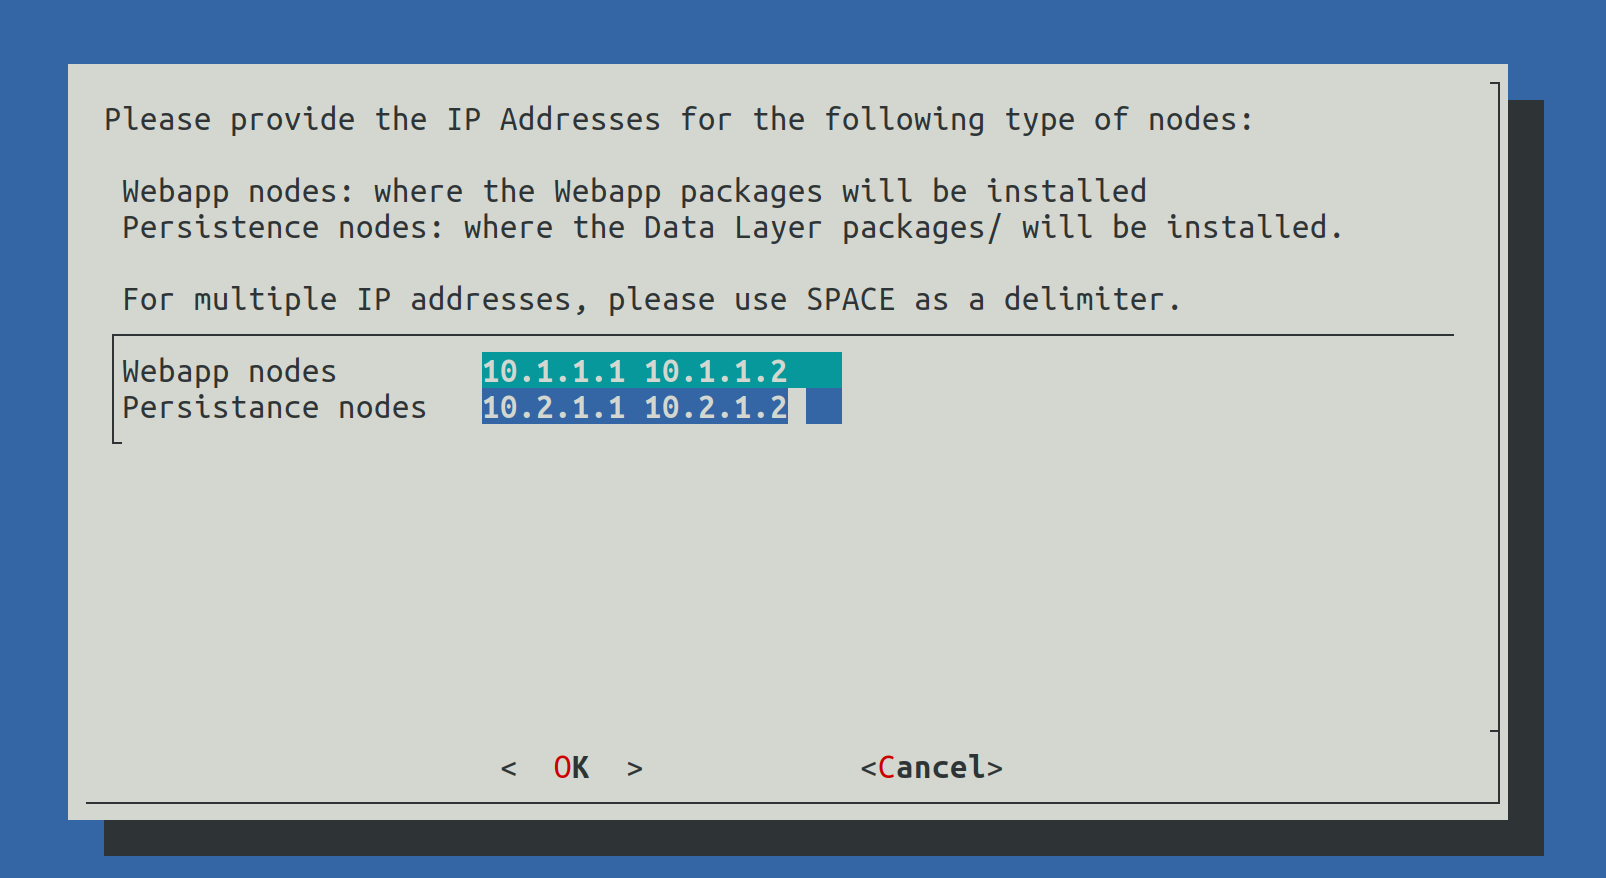
In this step the select from the list of IP addresses which will be Webapplication nodes and which will be Persistence node (Data nodes).
The list of nodes must be delimitted by Spaces.
2.6) Set RAM values

In this step the RAM values for different components will be configured. The value must contain a number followed by g for Gb or m for Mb.
2.7) Set CA variables
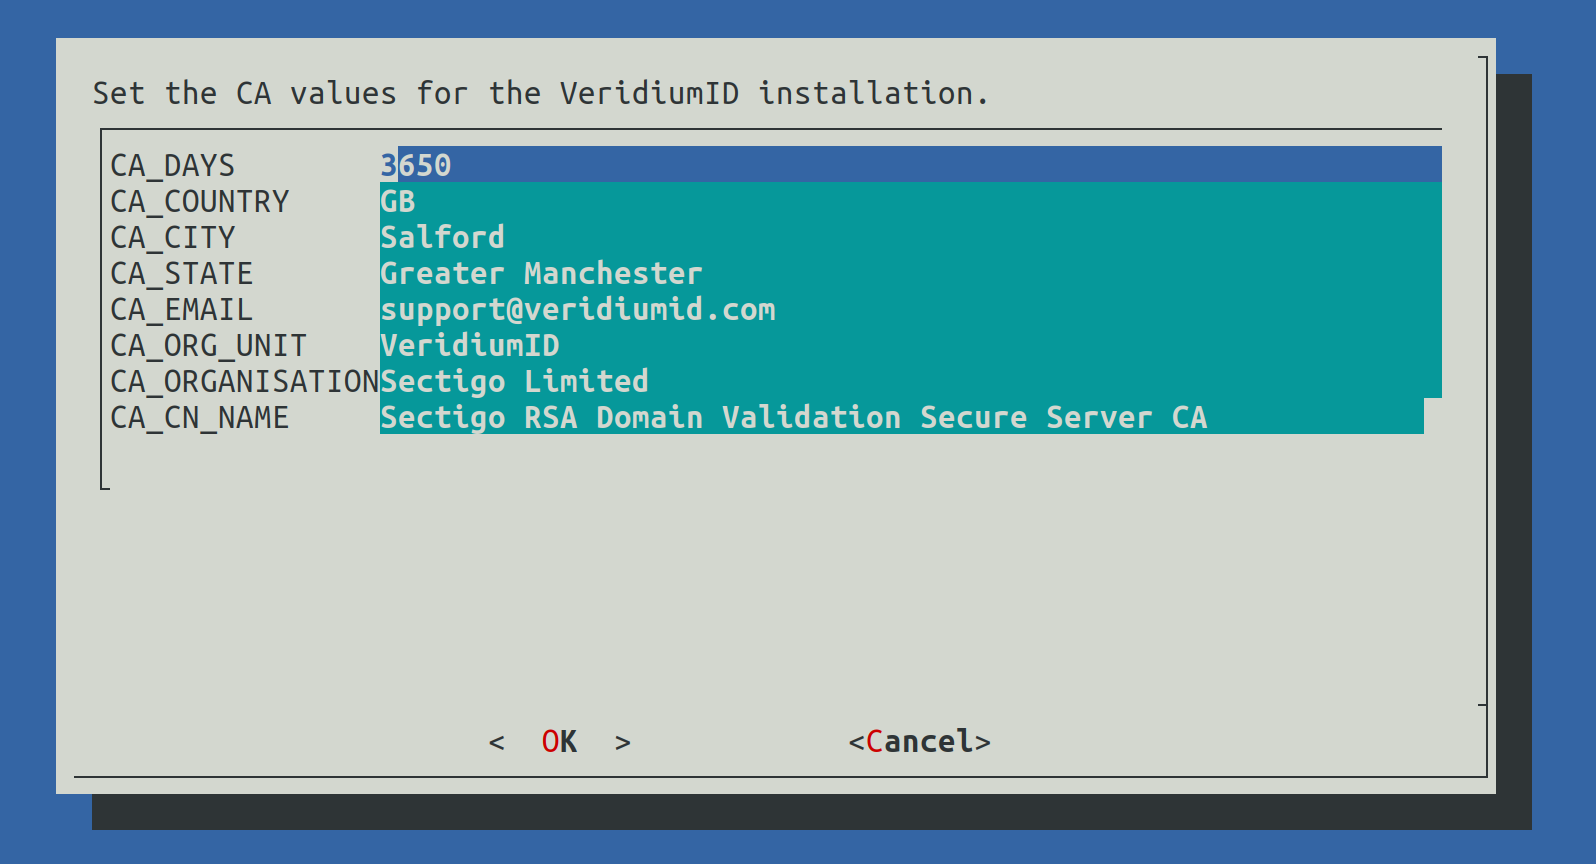
This step will configure the values used for the internal Certification Authority of the VeridiumID deployment (used to generate internal certificates).
2.8) Set Data Center Tag
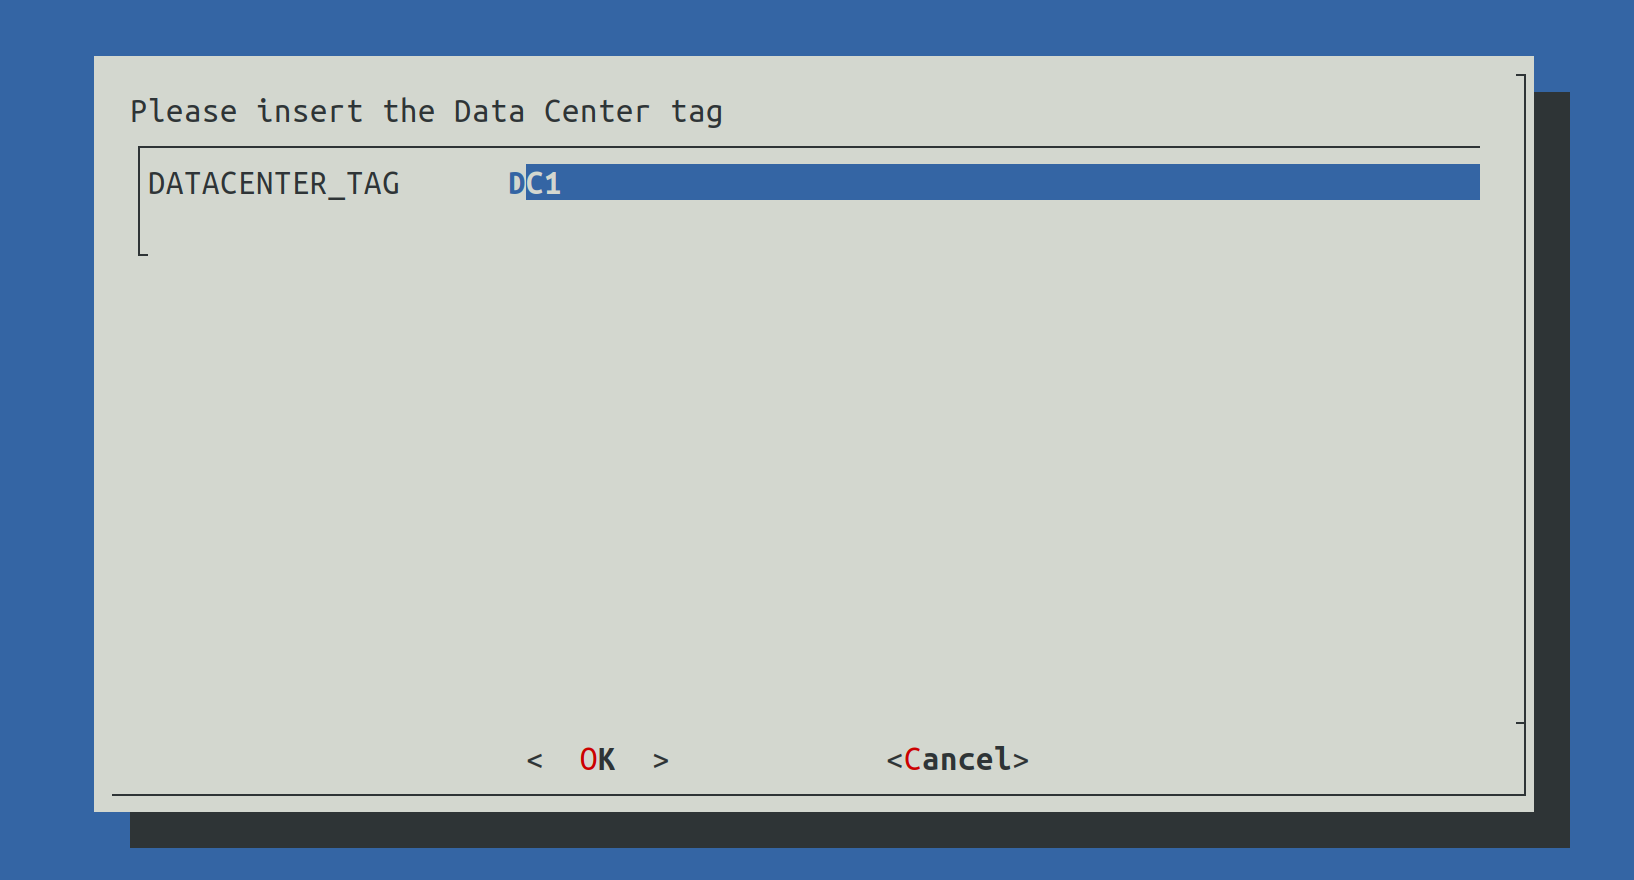
This value will be used to define the name of the current data center.
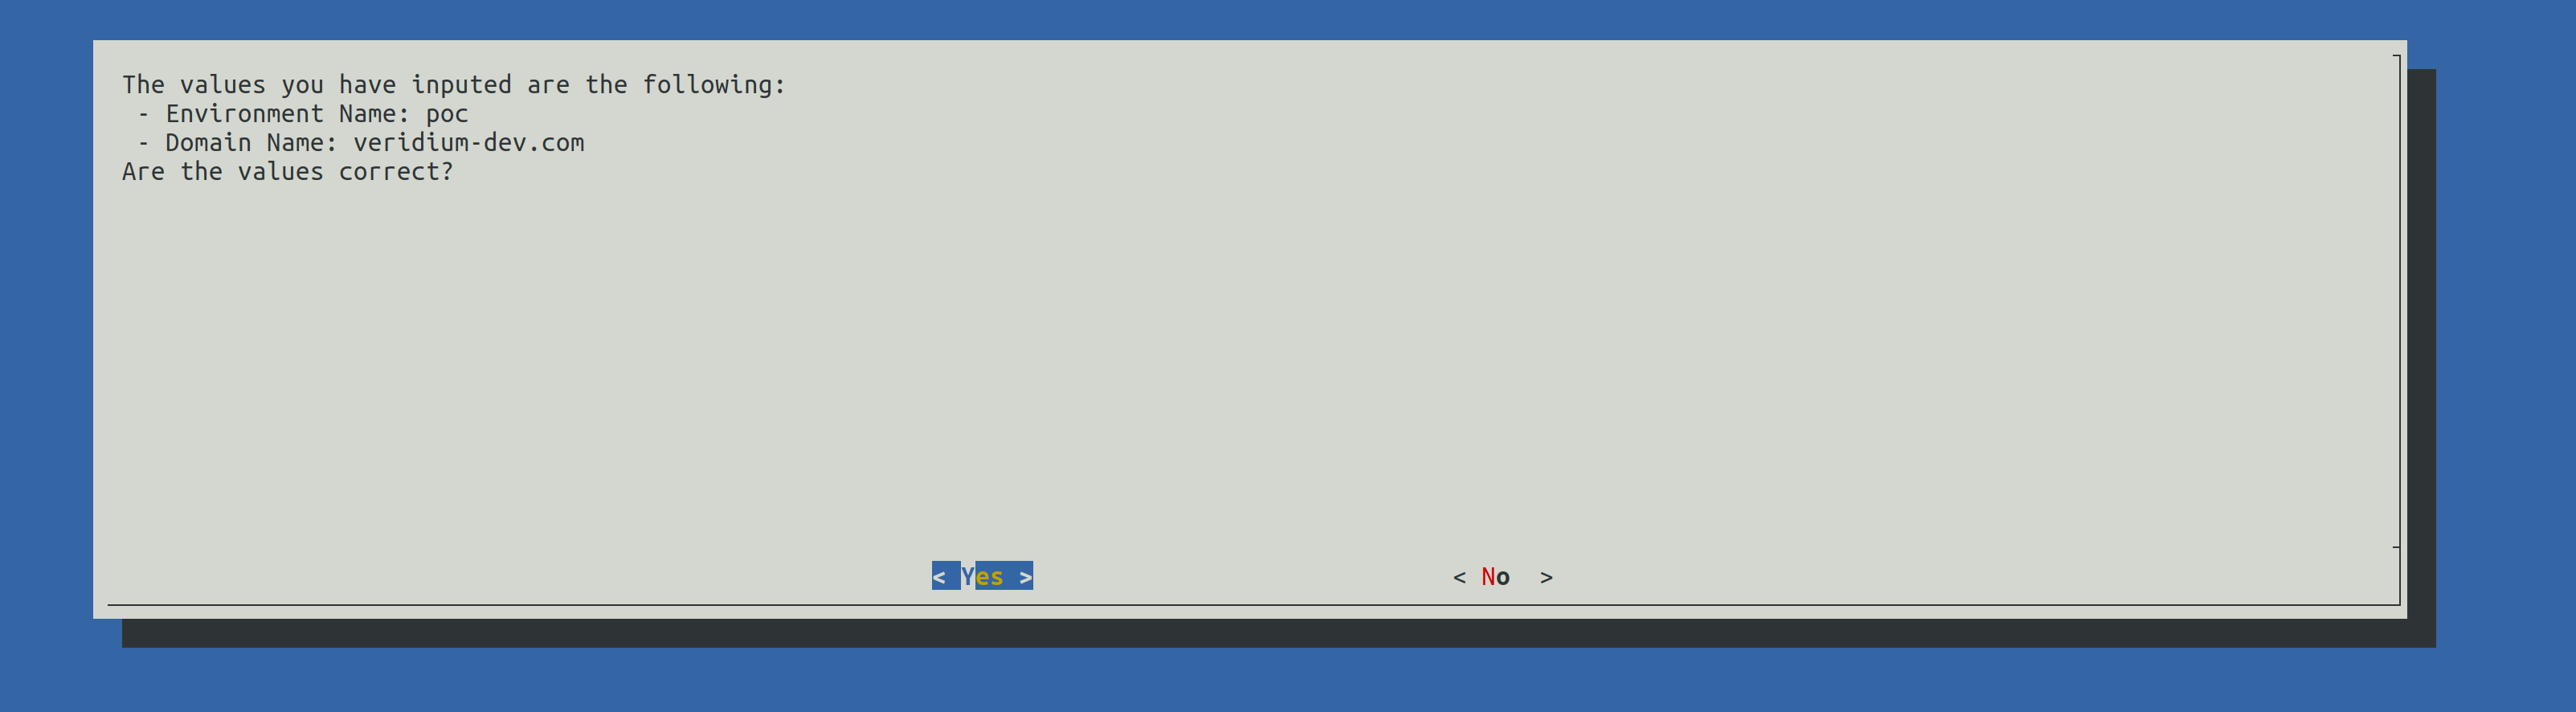
2.9) Show configuration

In this step we can verify all value provided earlier to validate them.
2.10) Start deployment
This step will close the Installation Wizard and provide the list of FQDNs:
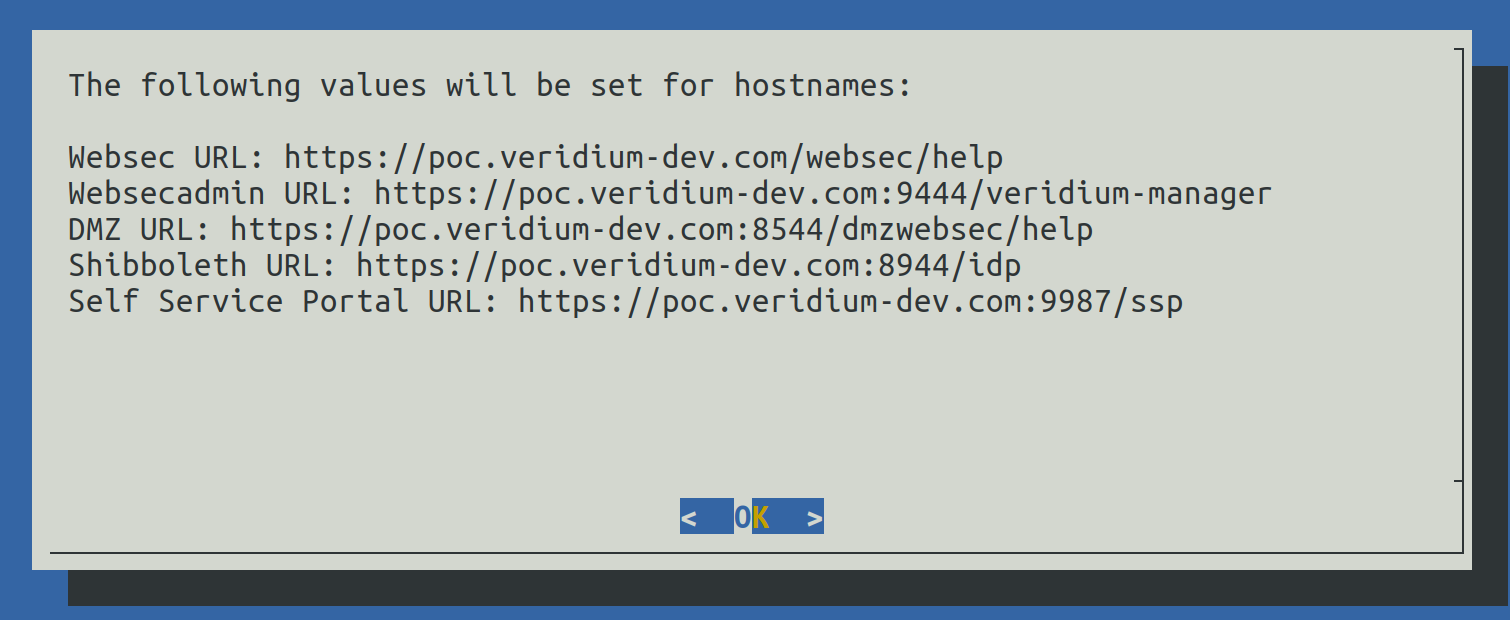
The values can be viewed later in the following file: /home/veridiumid/host_list.txt
After exiting the Installation Wizard, the deployment process will start by:
Checking the SSH connectivity from this node to all other nodes
Install specific VeridiumID components for Webapplication and Persistence nodes
Start the Ansible configuration
3) Cleanup installation files
In veridiumid user’s home directory the following script will take care of cleaning up installation files (in case of needing the same machine to deploy another environment or redeploying the environment).
Run the following command as veridiumid user:
## for RHEL 8 please use the same commands, with RHEL8 version.

# To remove local installation files (in order to deploy on a new environment):
./cleanup_install_files_rhel9.sh

# To redeploy the same environment (requires to remove the deployment's CA directory)
./cleanup_install_files_rhel9.sh -c
In order to redeploy the same environment, after using the cleanup command (with CA directory included) the following must be performed as well:
Connect to all webapp nodes and stop all services running the following command as root:
- CODE
bash /etc/veridiumid/scripts/veridium_services.sh stop
Connect to a persistence node and do the following:
Remove Zookeeper data using the following command as root:
- CODE
/opt/veridiumid/zookeeper/bin/zkCli.sh

# And after accessing the Zookeeper command line

deleteall /veridiumid

# To exit

quit
Remove Cassandra keyspace using the following command as root:
- CODE
/opt/veridiumid/cassandra/bin/cqlsh --cqlshrc=/opt/veridiumid/cassandra/conf/veridiumid_cqlshrc --ssl -e 'drop keyspace veridium;'

#(even it received timeout, it should be deleted; check with the following command; the veridium keyspace should not exists)

/opt/veridiumid/cassandra/bin/cqlsh --cqlshrc=/opt/veridiumid/cassandra/conf/veridiumid_cqlshrc --ssl -e 'desc keyspaces;'
Connect to all persistence nodes and stop all services running the following command as root:
- CODE
bash /etc/veridiumid/scripts/veridium_services.sh stop
4) Set a signed certificate for the installation
Replace the self signed certificate with a proper one, delivered by client. If the client has a p12, the following script can be executed to extract the certificates. It will be generated a in conversion_result, the private key and the public certificate. Please copy, as per instructions, the file in haproxy and restart the service. Also in websecadmin, remove the selfsigned certificate and import the correct one.
/etc/veridiumid/scripts/convert_haproxy_cert.sh certificate.p12

#To change the Haproxy domain certificate please use the following command as root user:
#    cp conversion_result/server.pem /etc/veridiumid/haproxy/server.pem; chown ver_haproxy:veridiumid /etc/veridiumid/haproxy/server.pem
# To restart the server after changing the certificate use the following command as root:
#    service ver_haproxy restart