Enrolment By Invitation Code
Manage User Enrollment Invites
Veridium Manager serves as a centralized place to manage user enrollment codes by providing functionality to generate enrollment codes for a single user or for a list of users, to view details and manage these enrollment codes and invitation list, and also to configure the email template used to send the code and other configurations regarding enrollment by invitation.
The page used for managing enrollment codes is enabled if there is any integration with Enrollment by invitation enabled and it can be reached by selecting “Manage Enrollment Invitations” option from the right side of the Identities page.
a. Configure Enrollment by Invitation
Enable Enrollment by invitation
The Enrollment by invitation may be enabled when AD Enrollment main step is used. Open the AD Enrollment step configuration and activate Enable user enrollment with OTP.

Edit the active AD Enrollment main step

In Configuration enable the invitation code. Additionally, you can allow users to use their PIN instead.
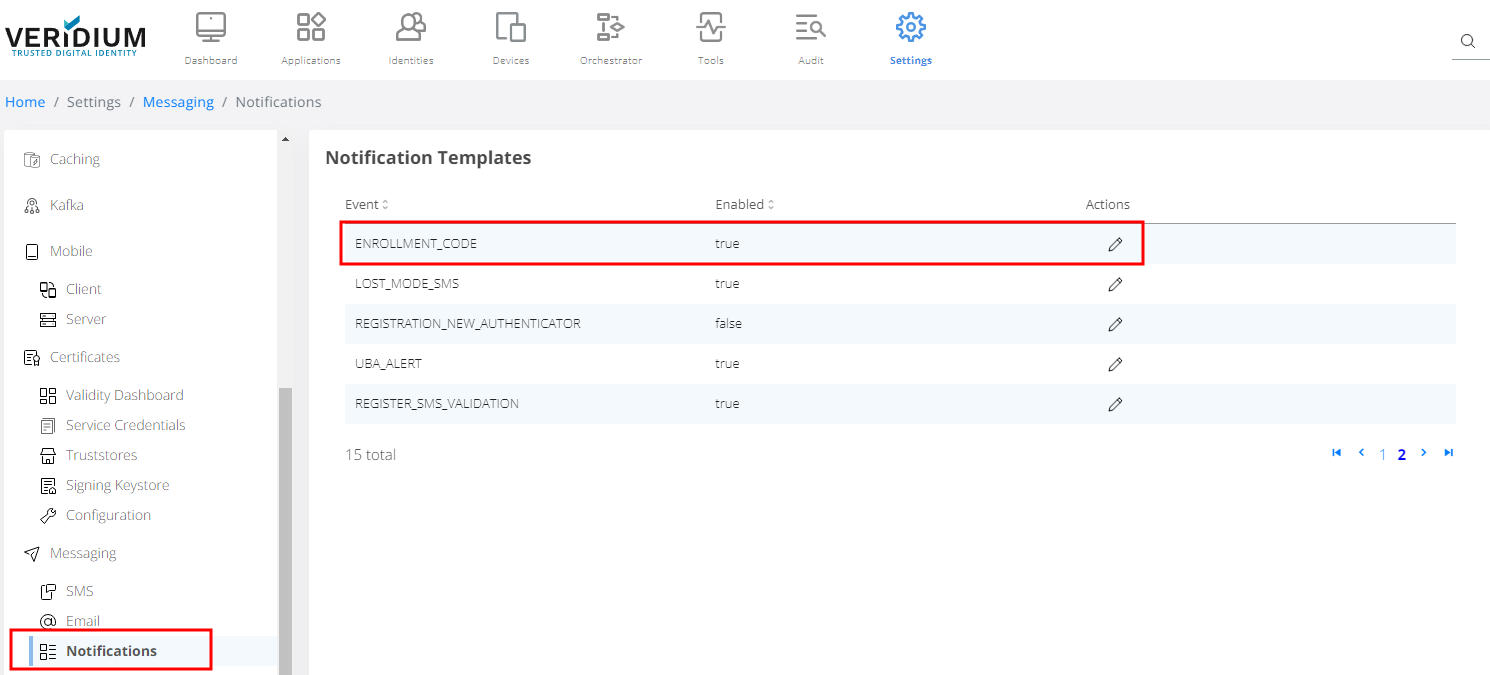
Configure invitation email template
The email template used to send an invitation for enrollment can be modified from Settings/Messaging/Notifications, where the template name is “ENROLLMENT_CODE”.
In the invitation template the following information may be used:
Enrollment QR Code used by Veridium Authenticator application enrollment
Link for Self Service Portal web application
Plain OTP code (possibility to be entered manually when enrollment process starts)
Location of the email template

Enrollment email template options. Don’t forget to validate body and save, after all desired changes are in place.
Other configurations
In the general settings there are 2 more configurations related to Enrollment by invitation used for database cleanup:
time to keep a pending invitation - after how many seconds a pending invitation should be removed.
time to keep a code after expiration - after how many seconds after expiration time the code (or invitation in case of bulk invitation codes) should be removed.
Location of Enrolment Code settings: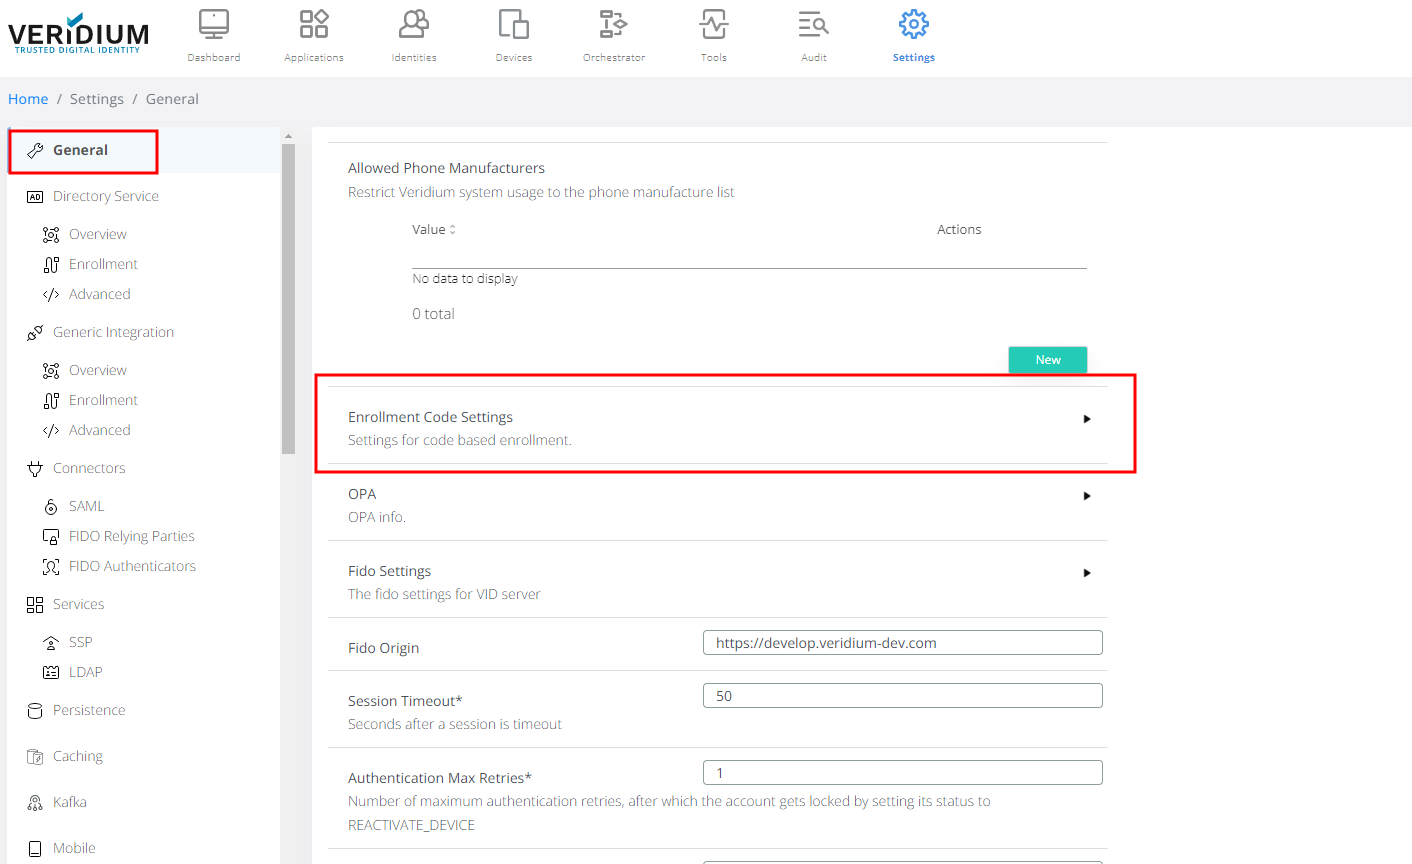
Location of Enrolment Code settings
Enrollment Code Settings:

Enrollment Code Settings
b. Manage invitations
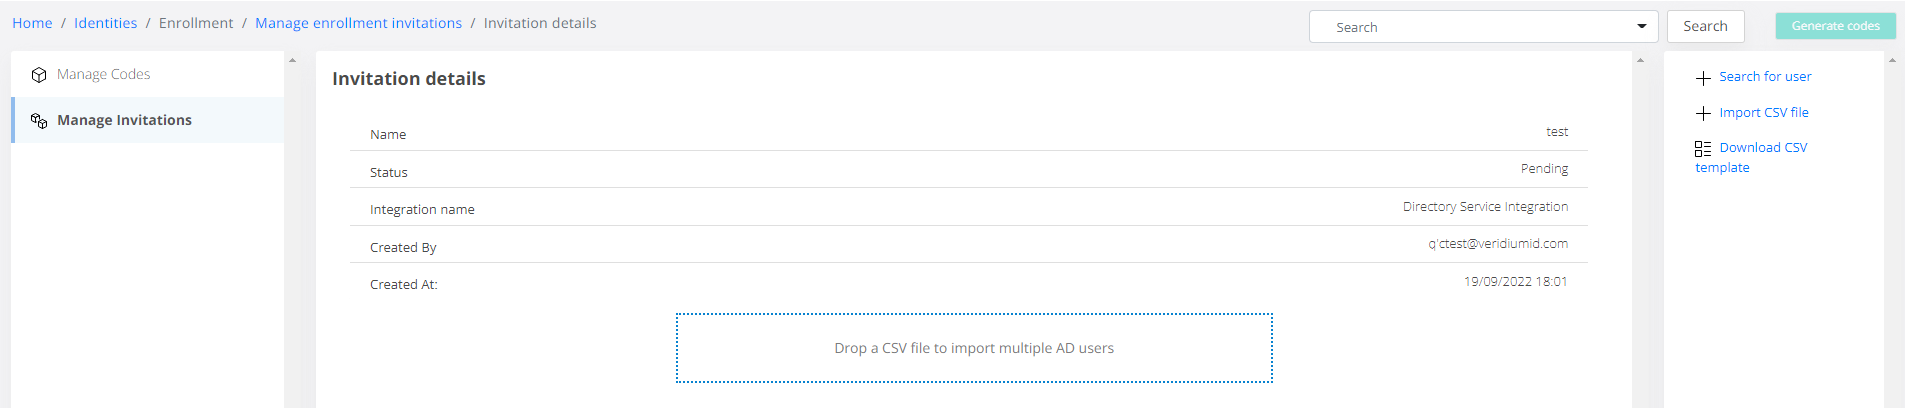
See invitation lists and invitation details
The administrator can see in the Manage invitations the list of invitations with the following information: integration name, creation time, user who created the invitation, status of the invitation, expiration time (if the invitation has been processed) and actions.
By double clicking an entry from this table or pressing the “See invitation details” from actions column the user can navigate to the page with more details about the invitation.
The possible statuses of an invitation are:
Pending - in this state the entry list of this invitation can be modified (adding or removing entries) and the administrator has the option to generate the codes based on the entry list.
Processing - in this state the process of generating enrollment codes is still on going and the details page is unreachable.
Processed - the enrollment codes have been generated and in the details instead of the initial entry list now is is displayed the list of generated enrollment codes (double clicking an enrollment code or pressing the “See details” from actions column navigates to more details about the enrollment code).
Create a new invitation list
In order to create a new invitation list, the administrator needs to select from the right side of the page the option “Generate invitation”. After this, if there are multiple integration with Enrollment by invitation enabled, the user should select an integration, and if there is only one, this integration is used by default. Afterwards, a new invitation is created with no user in the entry list.
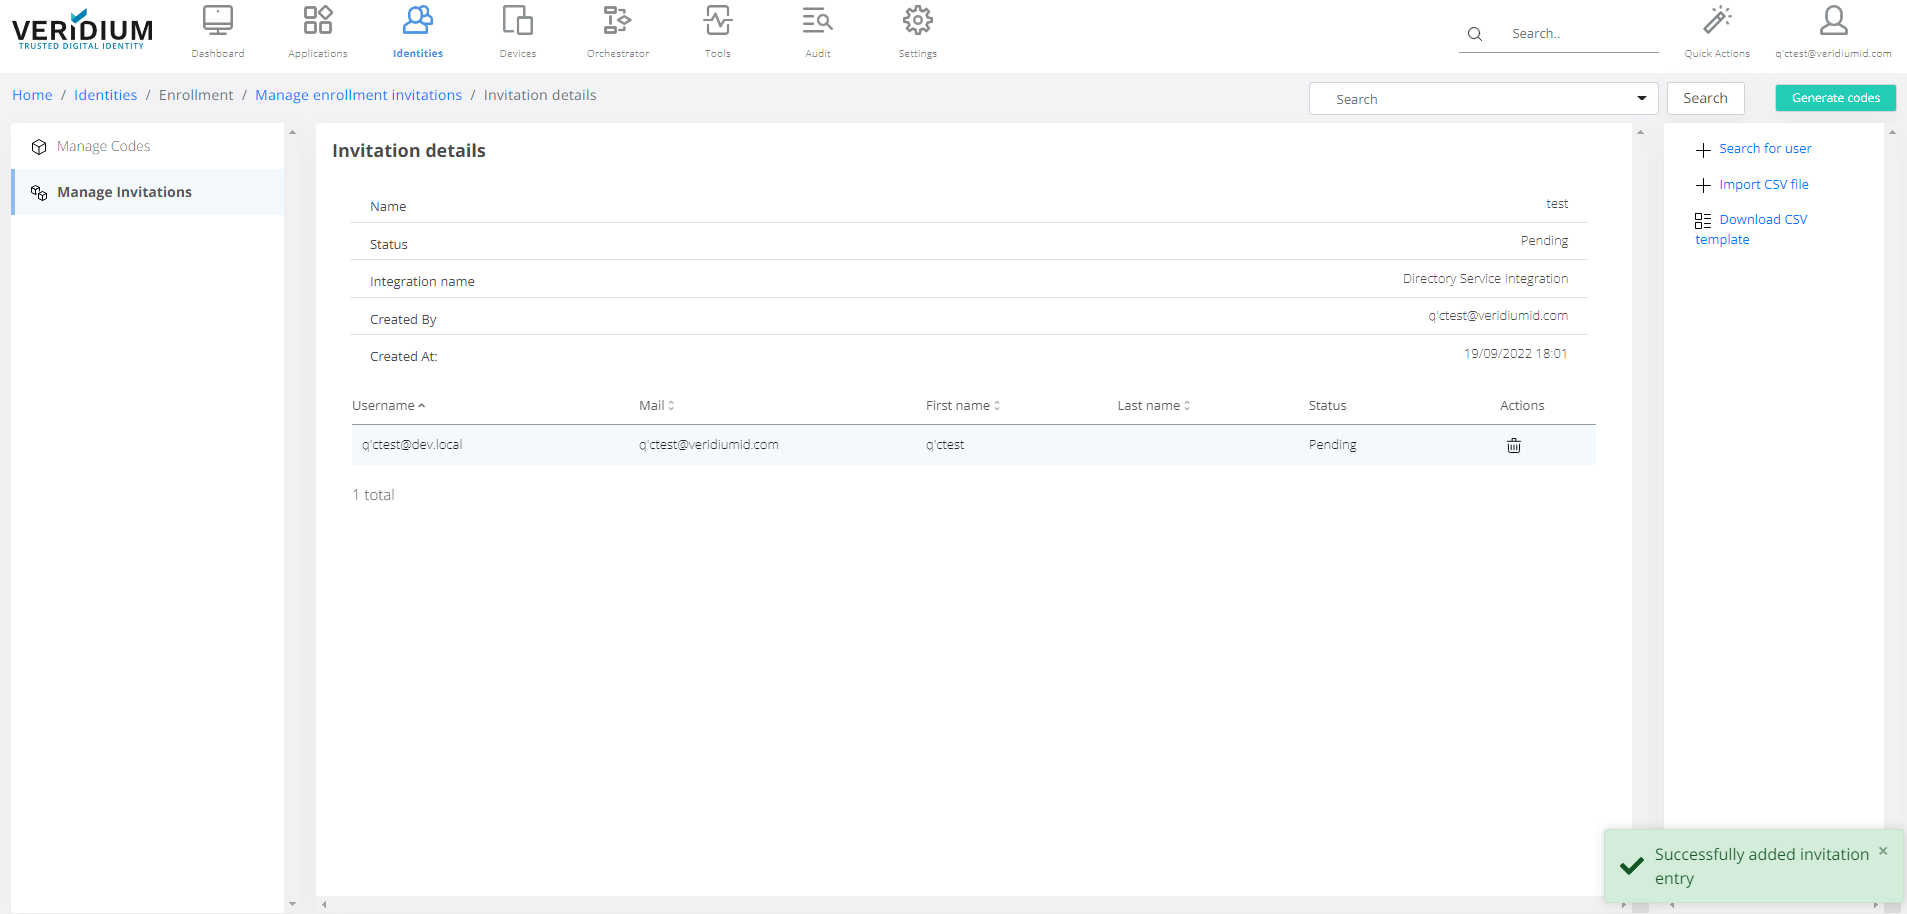
To add entries for an invitation in the details page there are 2 methods:
Searching for an user in AD and retrieving the following information: username (userPrincipalName, mail, firstName, lastName)

Adding a bulk of users by importing a CSV file generated from AD
After the import, the entries will be added for the invitation and a list of errors appeared while processing certain rows the CSV will be displayed (the rows are skipped). The format of the CSV used for import is:
userPrincipalName | firstName | lastName | |
|---|---|---|---|
{{UPN of the user}} | {{mail used for sending the code}} | {{ first name }} | {{ last name }} |
When the entry list is completed, the administrator can generate enrollment codes based on the entries by clicking “Generate codes”. A modal will be displayed to select the validity time and policy used for the enrollment codes. After the generation is started the invitation will be in “Processing” until all enrollment codes are generated.
Revoke active codes for invitation list
In the details page of a processed invitation the administrator can revoke all the generated enrollment codes from the invitation by clicking the button “Revoke all”.
c. Manage enrollment codes
See invitation lists and invitation details
The administrator can see in the Manage code the list of enrollment codes with the following information: integration name, username, mail, status of the code, expiration time and actions.
By double clicking an entry from this table or pressing the “See code details” from actions column the user can navigate to the page with more details about the enrollment code. In the details page, in case of validation errors, the user can also why the validation failed.
The possible statuses of an code are:
Active - only codes with Active status can be used for enrollment
Used - the code has been already used for enrollment (in the details page it is shown also when it have been used)
Revoked - the code has been revoked (in the details page it is shows who revoked the code)
Expired - the code haven’t been used until the expiration time
Validation error - when generating the code the validation failed
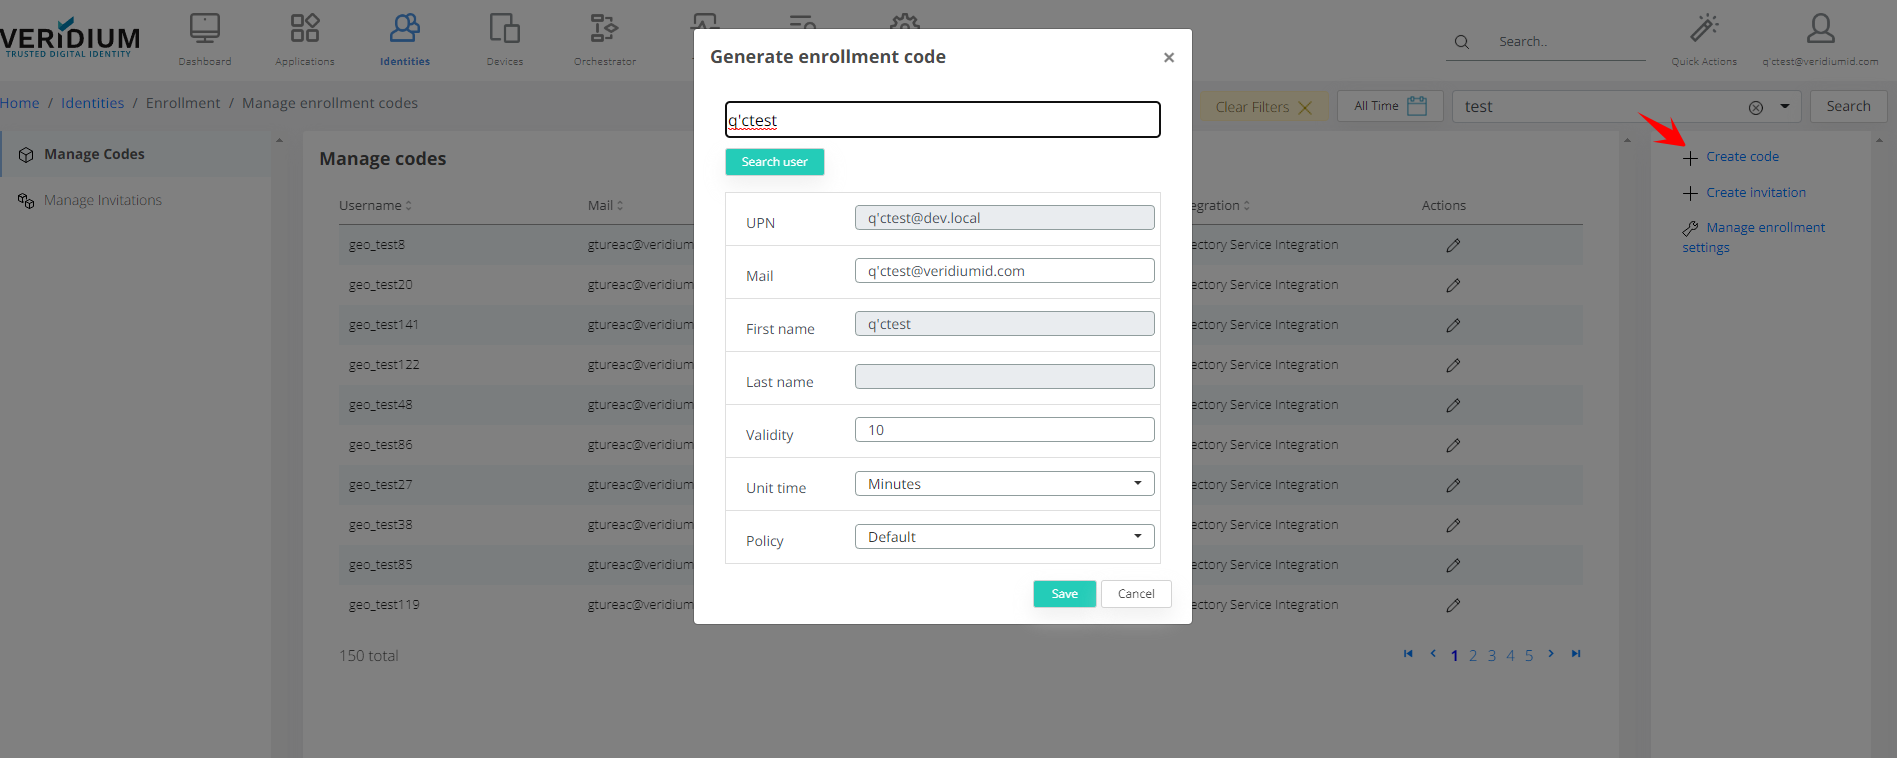
Create a new enrollment code (single user)
In order to create a new Enrollment code, the administrator needs to select from the right side of the page the option “Generate code”. After this, if there are multiple integration with Enrollment by invitation enabled, the user should select an integration, and if there is only one, this integration is used by default.
Afterwards, the user who wants to enrol is searched in AD and the following information are retrieved: UPN, mail, first name and last name. The administrator can modify the mail used for receiving the code (TBD if we want to edit the mail or retrieve from LDAP another value) and when clicking the button “Generate code” a new modal will be displayed to select the validity time and policy used for the enrollment code.
When generating an enrollment code, the username(UPN) is used to search for the user in LDAP and the validation process consists of checking if the user exists and if the user can be enrolled (based on the user groups and allowed groups).
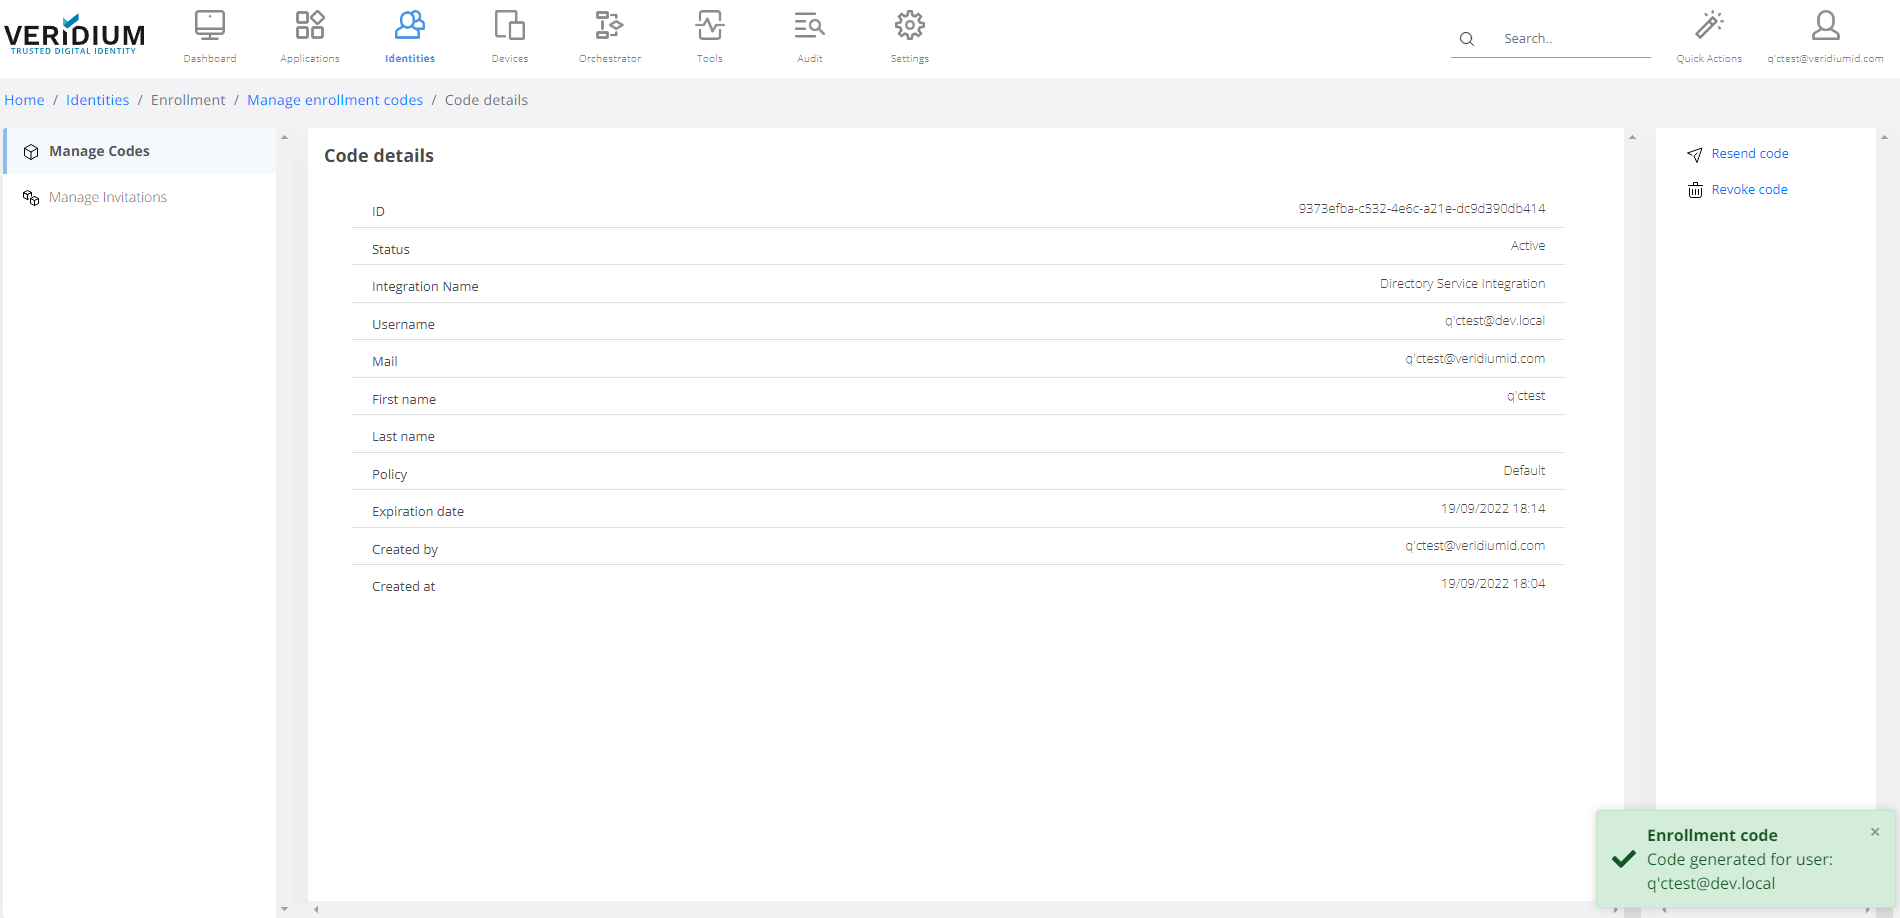
After the generation is finished, the new enrollment code will appear in the list from Manage codes.
Revoke active enrollment code
In the details page of an Active enrollment code the administrator can revoke the code by clicking the button “Revoke” so that the code can’t be used anymore to enroll the user.
Location of Enrollment Code management settings in Identities section:
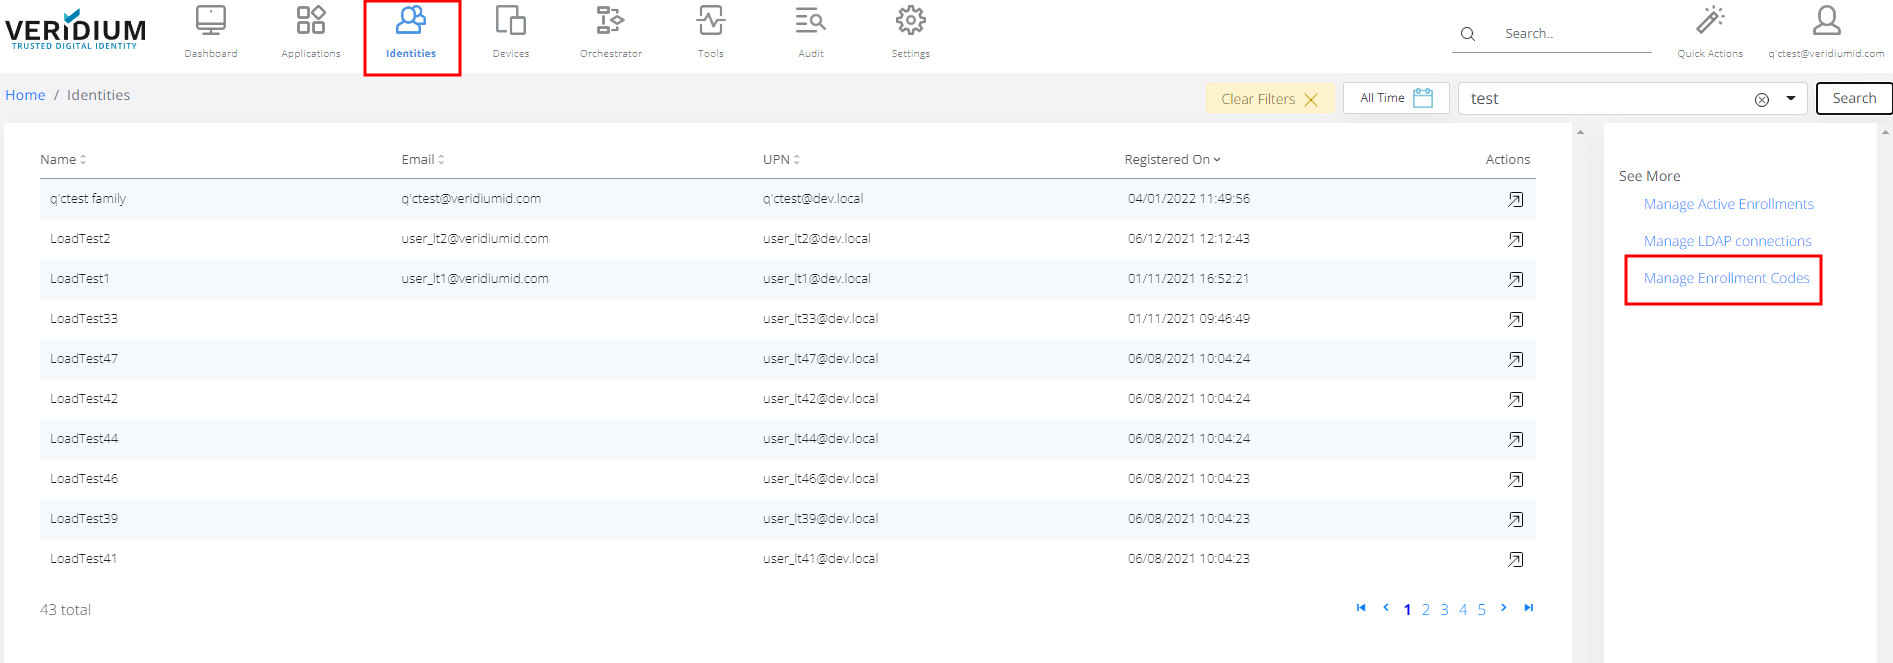
Location of Enrollment Code management settings in Identities section
Enrollment code management page, with highlights for the options available:
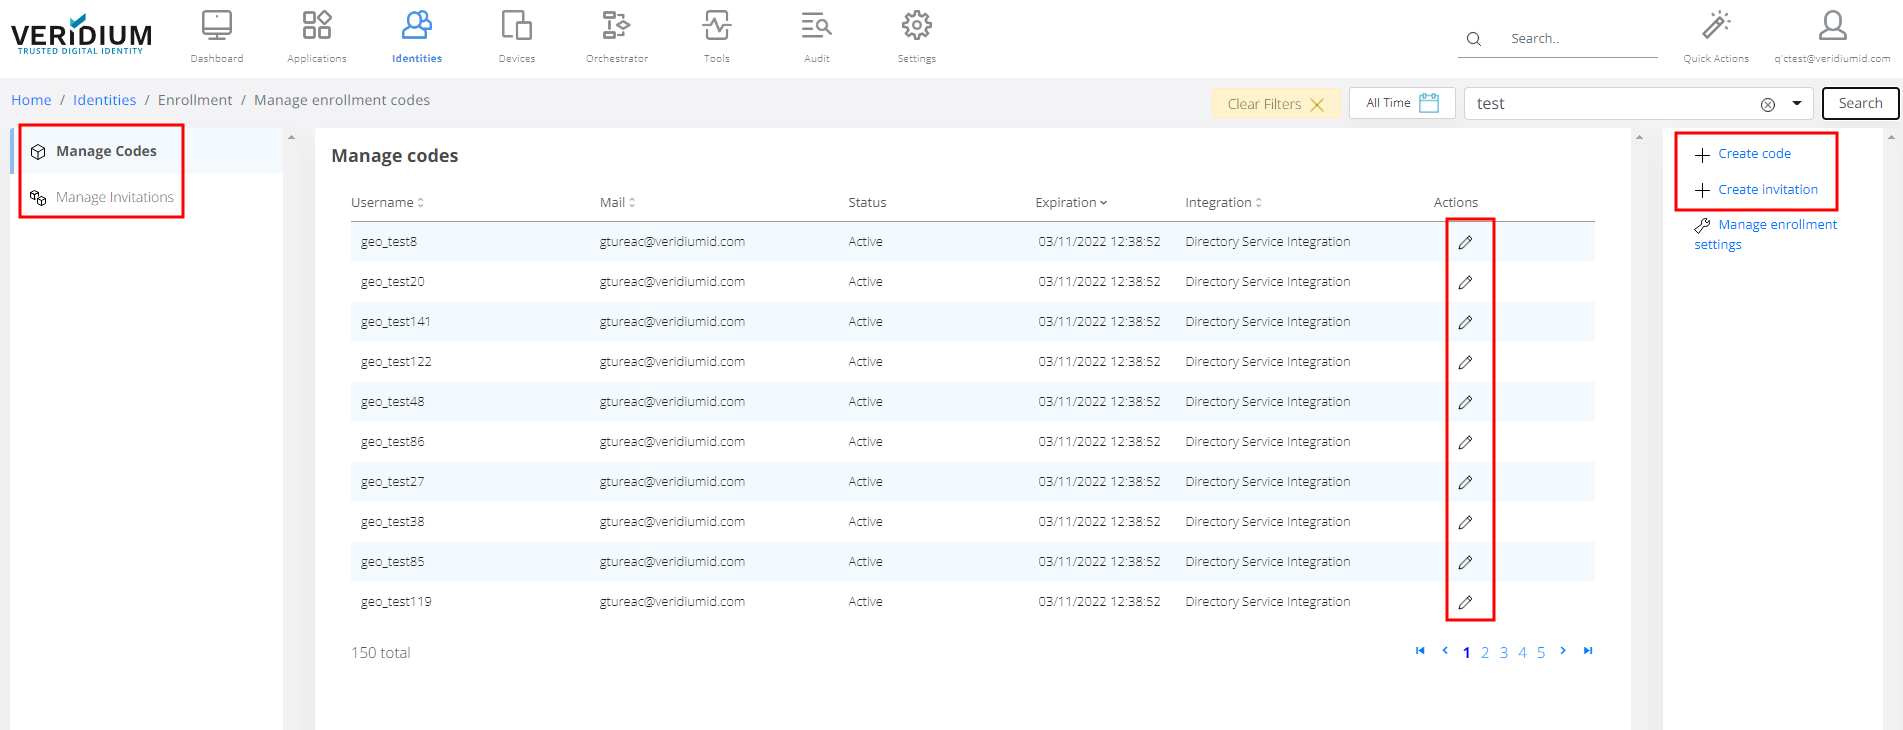
Enrollment code management page
Managing an invitation:
Invitation details:
Generating a code for a specific user:
Code information together with options to resend or revoke it.
Permissions necessary for Veridium Manager users to perform various actions:
Action | Permissions | Description |
|---|---|---|
View Invitation Lists | 'Cross Application Administrators' 'Application Administrators' |
|
Create Invitation List | 'Cross Application Administrators' 'Application Administrators' |
|
Invitation List - Bulk import users via CSV | 'Cross Application Administrators' 'Application Administrators' |
|
Invitation List - Add user via LDAP | 'Cross Application Administrators' 'Application Administrators' |
|
View Enrollment Codes | 'Cross Application Administrators' 'Application Administrators', 'Technical Support' 'Members profiles administrators' 'Accounts administrators' |
|
Create Enrollment Code | 'Cross Application Administrators' 'Application Administrators' 'Technical Support' 'Members profiles administrators' 'Accounts administrators' |
|
Revoke Enrollment Code | 'Cross Application Administrators' 'Application Administrators' 'Technical Support' 'Members profiles administrators' 'Accounts administrators' |
|
Revoke Enrollment Codes from invitation list | 'Cross Application Administrators' 'Application Administrators' 'Technical Support' |
|
Configure Email Template | 'Cross Application Administrators' 'Application Administrators' 'Configuration settings administrators' |
|
Configure Enrollment by Invitation | 'Cross Application Administrators' 'Application Administrators' 'Configuration settings administrators' |
|
Accept Enrollment Invitation - Scenarios:
a. Accept invitation from email:
Scan QR code with Veridium Authenticator
A user may scan the attached QR code from the email to start the enrollment process directly on mobile device and complete the enrollment steps. After the identity enrollment validation is completed, the authentication method will be registered according to the policy.
Click Self Service Portal enrollment link
A user may start the enrollment on the Self Service Portal by clicking the SSP enrollment link. The enrollment main step information is submitted for validation.
If the main step is validated, the identity and enrollment tracker is created. The user may continue to enroll independent authentication methods or register the mobile device by scanning the displayed QR code and continue the enrollment process on the mobile device.
b. Anonymous user in Self Service Portal
When the Self Service Portal is accessed by an anonymous user (via self enrollment link), the main enrollment step input form is displayed.
The user may fill the displayed form with a valid username and invitation code and submit for validation.
If the main step is validated, the identity and enrollment tracker is created. The user may continue to enroll independent authentication methods or register the mobile device by scanning the displayed QR code and continue the enrollment process on the mobile device.
c. Authenticated user in Self Service Portal
As an authenticated user in Self Service Portal, a secondary device or other authentication methods may be enrolled without an invitation enrollment code.
Starting a new enrollment creates an enrollment tracker that may be used to continue registration in the SSP for device independent authentication methods (e.g. FIDO, SMS OTP, VFace), or bound to a mobile device by scanning the displayed enrollment QR code with the mobile application.
3. Reset Authentication Method
a. From Service Portal
Reset PIN
b. From Veridium Authenticator
Reset Touch Id due invalidated by biometric data changes.
4. Enroll other authenticators
Registering new authenticators is possible by an authenticated user in the Self Service Portal or by requesting an enrollment token at Help Desk