Configure Citrix StoreFront to use SAML
Configure Citrix StoreFront to use the VeridiumID platform as an IdP (identity provider) for Citrix Storefront version 3.9 and later.
The installation steps for Citrix Storefront are fully documented on http://docs.citrix.com and this article assumes the reader is familiar with Citrix Storefront, and its configuration and terminology.
This procedure also provides SAML support for Citrix Receiver for Web and native Citrix Receiver for Microsoft Windows.
Configure the StoreFront Identity Provider Store
Before you begin
Download the idp-signing.crt certificate from the Veridium Admin Console by navigating to Configuration, SAML Configuration. At this screen hover over Change Configuration and select Download IDP Signing certificate
Copy the idp-signing.crt certificate to an accessible location on the machine running the StoreFront Administration Console. You access this certificate later in these procedures.
Procedure:
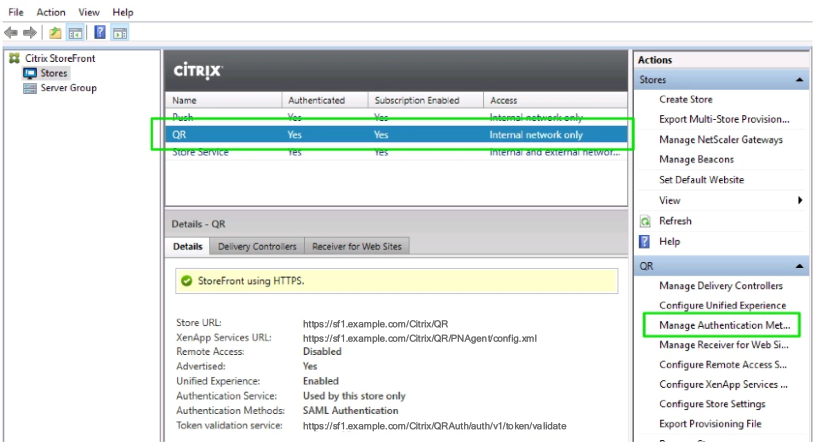
Open the Citrix StoreFront Administration Console.
Select the store you would like to enable for SAML authentication and then click Manage Authentication Methods on the right-side pane.
Record the store name in the first column. You enter this name later.
Select the checkbox next to SAML Authentication.
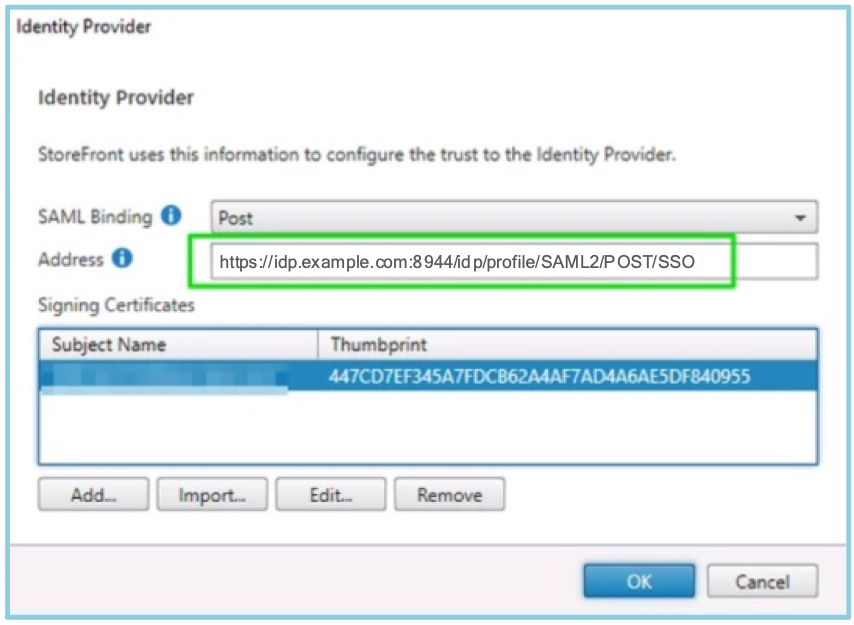
Choose Identity Provider from the drop-down list.

Populate the Address field as shown, replacing idp.example.com with the DNS name of the Veridium SAML Connector (refer to installation documentation for details if you are unsure of the URL for your Veridium Server).
If you haven't already, download the SAML signing certificate from the VeridiumID administration console (Settings -> SAML Configuration -> Change Configuration -> Download IDP Signing Certificate) and save to a suitable place like the NetScaler desktop where you can access it.
In the Identity Provider dialog box Signing Certificates pane, click Import... and follow the prompts to import the SAML signing certificate.
Collect Metadata from StoreFront
Procedure:
Using a browser, navigate to this location: https://**storefront-server-fqdn**/Citrix/**StoreNamefromStep2Above**Auth/SamlForms/ServiceProvider/Metadata.
Depending on the browser configuration, a metadata file does one of the following:
The file downloads to your desktop Downloads folder.
The webpage displays the metadata (XML). In this case, copy the text to a text file and save it for later use.
Add Storefront as a service provider
Procedure:
In the Veridium Dashboard, navigate to Dashboard > Configuration > SAML Configuration
Hover over Change configuration and select Add Service Provider.
Enter a 'Service provider name'
For Metadata provider, select File upload.
Click into 'Meta provider URL...' and browse to the Storefront metadata file saved earlier.
For 'NameID format', select email.
Under "Available attributes", select userPrincipalName & sessionid > to add them to the "Service provider attributes" list.
Select userPrincipalname as the NameID from the drop-down box.
Click Save.