Configure Citrix NetScaler to use SAML
Import the VeridiumID Signing Certificate
Copy the IdP-signing certificate from the Veridium server to the NetScaler and import it into the configuration.
Procedure:
Download the SAML signing certificate from the VeridiumID administration console (Settings -> SAML Configuration -> Change Configuration -> Download IDP Signing Certificate) and save to a suitable place like the NetScaler desktop where you can access it.
Open the NetScaler Administration GUI and browse to Traffic Management > SSL > Certificates > CA Certificate.
In the right-hand column click Install.
Enter a name for the certificate, for example, vid-saml-idp-signing.
Use the dropdown option next to Choose File to select local, browse to idp-signing.crt and click Open.
Click Install.
Create and Install NetScaler SAML signing certificate
NetScaler uses a public-private key pair to sign SAML requests. This certificate can be created using any CA, including a Microsoft internal CA.
The common name is used only for your own reference and therefore can be anything such as ngsamlsign.example.com.
Procedure:
Open the NetScaler Administration GUI and browse to Traffic Management > SSL > Certificates > Server Certificates.
In the right-hand column click Install.
Enter a name for the certificate such as ngsamlsign.
Click the dropdown option next to Choose File to select local, browse to the certificate and click Open.
You might be prompted to locate the certificate private key file and enter the private key password depending on the format of your certificate key pair.
Click Install.
Create Authentication Profile, Policy, and Metadata
Use these procedures to create the following objects on the NetScaler server:
SAML authentication profile
SAML authentication policy
SAML metadata
Create SAML Authentication Profile
Procedure:
Open the NetScaler GUI and browse to NetScaler Gateway > Policies > Authentication > SAML.
In the right-hand column select the Servers tab.
Click Add.
Enter a server descriptive name.
Select the IdP certificate name you imported in the 'Import VeridiumID signing certificate\' topic, for example, vid-saml-idp-signing.
Enter the Redirect URL.
The FQDN and port must match your domain name and port for the externally available VeridiumID SAML connector. The FQDN and port must match your domain name and port for the externally available VeridiumID SAML server.
Enter the NameID into User Field.
Select the Signing Certificate Name created in the \'Create and install NetScaler SAML Signing Certificate\' topic.
Enter the Issuer Name: The FQDN must match the domain name of your NetScaler Gateway virtual server.
Set Reject Unsigned Assertion to ON.
Set SAML Binding to POST.
Set Logout Binding to POST.
Click Create.
Create SAML Authentication Policy
Procedure:
Open the NetScaler GUI and browse to NetScaler Gateway > Policies > Authentication > SAML.
In the right-hand column select the Policy tab.
Click Add.
Enter a policy descriptive name.
Select the Server you created in the previous topic 'Create Authentication Profile'.
Enter ns_true in the Expression field.
Click Create.
Create SAML Metadata
Procedure:
Open the NetScaler GUI and browse to NetScaler Gateway > Policies > Authentication > SAML.
In the right-hand column select the Servers tab.
Select the authentication server you created in previous step and click Generate Metadata.
Enter the FQDN of your NetScaler Gateway virtual server and select HTTPS.
Click Continue.
Click Save. Save the file to location such as the NetScaler desktop where you can find it later. Use a meaningful name like ns1saml.xml
Copy Metadata File to the Veridium Server
Procedure:
Copy the NetScaler metadata file created in the previous topic to a location such as the NetScaler desktop where you can find it later.
Add Netscaler as a service provider
Procedure:
In the Veridium Dashboard, navigate to Dashboard > Configuration > SAML Configuration
Select Add Service Provider under Change configuration.
Enter a 'Service provider name'
For Metadata provider, select File upload.
Click into 'Meta provider URL...' and browse to the NetScaler metadata file saved earlier.
For 'NameID format', select email.
Under "Available attributes", select userPrincipalName & sessionid > to add them to the "Service provider attributes" list.
Select userPrincipalname as the NameID from the drop-down box.
Click Save.
Configure Storefront to use Passthrough Authentication
Use this procedure on Citrix StoreFront to enable \'Pass-through from NetScaler Gateway\'.
Procedure:
Open the Citrix StoreFront Administration Console.
Select the checkbox for Pass-through from NetScaler Gateway.
Click the gear icon and choose Configure Delegated Authentication.
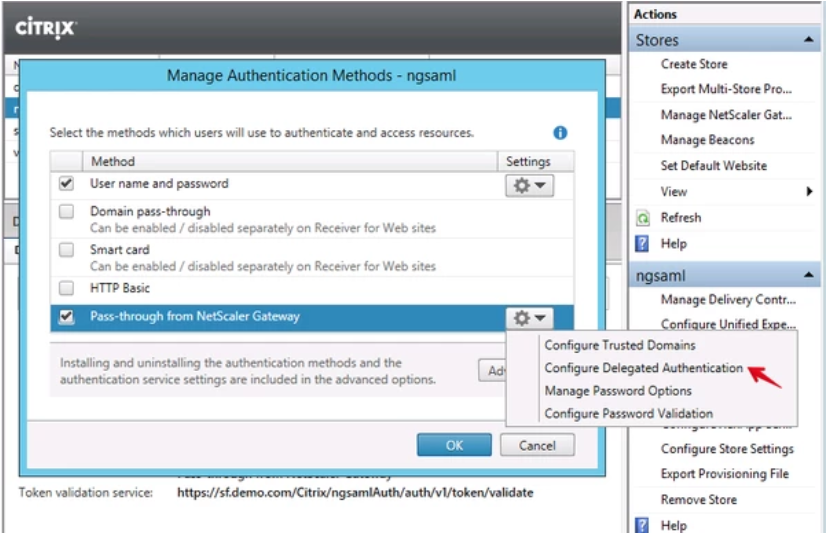
Enable Fully delegate credential validation to NetScaler Gateway.
Finish Configuring NetScaler
Use these procedures to create the following objects on the NetScaler server:
SAML authentication policy
SAML session profile
Create the Authentication Policy
Procedure:
Open the NetScaler GUI and browse to NetScaler Gateway > Virtual Servers.
In the right-hand column edit the appropriate virtual server.
Under Basic Authentication remove any bound polices and bind the SAML policy created earlier.
Click Done.
Edit the Session Profile
Procedure (this is only required when using UPN as the attribute):
Open the NetScaler GUI and browse to NetScaler Gateway > Virtual Servers.
In the right-hand column edit the appropriate virtual server.
Under Policies, select session policies.
Right-click the appropriate policy and choose Edit.
Select the Published Applications tab and remove Single Sign-on Domain.